  |
|
|
|
|
|
|
| |
|
|
|
|
|
|
Video
Interview with John Rice at IR3 launch
What
do you think?
|

Angel IR3 by Bill Mills The Angel IR3 was released in the spring of 2002, and lived up to the excitement and claims surrounding its launch. WDP has built a solid name for itself in Europe and the United States. Their launch of the original Angel V6 at the International Amateur Open marked the first production model paintgun to retail in the US for over $1,000. WDP has kept in mind that when selling a more expensive product, customers expect to be treated better. Theyve taken a similar approach to luxury car dealers. When a player pays more they get more than just the performance of the paintgun, they get support, style and a quality presentation. Opening the IR3s box, one gets the red carpet treatment. Many paintgun companies pack their products in a plain box with some bubble wrap, shrink wrap, or cardboard spacers for protection, some spare o-rings and a stapled, photocopied, or at best spiral bound manual. The IR3, on the other hand ships in a 4 color glossy box, with closed cell foam packing. Simply opening the box makes an effective display for a paintball store, showing all of the items included. The IR3s manual is 4 color printed on semi-gloss paper and 44 pages in length. It includes not only text but clear graphic illustrations of everything from out of the box set-up to exploded view diagrams and reference charts for converting gas and pressure information from English to Metric. Also packed with the IR3 body is a barrel, vertical regulator, spare seals and feed gate, a small container of WDPs Love Juice paintgun lubricant, battery charger, a sock style barrel blocker, and macroline hose and fittings. Literally everything needed is included, and done so in a way that looks good. Whats missing from the box are a loader, air system (note: when used with the Angel Air, all fittings, mounts and screws are included), and a squeegee (though thats not as necessary as one might think).
Mounting an Angel Air system on the IR3 was also quick. Two screws attach the Air mount to the bottom of the grip frame and another screw connecting the Air regulator to the mount. A quick cut to trim the macroline hose down to size and plug it into the waiting fittings, and the IR3 was ready to go.
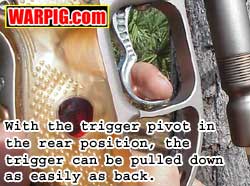
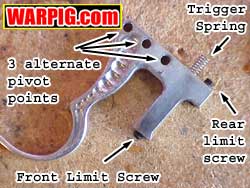
With the grip panels removed, another dividend of the new grip design becomes apparent. There is a lot more aluminum in which to sink screws for drop forward and air system mounting. On many paintguns, especially electros with circuit boards in the grip, this space is limited, and rather short screws must be used, leading to potential breakage or stripping after a hard slide into a bunker. Also along with the changes to the grip frame came a new shape and new adjustments for the trigger. The IR3 trigger features a choice of three pivot points, and ships mounted in the rearmost point. In order to change the trigger pivot, a small hex screw is removed, and the pivot pin slides out of the grip frame. It can then be reinstalled in any of the three holes. On most paintguns, the trigger pivot pin is press-fit into place, and removing it too many times can result in a loose fit. The IR3s system makes changing triggers, or moving the pivot pin simple and non-damaging. The trigger is shipped with the rear pivot point being used, which is most advantageous for firing in the low gripped firing position. The bottom of the trigger curves outward, and with the rear pivot point in use, the IR3 can be fired just as easily with a downward pull on the trigger as a pull toward the back.
Later model IR3s feature opto-mechanical triggers. Rather than clicking a mechanical switch, the back of the trigger breaks an infrared beam between an emitter and detector on the board. This greatly increases component longevity, as there are no switch contacts to possibly fail, and also changes the feel of the trigger as it lacks the same tactile click feedback when the trigger is pulled.
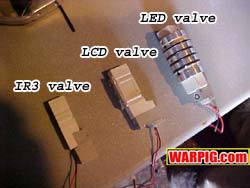
Near the breech is the feedneck, the other item that is changed significantly from the LCD to the IR3. The IR3 is a centerfeed paintgun and inside the feed neck is a one-way gate. Three small plastic arms extend into the feed area from a thin plastic ring. Because of the shape of the feedneck, they are able to flex downward but not upward, thus forming a one-way gate for the paintballs. The one-way gate pays off in a number of ways. The paintgun can be turned in any direction even upside down, and still fire a single shot. A player no longer needs to worry about that ball in the breech rolling back into the feeder, and firing a blank while jumping a bunker. The other major payoff is in feed consistency. In many paintball hopper designs, especially those that rely in a gap in the feedstack to activate, blowback gasses, and or the physical movement of the bolt closing can cause the balls to bobble back up the feedstack and even into the hopper in extreme cases. This causes an interruption to feeding, and slows down the maximum practical rate of fire. The new feed gate makes this a non-issue. From a safety aspect it is all the more important that players rely on a barrel-blocking device when off field. The IR3 can hold 3 paintballs ready to fire, even if turned upside down, when the hopper is removed. The absence of a hopper cannot be considered assurance that the paintgun is unloaded.
While the IR3 has a more advanced electronics package than paintguns to come before it, the interface has been made simple enough that it can be operated without understanding the details of advanced settings.
While live, the green command button will arm the IR3s timer. It will respond by activating the grips vibrating alarm, and displaying the time on the grip. It will then flash between LIVE and the time until the trigger is pulled. Once the trigger is pulled, the grip will continually display the time counting down, until 0:00 is reached, or until the green button is pressed again to turn off the timer. The backlight, which normally stays lit only a few seconds after any menu change or selection remains on constantly while the timer is counting down to allow it to be read easily in poor lighting.
The second menu is labeled H.U.D., and WDPs only public comment on this menu is that it is for an unnamed future feature. Since HUD is used as an acronym for Heads Up Display in aircraft, many have speculated that WDP has a goggle mounted data display in the works, but since the infrared port is not in a position to transfer data to goggles during play, it may also simply be a red herring. The next menu is the total shots fired since the board was programmed, much like the odometer in a car, it is not user adjustable. Following the total shot counter is the shot counter, which is more like a trip odometer in a car. Pressing the green button resets this to zero, making it useful for keeping track of how much paint is fired in a tournament. The total shot counter is critical to WDPs internal service announcement system. The IR3 tells the user when its time for recommended maintenance. For example after 8,000 shots, the first time the IR3 is set into SAFE mode, the display scrolls the message OIL SERVICE, to remind the user it is time to oil the seals. The IR3 also displays a greeting to its new owner the first time it is used. Following the counters is the ID number of the circuit board, also not user adjustable. The next item is ROF the highest rate of fire achieved by the shooter, and this is reset to zero by pressing the green button. ROF gives the speed in balls per second of the two fastest shots fired. MROF displays the maximum rate of fire allowed under the current settings, but does not adjust it. MROF with a C on the left of the display is the maximum rate of fire to be used when COPS is on. This is also not adjustable externally.
The next menu vibes turns on or off the vibrating grip alarm. The next menus, ASTM, firing mode and dwell time can be viewed, but not adjusted externally. The hopper motor turning time selects how long the Intellifeed signal should last each time it is sent. With the original Intellifeed for the Angel, the Intellifeed activated for a preset period of time, because it was meant for one thing to drive the paddles of a modified Revolution loader. Now there are a variety of loaders on the market, so the length of this signal is adjustable for optimal operation. The time is adjustable from 0.1 to 2 seconds in increments of 0.1 seconds.
The temperature setting shows the current temperature on the circuit board, and the green button selects it between Fahrenheit and Centigrade readings. In the right side of the circuit board, visible through a window in the grip are the infrared emitter and detector from which the IR3 gets its name. These are used to send and receive data with other IR3 paintguns, or PDAs. The first IR menu selects the data to be sent or received. Pressing the green button cycles between IRM1 swapping the library of text messages, IRM2 swapping game timer settings with vibes on, IRM3 swapping game timer settings and resetting the shot counter with vibes on, and IRM4 just swapping all game timer settings. On a team using all IR3 paintguns, the team captain can set timer values for specific plays, and then beam the settings to the rest of the team so that everyone gets a synchronized signal to make their move.
The TCOPS menu is the test mode for the TCOPS system. Pressing the green button will begin the test, during which the LCD will read DROPB for Drop Ball. Dropping a ball into the breech should result in the display switching to PASS, if not, the COPS system is not adjusted properly, or is not working. Adjustments are made to the COPS sensitivity while the paintgun is live. While live with COPS on, the orange button is held for 5 seconds until the LCD shows the sensitivity level along with the word SENS. The sensitivity is adjustable from 1 to 12. In testing with Diablo, RP Scherer and Severe paint, we found the setting of 8 to be the lowest that would reliably trip when a ball was just lightly tapped past the feed gate, and used this setting during testing in the field. Holding the orange button down again for 5 seconds advances to the COPS base ROF menu. This is where the restricted rate of fire is set for use when COPS cant detect a ball in the breech. This way if the sensor for some reason isnt working properly and COPS is on, the IR3 can still fire, albeit at a low rate, of either one, two or three balls per second. In field testing, we used the setting of 3.
In the protected menus, the ASTM menu is designed to switch between ASTM (compliant with proposed ASTM guidelines for paintguns) and EXTRA options. On IR3s sold in the US, and in countries where full auto paintguns are prohibited by law, the EXTRA option flashes between EXTRA and NOACC for no access, indicating that setting is not available.
The MROF menu allows the maximum rate of fire to be adjusted between two and twenty balls per second. This is useful for limiting the rate of fire, either as a method of game handicapping, or to keep from outpacing a hopper that does not feed at higher rates. Similarly the COPS MROF menu (signified by a C on the left of the display) sets the maximum rate of fire (up to 20 BPS) to be used when the COPS is on. Since COPS can be turned on and off without opening the IR3 grip, this can also be used as a way to switch between two MROF settings in the field (note: both MROF readings are available to read from the main menus, so this isnt an effective way to cheat on settings). The dwell adjustment sets the length of time that the solenoid valve is held open, in milliseconds. This directly affects how long the exhaust valve stays open, delivering gas to the breech. As the dwell time is reduced, the volume of gas used to fire the ball is reduced, and thus its pressure must be increased to maintain velocity. Conversely, increasing the dwell time requires a lower pressure to fire the ball. Adjusting the dwell and pressure time can optimize the gas efficiency for any particular barrel and paint match. Additionally many players have reported that increasing the dwell has helped take care of ball breakage problems with out of round or fragile paint. Field testing of the IR3 for this review was done by a number of players ranging from beginners to advanced, at a number of fields including Paintball Long Island, Spacecoast Paintball, and the Florida Firemans Olympics tournament. Through testing, HALO B, Revolution and VL 200 loaders were used along with an Angel Air compressed air system. The stock barrel features a .690 diameter bore. It had no problem coping with a variety of paint sizes, though as would be expected it was less efficient with smaller bore paints. While one might argue that the owner of a higher end paintgun will be spending money on higher grade paint, so a smaller bore barrel would be in order, an equal argument can be made that it is better for the barrel to do a good job with whatever is thrown at it, not just fresh, high grade paint. It features several rows of porting in its last third giving it a reasonably soft noise signature. Adjustment of the IR3s velocity is the same as with previous model Angels, by adjusting the pressure output of the vertical regulator with a hex wrench. It is a simple process, and with all but the worst, out of round paint, velocity fluctuations at the chrono were at +/- 5 fps or less.
Glenn Bryant used the IR3 in the Florida Firefighters Olympics, representing the Palm Bay Fire Deparment, and was very pleased. For Bryant, who was used to paintguns with mechanical triggers, the ease of firing at a higher rate was a benefit to his game, and despite a lack of experience with LCD or IR3 menus, he had no problems operating the gun in the tournament.
Purposefull tipping to the sides and pointing the barrel up while using a Revolution loader verified that the feed gate kept paint in the breech ready to fire. Soon to be released is additional infrared based programming software for notebook computers and personal data assistants using the Palm Operating System. According to WDPs John Rice, the Palm OS was chosen because Handspring PDAs utilize it and are available in low end models for as little as $100. Expected features of the programming software are the ability to save and swap IR3 settings, make adjustments with a graphic interface and programming of messages to be displayed on the IR3s LCD. All things considered, the IR3 has incorporated key improvements to position it well as the next generation Angel. With a maximum rate of fire of 20 balls per second, smaller size, than previous models and new anti-chop systems, the IR3 has quickly gained market acceptance despite its unorthodox grip frame.
|
| Copyright © 1992-2019
Corinthian Media Services. WARPIG's webmasters can be reached through our feedback form. All articles and images are copyrighted and may not be redistributed without the written permission of their original creators and Corinthian Media Services. The WARPIG paintball page is a collection of information and pointers to sources from around the internet and other locations. As such, Corinthian Media Services makes no claims to the trustworthiness or reliability of said information. The information contained in, and referenced by WARPIG, should not be used as a substitute for safety information from trained professionals in the paintball industry. |
 The
IR3 used for this review is a Coloured and Carved (Decorative milling pattern
and anodized in a color other than black) model with a champagne dust finish.
The C&C IR3s, as wall as other designs including the Fly, feature highlight
panels in the upper rear portion of the receiver. Mill cuts in the
body go all the way to the interior, and vanity panels on the inside with
a bright copper like finish provide a contrasting color. The plates
that ship with the IR3 are perforated into a fine screen. While that
looks very good, they can admit dust and fine sand (something abundant
on the paintball fields in Florida) which arent good things with which
to muck up the solenoid valve inside.
The
IR3 used for this review is a Coloured and Carved (Decorative milling pattern
and anodized in a color other than black) model with a champagne dust finish.
The C&C IR3s, as wall as other designs including the Fly, feature highlight
panels in the upper rear portion of the receiver. Mill cuts in the
body go all the way to the interior, and vanity panels on the inside with
a bright copper like finish provide a contrasting color. The plates
that ship with the IR3 are perforated into a fine screen. While that
looks very good, they can admit dust and fine sand (something abundant
on the paintball fields in Florida) which arent good things with which
to muck up the solenoid valve inside.
 Replacing
the vanity panels was a quick and easy task. The two screws that
hold the sight rail (which isnt a grooved rail for mounting a sight, it
mainly functions as an access hatch) are removed, and the rail lifted out.
The C&C version of the IR3 includes an Intellifeed port on the sight
rail, which can be used for the paintgun to communicate with a hopper (note:
this also means that its an easy modification to put superbright LEDs
inside the mesh that will flash with the Intellifeed signal when each shot
is fired). This is not included on stock IR3s, but it is an upgrade
item that can be installed with relative ease. With the sight rail
off, the vanity plates were lifted out and solid plates, which were included
with the C&C IR3 were then installed in their place.
Replacing
the vanity panels was a quick and easy task. The two screws that
hold the sight rail (which isnt a grooved rail for mounting a sight, it
mainly functions as an access hatch) are removed, and the rail lifted out.
The C&C version of the IR3 includes an Intellifeed port on the sight
rail, which can be used for the paintgun to communicate with a hopper (note:
this also means that its an easy modification to put superbright LEDs
inside the mesh that will flash with the Intellifeed signal when each shot
is fired). This is not included on stock IR3s, but it is an upgrade
item that can be installed with relative ease. With the sight rail
off, the vanity plates were lifted out and solid plates, which were included
with the C&C IR3 were then installed in their place.
 A
striking difference between the IR3 and the previous Angel paintguns (V6
and LCD) lies in the grip. Rather than being tilted back at an angle
like most paintball guns, the IR3s grip is vertical. Most paintguns
have a grip styled after and angled like a Colt model 1911 semiautomatic
pistol. As the IR3s designer, John Rice points out, the 1911 is
meant to be held at arms length, while paintball players tend to hold
their paintgun back closer to their body and higher up, bracing the air
tank against their shoulder. This stance creates an awkward angle
for the wrist. Airgun Designs addressed this a few years ago with
their Z-Grip for the Automag, which slanted down and forward, so a players
wrist stayed straight while in a typical paintball shooting position.
The problem with that solution is that it is no longer practical to shoot
from the hip while running or with the arm extended.
A
striking difference between the IR3 and the previous Angel paintguns (V6
and LCD) lies in the grip. Rather than being tilted back at an angle
like most paintball guns, the IR3s grip is vertical. Most paintguns
have a grip styled after and angled like a Colt model 1911 semiautomatic
pistol. As the IR3s designer, John Rice points out, the 1911 is
meant to be held at arms length, while paintball players tend to hold
their paintgun back closer to their body and higher up, bracing the air
tank against their shoulder. This stance creates an awkward angle
for the wrist. Airgun Designs addressed this a few years ago with
their Z-Grip for the Automag, which slanted down and forward, so a players
wrist stayed straight while in a typical paintball shooting position.
The problem with that solution is that it is no longer practical to shoot
from the hip while running or with the arm extended.
 WDP
basically found a compromise between the forward and back angles by making
the grip vertical. Then, by rounding the bottom rear of the grip,
they created a shape that can be grabbed low at an angle with the wrist
straight in a paintball shooting pose, or high on the grip like a traditional
pistol pose.
WDP
basically found a compromise between the forward and back angles by making
the grip vertical. Then, by rounding the bottom rear of the grip,
they created a shape that can be grabbed low at an angle with the wrist
straight in a paintball shooting pose, or high on the grip like a traditional
pistol pose.
 The
IR3 trigger has two adjustment screws built in, one of which requires that
the grip frame be removed from the receiver in order to be accessed.
The two trigger screws eliminate the need for a trigger job as they allow
both the front and back limits of trigger travel to be precisely set.
The stock adjustments gave the trigger 5mm of trigger pull when measured
at the bottom point of the trigger. With approximately 3 minutes
of adjusting and testing, the trigger pull was reduced to 1mm at the same
point (0.5mm when measured at the bottom of the first finger position on
the trigger). While the trigger pull could be adjusted even shorter,
the trigger became less reliable at that point. It is important to
test firing from many different angles after making trigger adjustments
to make sure the individual shooter can release the trigger far enough
to reset for the next shot when rapid firing.
The
IR3 trigger has two adjustment screws built in, one of which requires that
the grip frame be removed from the receiver in order to be accessed.
The two trigger screws eliminate the need for a trigger job as they allow
both the front and back limits of trigger travel to be precisely set.
The stock adjustments gave the trigger 5mm of trigger pull when measured
at the bottom point of the trigger. With approximately 3 minutes
of adjusting and testing, the trigger pull was reduced to 1mm at the same
point (0.5mm when measured at the bottom of the first finger position on
the trigger). While the trigger pull could be adjusted even shorter,
the trigger became less reliable at that point. It is important to
test firing from many different angles after making trigger adjustments
to make sure the individual shooter can release the trigger far enough
to reset for the next shot when rapid firing.
 It
is also important to make sure the trigger rear stop makes contact early
enough in the trigger stroke that the trigger can not be pulled back all
the way into the body of the firing switch, in order to protect it from
mechanical damage. Some players may be tempted to remove the trigger
return spring in search of a lighter trigger pull. While this can
make the trigger pull a tiny bit lighter, it can also lead to problems
with the trigger resetting fast enough in rapid fire situations, and is
not recommended.
It
is also important to make sure the trigger rear stop makes contact early
enough in the trigger stroke that the trigger can not be pulled back all
the way into the body of the firing switch, in order to protect it from
mechanical damage. Some players may be tempted to remove the trigger
return spring in search of a lighter trigger pull. While this can
make the trigger pull a tiny bit lighter, it can also lead to problems
with the trigger resetting fast enough in rapid fire situations, and is
not recommended.
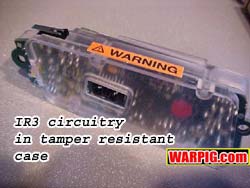 Inside
the grip is the IR3s circuit board, which is encapsulated in a plastic
anti-tamper shell. In addition to new software features, the programs
that make the IR3 go are protected by a rolling encryption technology which,
combined with the tamper resistant seal make the IR3 very difficult to
reprogram in a non standard way (such as for adding cheater modes) without
leaving some sort of evidence behind. WDP has definitely taken the
lead in the paintball industry for protecting the integrity of the software
driving their paintguns.
Inside
the grip is the IR3s circuit board, which is encapsulated in a plastic
anti-tamper shell. In addition to new software features, the programs
that make the IR3 go are protected by a rolling encryption technology which,
combined with the tamper resistant seal make the IR3 very difficult to
reprogram in a non standard way (such as for adding cheater modes) without
leaving some sort of evidence behind. WDP has definitely taken the
lead in the paintball industry for protecting the integrity of the software
driving their paintguns.
 Sandwiched
between the grip frame and the receiver is the Crystal Operated Paint Sensor,
or COPS. This small piezoelectric strip rests below a plastic pin
that barely extends into the bottom of the breech. When a paintball
drops into the IR3, the impact of the ball on the pin transfers the energy
to the sensor, which converts it to a tiny electric current that is fed
by wires into the circuit board. In this way the IR3 can be set up
to not fire until a ball is in the breech, preventing misfires and balls
that are chopped from firing when they are partially fed.
Sandwiched
between the grip frame and the receiver is the Crystal Operated Paint Sensor,
or COPS. This small piezoelectric strip rests below a plastic pin
that barely extends into the bottom of the breech. When a paintball
drops into the IR3, the impact of the ball on the pin transfers the energy
to the sensor, which converts it to a tiny electric current that is fed
by wires into the circuit board. In this way the IR3 can be set up
to not fire until a ball is in the breech, preventing misfires and balls
that are chopped from firing when they are partially fed.
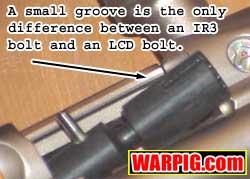 The
addition of COPS has led to another difference between the LCD Angel and
the IR3 the bolt. The IR3 bolt is the same as an LCD bolt, with
the exception of a small channel milled into its bottom to make room for
the COPS pin. The bolt is made of Delrin with a Venturi design
that distributes the air around the back of the painbtball. The bolt
is held in WDPs Rotabreech, a section of the receiver that can swing open
for easy breech and bolt access simply by pulling a pin on the back of
the receiver.
The
addition of COPS has led to another difference between the LCD Angel and
the IR3 the bolt. The IR3 bolt is the same as an LCD bolt, with
the exception of a small channel milled into its bottom to make room for
the COPS pin. The bolt is made of Delrin with a Venturi design
that distributes the air around the back of the painbtball. The bolt
is held in WDPs Rotabreech, a section of the receiver that can swing open
for easy breech and bolt access simply by pulling a pin on the back of
the receiver.
 The
back of the IR3, from the rear of the Rotabreech to the backplate is shorter
than earlier Angel models. This is due largely to the newer, more
compact solenoid valve that is used. Because of the length difference,
LCD sight rails are not compatible with the IR3. For airsmiths, the
smaller valve size means that there is more "meat to carve up on the body
with milling, because the minimum required space for components has decreased.
The
back of the IR3, from the rear of the Rotabreech to the backplate is shorter
than earlier Angel models. This is due largely to the newer, more
compact solenoid valve that is used. Because of the length difference,
LCD sight rails are not compatible with the IR3. For airsmiths, the
smaller valve size means that there is more "meat to carve up on the body
with milling, because the minimum required space for components has decreased.
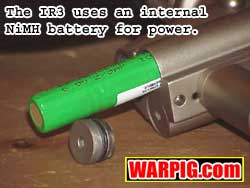 Charging
the IR3 is simple. The included fast charger plugs into a cars cigarette
lighter and into the back of the grip frame. When the power switch
is turned on, the IR3 will indicate via its LCD display that it is charging,
and with any distance, a enough charge for a days worth of play can be
attained on the drive to the field. The high capacity of the internal
Nickel Metal Hydride batteries (which unlike NiCDs do not suffer a memory
effect), the charge level indicator on the LCD, and the low power consumption
of the two stage solenoid valve (the solenoid opens a valve that pilots
the larger valve which drives the ram to strike the Angels exhaust valve)
mean that running out of battery power on the field isnt a realistic problem.
Charging
the IR3 is simple. The included fast charger plugs into a cars cigarette
lighter and into the back of the grip frame. When the power switch
is turned on, the IR3 will indicate via its LCD display that it is charging,
and with any distance, a enough charge for a days worth of play can be
attained on the drive to the field. The high capacity of the internal
Nickel Metal Hydride batteries (which unlike NiCDs do not suffer a memory
effect), the charge level indicator on the LCD, and the low power consumption
of the two stage solenoid valve (the solenoid opens a valve that pilots
the larger valve which drives the ram to strike the Angels exhaust valve)
mean that running out of battery power on the field isnt a realistic problem.
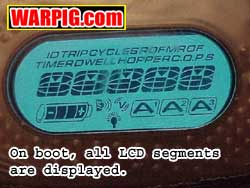 The
IR3 is turned on with the power interrupt switch on the back. The
LCD display first displays all of its segments while the circuitry runs
through its boot sequence, then a Green LED is visible near the top on
the back face of the grip, and through the grip panel on the left hand
side if it is of a sufficiently tanslucent color. The LCD will display
the word SAFE clearly. Pulling and holding the trigger while in safe
mode will show first the selected firing mode (SEMI in this case) and the
electronic ID number of the circuit board. While the power is on,
a four segment bar graph shaped like a battery shows how much of a charge
is in the IR3s battery.
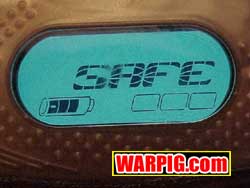
The
IR3 is turned on with the power interrupt switch on the back. The
LCD display first displays all of its segments while the circuitry runs
through its boot sequence, then a Green LED is visible near the top on
the back face of the grip, and through the grip panel on the left hand
side if it is of a sufficiently tanslucent color. The LCD will display
the word SAFE clearly. Pulling and holding the trigger while in safe
mode will show first the selected firing mode (SEMI in this case) and the
electronic ID number of the circuit board. While the power is on,
a four segment bar graph shaped like a battery shows how much of a charge
is in the IR3s battery.
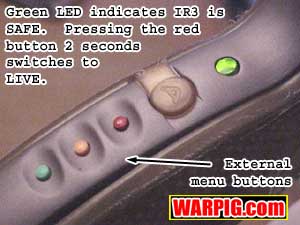 Pressing
and holding the red control button for about two seconds puts the IR3 into
live mode, ready to fire. The LED in the grip will switch to red,
and the LCD display will alternate between the words LIVE and ANGEL.
Alternatively, the display can be programmed to display other words besides
ANGEL, such as the owners name, up to 5 characters long.
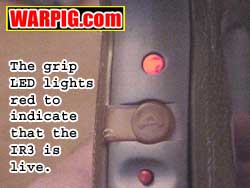
Pressing
and holding the red control button for about two seconds puts the IR3 into
live mode, ready to fire. The LED in the grip will switch to red,
and the LCD display will alternate between the words LIVE and ANGEL.
Alternatively, the display can be programmed to display other words besides
ANGEL, such as the owners name, up to 5 characters long.
 While
the Angel is live, the orange button is used to turn COPS on or off.
When COPS is on, the grip LED will flash red once per second, and the LCD
will indicate COPS in the upper right corner. When the COPS is
engaged, the IR3 will not fire at its full rate of fire unless it detects
that a ball has fallen into the breech. Instead, it will revert to
the COPS rate of fire setting. This setting is user adjustable, and
is ideally set fast enough that if the COPS sensor should jam, or not detect
paint, the Angel will still be useable, but slow enough that the COPS will
have enough control to keep from firing when a ball is only partially fed.
The COPS status (on or off) will remain even when the IR3 is safe or turned
off. Players who normally use COPS need only to turn on and go live
to use it.
While
the Angel is live, the orange button is used to turn COPS on or off.
When COPS is on, the grip LED will flash red once per second, and the LCD
will indicate COPS in the upper right corner. When the COPS is
engaged, the IR3 will not fire at its full rate of fire unless it detects
that a ball has fallen into the breech. Instead, it will revert to
the COPS rate of fire setting. This setting is user adjustable, and
is ideally set fast enough that if the COPS sensor should jam, or not detect
paint, the Angel will still be useable, but slow enough that the COPS will
have enough control to keep from firing when a ball is only partially fed.
The COPS status (on or off) will remain even when the IR3 is safe or turned
off. Players who normally use COPS need only to turn on and go live
to use it.
 When
in safe mode, the majority of the IR3s menu items become available.
Items which adjust the rate of fire or firing mode are not accessible from
the command buttons on the rear of the grip frame. The menu system
is simple enough that just playing with it for a minute or two is long
enough to figure it out. The middle, orange button cycles through
each menu, while the green bottom button cycles through the choices for
that menu. As a matter of convenience, the IR3 stays in a single
menu between sessions. For example, while in safe mode, the orange
button can be pressed multiple times to cycle through to the shot counter
menu, then the IR3 can be armed and fired. When the IR3 is switched
back to SAFE mode, the pressing the orange button once will bring up the
shot counter without having to cycle first through the other menus.
When
in safe mode, the majority of the IR3s menu items become available.
Items which adjust the rate of fire or firing mode are not accessible from
the command buttons on the rear of the grip frame. The menu system
is simple enough that just playing with it for a minute or two is long
enough to figure it out. The middle, orange button cycles through
each menu, while the green bottom button cycles through the choices for
that menu. As a matter of convenience, the IR3 stays in a single
menu between sessions. For example, while in safe mode, the orange
button can be pressed multiple times to cycle through to the shot counter
menu, then the IR3 can be armed and fired. When the IR3 is switched
back to SAFE mode, the pressing the orange button once will bring up the
shot counter without having to cycle first through the other menus.
 The
first menu to come up is the backlight, indicated by a small light bulb
icon in the bottom of the display. The green button selects between
ON and OFF. The backlight definitely helps the displays readability
in dim light or total darkness, but it decreases total battery life on
a single charge, and can become a beacon during a scenario game at night.
The
first menu to come up is the backlight, indicated by a small light bulb
icon in the bottom of the display. The green button selects between
ON and OFF. The backlight definitely helps the displays readability
in dim light or total darkness, but it decreases total battery life on
a single charge, and can become a beacon during a scenario game at night.
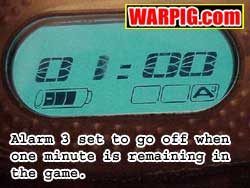 The
timer menu is set from 1 to thirty minutes in 30 second increments by pressing
the green command button. Pressing and holding the button resets
the timer to 0:00. There are also three warning alarms that are user
adjustable. The next three menus are signified by a letter A in the
lower right of the display with a small number 1 two or three. These
warning alarms are set the same way as the timer, by pressing the green
button. An example use would be to set the timer for a 20 minute
game with the first alarm for 10 minutes to signify the game was half over,
the second at 2 minutes, and the last at 1 minute, to give warnings about
when its time to get up and go. Each of the alarms emits a different
pattern of buzzes from the vibrating grip frame.
The
timer menu is set from 1 to thirty minutes in 30 second increments by pressing
the green command button. Pressing and holding the button resets
the timer to 0:00. There are also three warning alarms that are user
adjustable. The next three menus are signified by a letter A in the
lower right of the display with a small number 1 two or three. These
warning alarms are set the same way as the timer, by pressing the green
button. An example use would be to set the timer for a 20 minute
game with the first alarm for 10 minutes to signify the game was half over,
the second at 2 minutes, and the last at 1 minute, to give warnings about
when its time to get up and go. Each of the alarms emits a different
pattern of buzzes from the vibrating grip frame.
 The
hopper motor activation menu is even more important for different feed
systems. The original Intellifeed activated when the user fired faster
than 4 shots per second, because thats when agitation would be most likely
needed. However there are products like the Warp Feed that must receive
a signal with every shot in order to work properly. This setting
allows the Intellifeed signal to be sent after every shot, or when the
rate of fire is greater than 2, 3, or 4 shots per second.
The
hopper motor activation menu is even more important for different feed
systems. The original Intellifeed activated when the user fired faster
than 4 shots per second, because thats when agitation would be most likely
needed. However there are products like the Warp Feed that must receive
a signal with every shot in order to work properly. This setting
allows the Intellifeed signal to be sent after every shot, or when the
rate of fire is greater than 2, 3, or 4 shots per second.
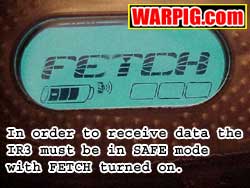 The
next two menus are each activated by pressing the green button. Send
attempts to send the IR menu that had been selected (1-4) to another IR3.
For 30 seconds it will attempt to detect another IR3 and send the data.
FETCH will prepare and IR3 to receive data, and will look for a signal
for 30 seconds. The IR3 can only communicate while in safe mode,
and can only receive data when the FETCH menu is activated.
The
next two menus are each activated by pressing the green button. Send
attempts to send the IR menu that had been selected (1-4) to another IR3.
For 30 seconds it will attempt to detect another IR3 and send the data.
FETCH will prepare and IR3 to receive data, and will look for a signal
for 30 seconds. The IR3 can only communicate while in safe mode,
and can only receive data when the FETCH menu is activated.
 Further
software adjustment on the IR3 requires opening the grip, as a many of
the functions are controlled by a pair of buttons inside, one blue and
one yellow, in order to lock them out from access on the field. The
yellow button cycles through menus just as the orange button does, and
the blue button is used to cycle through the items in these menus analogous
to the green button on the back of the grip.
Further
software adjustment on the IR3 requires opening the grip, as a many of
the functions are controlled by a pair of buttons inside, one blue and
one yellow, in order to lock them out from access on the field. The
yellow button cycles through menus just as the orange button does, and
the blue button is used to cycle through the items in these menus analogous
to the green button on the back of the grip.
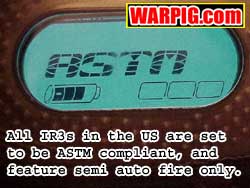 The
next menu is firing mode. While there are 26 modes possible with
WDPs software, the only one available under ASTM mode, and thus the only
mode available to IR3 users in the US is SEMI semiautomatic with a maximum
rate of fire of 20 balls per second.
The
next menu is firing mode. While there are 26 modes possible with
WDPs software, the only one available under ASTM mode, and thus the only
mode available to IR3 users in the US is SEMI semiautomatic with a maximum
rate of fire of 20 balls per second.
 When
first tried, the COPS system led to disappointment because it was not sensing
the balls dropping into the breech. After increasing the sensitivity
the COPS system, combined with the feed gate provided chop free foromg
even with a non-agitated VL200 hopper. Certainly ball jams were noticeable
and the hopper needed to be shaken often through the games, but the CPOPS
system kept the IR3 from breaking paint. With the COPS on and the
feed gate removed, the IR3 fed less consistently from the VL200, but still
did not chop paint.
When
first tried, the COPS system led to disappointment because it was not sensing
the balls dropping into the breech. After increasing the sensitivity
the COPS system, combined with the feed gate provided chop free foromg
even with a non-agitated VL200 hopper. Certainly ball jams were noticeable
and the hopper needed to be shaken often through the games, but the CPOPS
system kept the IR3 from breaking paint. With the COPS on and the
feed gate removed, the IR3 fed less consistently from the VL200, but still
did not chop paint.
 At
different fields during testing, the IR3 was handed around to players to
try. One, who had just purchased an LCD Angel remarked that he was
able to fire the IR3 noticeably faster than the LCD and he attributed the
difference to the positioning of his hand on the IR3 grip frame.
Most experienced players were put off at first by the appearance of the
vertical grip frame. Many changed their minds after trying it out,
and getting the feel for the way the palm of the hand mates up with the
curve on the back of the frame.
At
different fields during testing, the IR3 was handed around to players to
try. One, who had just purchased an LCD Angel remarked that he was
able to fire the IR3 noticeably faster than the LCD and he attributed the
difference to the positioning of his hand on the IR3 grip frame.
Most experienced players were put off at first by the appearance of the
vertical grip frame. Many changed their minds after trying it out,
and getting the feel for the way the palm of the hand mates up with the
curve on the back of the frame.
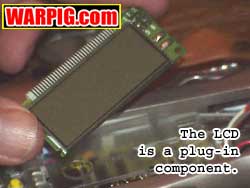 Authors
note: One significant mishap occurred during review testing. While
packed in a JT Gearsack, an impact, presumably at the hands of airline
baggage handlers was enough to crack the LCD display inside the IR3s grip
frame. While the menus were inaccessible, the Angel could switch
between safe and live modes and have COPS activated or deactivated, and
was used for a full days play. Due to the modular nature of the
IR3 electronics package, installing a new LCD onto the circuit board was
a quick procedure.
Authors
note: One significant mishap occurred during review testing. While
packed in a JT Gearsack, an impact, presumably at the hands of airline
baggage handlers was enough to crack the LCD display inside the IR3s grip
frame. While the menus were inaccessible, the Angel could switch
between safe and live modes and have COPS activated or deactivated, and
was used for a full days play. Due to the modular nature of the
IR3 electronics package, installing a new LCD onto the circuit board was
a quick procedure.