  |
|
|
|
|
|
|
| |
|
|
|
|
|
|

What
do you think?
|

Eclipse eBlade Autococker by Bill Mills With a number of choices for converting an Autococker to an electro-pneumatic paintgun, Planet-Eclipse hit a home run with their eBlade by partnering with Worr Games Products, manufacturers of the Autococker. While other electronic Cocker grips are available in custom built guns, or as an add-on, the eBlade is standard equipment on Worr Games E-Class Orr-acle Autococker. This close connection with the manufacturer of the Autococker is giving Planet a leg-up in terms of publicity and recognition for their grip frame. The eBlade frame is partially electromechanical, and partially electropneumatic in operation. Stock, mechanical autocockers feature a two-step trigger pull. On the first part of the trigger stroke the trigger tips the sear, which is a small metal latch that holds the hammer back in the cocked position. When the sear is tripped the hammer slams forward under the pressure of the mainspring, striking the valve to release gas up through the bolt, firing a paintball out of the barrel. During the second part of the trigger stroke, a 4 way valve is actuated that redirects gas through a pneumatic cylinder, also often called a ram. The ram pulls back the cocking block, which in turn pulls back the bolt, to load a fresh paintball, and pulls the hammer back, until it catches on the sear, cocked for the next shot. When the trigger is released, the 4-way valve (called a 3 way by WGP and a 5 way by some other manufacturers) directs gas into the other side of the ram, which then pulls the cocking block forward, leaving the hammer cocked, and chambering the paintball while resealing the breech. Because of the two-stage trigger pull, of the Autococker there are limits to how quickly a person can fire it. There are also timing issues. The length of the trigger pull must account for a long enough delay between firing the shot and re-cocking the gun, but that delay depends in part on how fast the user is pulling the trigger. The user must also hold the trigger back long enough for a ball to drop into the breech.
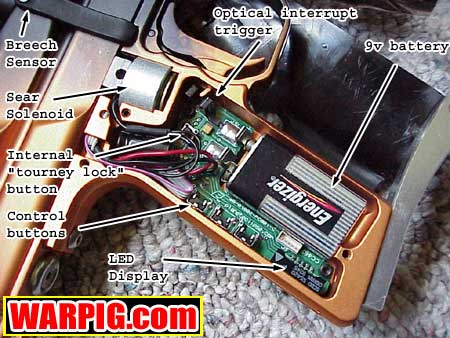
Both solenoids, the pilot driving the valves up front, and the sear solenoid are driven by the eBlades circuit board. The boards chip based CPU contains read only memory with the operating software needed to run the paintgun and change timing values through the grip interface, all while powered by a standard 9 volt battery which is stored in the grip.
The eBlade frame also includes an infrared reflective breech sensor. A small plastic cover extends from the grip frame, up the right side of the Autococker body (the sensor is designed to fit vertical feed bodies only.) Protected inside the cover are both the sensor and its wiring. The sensor provides feedback to the circuit board as to when a ball has fallen into the breech, so that the bolt will not be closed too soon, leading to either a dry-fire, or a chopped ball. Planet has built a reputation with its Eclipse line of customized paintguns that is both about style and looks as well as hassle free performance. Its no surprise that the Eclipse Autococker would be outfitted with the eBlade electronic system to become the Eclipse eBlade Autococker. The particular model reviewed was anodized in a fade pattern from black at the front to orange at the rear, with a bead blasted matte finish. All of the major aluminum components matched the pattern, including the trigger itself. Also included was a DYE Xcell ported one piece aluminum barrel which blended right in to the black on the front of the gun.
The milling pattern on the Eclipse body was stylish, but not severe. Some key points in the design pointed out Planets concern that while looking good, it must still be durable. Notable amongst these were short sections of the original bodys sight rail left in tact in front of and behind the feed neck. Many custom shops choose to mill these away for aesthetics, but leaving them in place provided additional support strength to the feed neck against impacts from the front or rear, such as when the hopper hits something during a bunker slide. Also notable, is that because Planet uses genuine Worr Game Products Autococker bodies, they have left a raised area on the right front corner of the receiver in order to keep the original WGP serial number intact.
Speaking of regulators, the Eclipse eBlade Autococker comes fitted with a WGP Black Magic regulator, which features a side input, and is easily adjusted with a hex wrench from the bottom. The feedneck is WGPs threaded neck to allow a fast switch between short or tall necks. On the left side of the receiver is the single ball bearing style ball detent, while the eBlade infrared breech sensor is on the right.
Set-up of the Eclipse was very simple. For review a Shocktech drop forward and ASA were added, hosed to the Black Magic regulator with macroline. Mounted in the ASA was a Crossfire 800 psi output 4500 psi compressed air system. On first go, the electronics gave no response. After taking out the three screws holding the rubber wraparound grip onto the grip frame, it was quickly discovered that the battery inside the grip was very weak. It was replaced with a fresh Alkaline battery, and the grip frame jumped to life when the middle button was held down to turn it on. Planet recommends using a 9-volt alkaline battery as the power source, but a NiMH rechargeable also worked during a brief test. Planet says to expect about 20,000 or more shots between battery changes when using alkalines.
The menus allow setting of the game timer, resetting or viewing the shot counter, and gun configuration. While the breech sensor worked fine without adjusting, its parameters can be fully configured through the in-grip menus. Because the sensor is reflective, different brands and shell colors of paintballs will be detected differently, based on how reflective they are to infrared light. The eye menu allows the user to see exactly how much IR light is being detected, to make sure the eye is seeing the bolt when it is closed, and to see how strong of a signal is reflected by a particular paintball. After seeing the reflection value of the paint to be used, the grip can then be set to accept a signal at a given threshold to indicate that paint has been loaded into the breech. This allows the eye system to work properly even with dark shelled paint.
The brighness of the display is adjustable, but Planet notes in their manual that the brighter levels drain the battery faster, and should be avoided if possible. During review, even the brightest setting was a bit difficult to read outdoors, so the brightness was set in the middle which used less battery power and was still easy to read when the grip was shaded with a hand. The battery level can also be checked, shown as a series of bars on the LED display. The setup menu is not available on the field. Instead, a hex wrench must be used to remove the wraparound grip, in order to provide access to the set up field lock button on the eBlade circuit board. Like the main menu, the set up menu can be scrolled through in both directions with the top and bottom buttons, and selected with the center button. The timing menu allows adjustment of the timing. Compared to the old-school method of breaking out the hex wrenches adusting, testing, and adjusting again, setting numbers in the grip frame is incredibly convenient. Also the ability to make changes to these settings without the use of a computer or PDA means a player wont be stuck needing to re-adjust but not having the right tools to do it. The menus allow setting how long the sear solenoid is actuated, How long before the start of the firing stroke until the cocking stroke is actuated, how long the pneumatics solenoid should stay actuated to hold the bolt back, and the minimum amount of time to wait before firing the next shot (this ensures there is time for the bolt to fully close.) Additionally, there is a second bolt delay timing value that tells the system how long to wait in case the breech sensor is being used, and a new paintball is not detected. That is an error trap that keeps a dark ball which might not be detected from preventing the gun from firing. Additional input filtering settings allow the user to adjust the maximum amount of times the gun is willing to wait to detect the fact that the breech has been opened (that the bolt is fully back,) how long it will wait for a new ball to drop in, and the minimum amounts of time that the trigger must be pulled and released in order to be considered a valid trigger pull by the operating software. For the average user, the timing and filtering settings may be a bit complex. While they provide an airsmith or experienced user the ability to maximize performance and rate of fire, they also give the inexperienced user the chance to muck up the timing of the gun. As a workaround for this, Planet has included 3 factory presets with slow, medium, and fast settings. These presets change all of the timing and filtering values. The slow settings will compensate for almost any conceivable hardware situation. It will make the gun work, but not at the peak of performance, especially with respect to rate of fire. Moving up to medium and fast, the performance goes up, but so does the risk of a timing problem if there are any mechanical issues. More experienced users can use the presets as a shortcut by selecting a factory preset, and then tweaking individual values do dial in perfect performance.
Planet has merged their eBlade electronics into the Eclipse Autococker in order to produce a paintgun that has both the performance and sharp looks for which they are known, while at the same time taking the reliability and rate of fire to a new level.
|
| Copyright © 1992-2019
Corinthian Media Services. WARPIG's webmasters can be reached through our feedback form. All articles and images are copyrighted and may not be redistributed without the written permission of their original creators and Corinthian Media Services. The WARPIG paintball page is a collection of information and pointers to sources from around the internet and other locations. As such, Corinthian Media Services makes no claims to the trustworthiness or reliability of said information. The information contained in, and referenced by WARPIG, should not be used as a substitute for safety information from trained professionals in the paintball industry. |
 Owing
to the relative complexity of the Autocockers timing compared to paintguns
of more simple design that have their hammer and bolt linked together,
the Cocker can definitely benefit from electronic control. The timing
of the firing and recocking cycles can be handled with digital precision,
completely independent of the speed at which the trigger is pulled.
Additionally an electronic trigger can be set up for a shorter pull than
a mechanical two stage trigger, thus allowing the user to pull the trigger
faster, which is all too important in modern tournament paintball.
Owing
to the relative complexity of the Autocockers timing compared to paintguns
of more simple design that have their hammer and bolt linked together,
the Cocker can definitely benefit from electronic control. The timing
of the firing and recocking cycles can be handled with digital precision,
completely independent of the speed at which the trigger is pulled.
Additionally an electronic trigger can be set up for a shorter pull than
a mechanical two stage trigger, thus allowing the user to pull the trigger
faster, which is all too important in modern tournament paintball.
 The
eBlade trigger frame tackles the sear with a compact solenoid. When
electrical current is driven through its coil the magnetic field that is
created pulls on the solenoids core which moves, tripping the sear and
releasing the hammer. The particular solenoid used is rather squat
in shape, and oriented vertically, just below the front of the sear.
The Autocockers mechanical 4 way valve is replaced by a solenoid driven
4 way valve. This is a compact, low pressure, low flow (relative
the pressures and flow rates handled by the Autocockers main exhaust valve)
valve that is actuated by a tiny solenoid inside.
The
eBlade trigger frame tackles the sear with a compact solenoid. When
electrical current is driven through its coil the magnetic field that is
created pulls on the solenoids core which moves, tripping the sear and
releasing the hammer. The particular solenoid used is rather squat
in shape, and oriented vertically, just below the front of the sear.
The Autocockers mechanical 4 way valve is replaced by a solenoid driven
4 way valve. This is a compact, low pressure, low flow (relative
the pressures and flow rates handled by the Autocockers main exhaust valve)
valve that is actuated by a tiny solenoid inside.
 On
the outside, the eBlade trigger looks much like Planets earlier Blade
two finger mechanical trigger for the Autococker. It is a straight
blade design, with just enough room for two fingers that are angled downward.
Functionally however, it is entirely different. The eBlade trigger
has no springs. Instead, it is equipped with a trigger return magnet.
Unlike trigger return springs which provide more resistance the further
a trigger is pulled, return magnets actually give less resistance because
the magnet is getting further away from the metal in the trigger.
This gives a very different feeling to the trigger pull, almost completely
ensuring that any pull with enough force to start the trigger pull will
result in a complete, full length trigger stroke. Extending out of
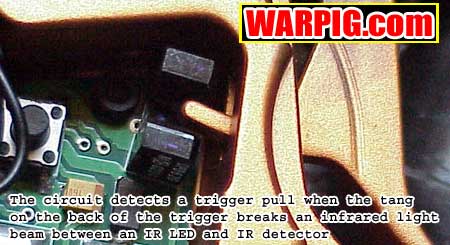
the rear of the trigger and into the grip frame is a small metal tang.
This is how the trigger signals to the circuit board to fire the gun.
When the trigger is pulled, its tang swings in between an infrared LED
and an infrared detector, breaking a beam of invisible light. That
signals the circuit board to fire. The forward and rear limits of
the trigger pull are adjustable with small set-screws, allowing for easy
customization of the trigger pull length.
On
the outside, the eBlade trigger looks much like Planets earlier Blade
two finger mechanical trigger for the Autococker. It is a straight
blade design, with just enough room for two fingers that are angled downward.
Functionally however, it is entirely different. The eBlade trigger
has no springs. Instead, it is equipped with a trigger return magnet.
Unlike trigger return springs which provide more resistance the further
a trigger is pulled, return magnets actually give less resistance because
the magnet is getting further away from the metal in the trigger.
This gives a very different feeling to the trigger pull, almost completely
ensuring that any pull with enough force to start the trigger pull will
result in a complete, full length trigger stroke. Extending out of
the rear of the trigger and into the grip frame is a small metal tang.
This is how the trigger signals to the circuit board to fire the gun.
When the trigger is pulled, its tang swings in between an infrared LED
and an infrared detector, breaking a beam of invisible light. That
signals the circuit board to fire. The forward and rear limits of
the trigger pull are adjustable with small set-screws, allowing for easy
customization of the trigger pull length.

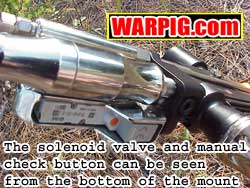 Up
on the front pneumatics block, the solenoid valve was mounted in Planets
unique valve mount. This chrome finish part has lines that match
the shapes in the Eclipse body. It has a threaded neck which screws
into the cockers front block in the same mount hole as a normal 4 way
valve. Instead of passing a timing rod through the block, the solenoid
valves wires pass through the same opening, as well as through the timing
rod passage in the vertical ASA, then back into the grip frame. The
solenoid valves input and output fittings are all oriented on its top,
keeping all the hose lengths short and tidy. The solenoid valve itself
can be seen from the opening in the bottom of the mount. It has a
small test button on it. The test button manually activates the valve.
This can be used as a diagnostic tool. If the cocking system ever
stopped functioning, but the ram still moved when the valve was triggered,
that would show that the problem lay in the electronics or wiring.
If the ram didnt move, that would show the problem to be in the valve,
ram or low pressure regulator.
Up
on the front pneumatics block, the solenoid valve was mounted in Planets
unique valve mount. This chrome finish part has lines that match
the shapes in the Eclipse body. It has a threaded neck which screws
into the cockers front block in the same mount hole as a normal 4 way
valve. Instead of passing a timing rod through the block, the solenoid
valves wires pass through the same opening, as well as through the timing
rod passage in the vertical ASA, then back into the grip frame. The
solenoid valves input and output fittings are all oriented on its top,
keeping all the hose lengths short and tidy. The solenoid valve itself
can be seen from the opening in the bottom of the mount. It has a
small test button on it. The test button manually activates the valve.
This can be used as a diagnostic tool. If the cocking system ever
stopped functioning, but the ram still moved when the valve was triggered,
that would show that the problem lay in the electronics or wiring.
If the ram didnt move, that would show the problem to be in the valve,
ram or low pressure regulator.
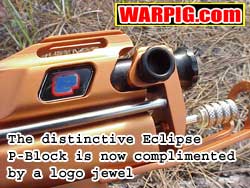 The
Eclipse body includes a p-block in the back. Instead of the cocking
block extending rearward to hold onto the bolt, a P shaped cut out in the
receiver allows it to extend forward, leading to a slightly lighter overall
weight with less metal in the paintgun. The eclipse bolt is made
completely of Delrin and features a venturi style vented face. A
ball bearing in the bolt captures the bolt pin, instead of using a bolt
pin with locking ball bearings like the older WDP design. The bolt
pin too, is made of Delrin.
The
Eclipse body includes a p-block in the back. Instead of the cocking
block extending rearward to hold onto the bolt, a P shaped cut out in the
receiver allows it to extend forward, leading to a slightly lighter overall
weight with less metal in the paintgun. The eclipse bolt is made
completely of Delrin and features a venturi style vented face. A
ball bearing in the bolt captures the bolt pin, instead of using a bolt
pin with locking ball bearings like the older WDP design. The bolt
pin too, is made of Delrin. 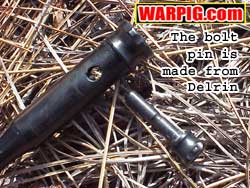 The
use of Delrin for both parts means less moving mass during the recock stroke,
and thus less perceived recoil while shooting. A flat style beavertail
rounds out the back end to protect the cocking rod.
The
use of Delrin for both parts means less moving mass during the recock stroke,
and thus less perceived recoil while shooting. A flat style beavertail
rounds out the back end to protect the cocking rod.
 The
four character LED display on the back of the grip is used for the eBlades
timer and menu functions. While it was great in the office, out on
the field under an overcast sky, it often needed to be shaded with a hand
to be read clearly. For basic use, the only thing that needed to
be done was turn on the gun. From there, with the compressed air
system screwed in, it fired each time the trigger was pulled. No
timing issues, no short stroking problems, just fast shooting with a short
and light trigger pull. While a hex wrench is included for adjusting
the trigger stop screws, there was no need, it was already dialed in nice
and tight. This is likely because prior to coming over to WARPIG
for review, the crew at Paintball Games International had been putting
the same gun through its paces for their review.
The
four character LED display on the back of the grip is used for the eBlades
timer and menu functions. While it was great in the office, out on
the field under an overcast sky, it often needed to be shaded with a hand
to be read clearly. For basic use, the only thing that needed to
be done was turn on the gun. From there, with the compressed air
system screwed in, it fired each time the trigger was pulled. No
timing issues, no short stroking problems, just fast shooting with a short
and light trigger pull. While a hex wrench is included for adjusting
the trigger stop screws, there was no need, it was already dialed in nice
and tight. This is likely because prior to coming over to WARPIG
for review, the crew at Paintball Games International had been putting
the same gun through its paces for their review.
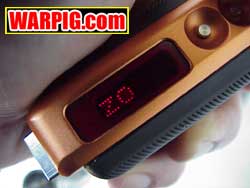 Pressing
the top of the three buttons on the grip allows the breech sensor eye to
be turned on or off during use. For review, the eye was left on.
Pressing the center button brings up the menu items which can be scrolled
through by pressing the top and bottom buttons. Many paintguns with
built in displays have only a single button to scroll through menus the
use of two buttons proved to be more convenient on the eBlade. If
one accidentally scrolls past a choice, they do not have to cycle through
all of the options to get back to it, they can simply press the other button.
When in menus, the middle button selected the displayed option.
Pressing
the top of the three buttons on the grip allows the breech sensor eye to
be turned on or off during use. For review, the eye was left on.
Pressing the center button brings up the menu items which can be scrolled
through by pressing the top and bottom buttons. Many paintguns with
built in displays have only a single button to scroll through menus the
use of two buttons proved to be more convenient on the eBlade. If
one accidentally scrolls past a choice, they do not have to cycle through
all of the options to get back to it, they can simply press the other button.
When in menus, the middle button selected the displayed option.
 There
are two normal modes of fire that can be selected through the grip menus.
These are semi, and classic plus. Technically both are semi-automatic,
but their difference lies in the timing of the bolt stroke. In semi,
all of the timing for the firing and cocking cycles will be taken from
the settings in the grip. In classic plus mode, the same timing values
are used, but the back block is held back until the trigger is released,
so the feel to the user is more like a traditional Autococker. In
either mode, the electronic sequencing removes the possibility of a short-stroke,
but the classic just gives more of that traditional cocker feel.
There
are two normal modes of fire that can be selected through the grip menus.
These are semi, and classic plus. Technically both are semi-automatic,
but their difference lies in the timing of the bolt stroke. In semi,
all of the timing for the firing and cocking cycles will be taken from
the settings in the grip. In classic plus mode, the same timing values
are used, but the back block is held back until the trigger is released,
so the feel to the user is more like a traditional Autococker. In
either mode, the electronic sequencing removes the possibility of a short-stroke,
but the classic just gives more of that traditional cocker feel.
 On
the field, the Eclipse eBlade Cocker performed with no problems at all.
At Extreme Rage Paintball Park in Fort Meyers, Florida quick tweak of the
velocity adjuster at the chronograph got it dialed in, and it was shooting
with a consistency of +/- 3 fps. Shot groupings on the target range
were very tight, and high rates of fire were easy to achieve. During
the review, a HALO B loader was used, and the breech sensor eye turned
on. Trying to cause feed problems by turning the HALO off, then shooting
it dry just didnt work. Even without the spring pressure of the
loader, the eBlade sensor and timing system would hold the bolt open just
long enough to make sure a ball fed, and then be ready for the next shot.
In game, the telling point about the gun was that it required no attention.
In a practice session scrimmaging against the Philly Americans the author
was able to think about the game and not his gun. That is unusual
when trying a new paintgun for the first time.
On
the field, the Eclipse eBlade Cocker performed with no problems at all.
At Extreme Rage Paintball Park in Fort Meyers, Florida quick tweak of the
velocity adjuster at the chronograph got it dialed in, and it was shooting
with a consistency of +/- 3 fps. Shot groupings on the target range
were very tight, and high rates of fire were easy to achieve. During
the review, a HALO B loader was used, and the breech sensor eye turned
on. Trying to cause feed problems by turning the HALO off, then shooting
it dry just didnt work. Even without the spring pressure of the
loader, the eBlade sensor and timing system would hold the bolt open just
long enough to make sure a ball fed, and then be ready for the next shot.
In game, the telling point about the gun was that it required no attention.
In a practice session scrimmaging against the Philly Americans the author
was able to think about the game and not his gun. That is unusual
when trying a new paintgun for the first time.