  |
|
|
|
|
|
|
| |
|
|
|
|
|
|
Thanks to
What
do you think?
|
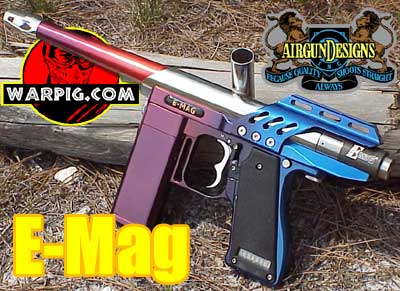
AGD E-Mag by Bill Mills May 2001
The operating concept of the Automag is a blow forward design, a style which Airgun Designs was first to bring to market. The operating theory is that shot to shot consistency can be best achieved by using an exact volume of gas at a set pressure to fire each shot, rather than relying on the amount of time a hammer holds open a valve seal. When gas enters an Automag, it is first routed to the AIR valve. AIR is an acronym for Advanced Integrated Regulator. The regulator takes the input gas, and allows it to flow past, until the pressure inside the paintgun has reached the set level. The AIR then shuts off the gas flow so that the pressure inside the paintgun is limited - or regulated. The regulated gas from the AIR flows forward through the valve body, and through an open cut-off valve referred to as the on/off valve. Past the on/off valve the gas fills an air chamber that is blocked by a piston in the center of the bolt. The bolt is held back by a sear, keeping the Automag's breech open.
When the bolt reaches the forward position of its stroke closing the breech, the rod in its center clears the front seal in the piston (known as the power tube o ring) and the gas in the air chamber escapes through passages in the bolt, firing the ball down the barrel. No more gas escapes from the Automag, other than what is in the air chamber, because the on/off valve has closed the path between the chamber and the AIR.
As the Automag became more prominent in tournament paintball, it was discovered that some players could shoot faster than the AIR valve could recharge the gas chamber. If a shot was fired before the chamber has recharged from the previous shot, the preset volume of gas will not be at the proper pressure, and the velocity will be decreased. This is known as shoot-down. Automag shoot-down has often been exaggerated, and many after market on/off valves have claimed to decrease it, which is a rather astounding claim considering that the gas restriction occurs in the AIR. In 1996, Airgun Designs went a step past the AIR valve with the RT valve, featured on the Automag RT. The RT valve, unlike the AIR will operate with compressed air only, not CO2. The RT valve used a different air supply routing than original Automags, and thus was not backward compatible with the earlier grip rails and receivers. In addition to providing the Reactive Trigger from which its name was derived, the RT valve features a faster acting mechanism, letting it recharge the paintgun faster than the original AIR - fast enough to cycle 28 times per second without shoot-down. A side effect of the new valve was the way it recharges the air chamber. It first delivers a spike of higher pressure, due to adiabatic compression increasing the temperature of the gas, and then the pressure drops slightly to the operating pressure as the heat dissipates. As a result the on/off valve pushes harder on the trigger in the moment after firing, than it does when resting a while before firing. This means that when the user pulls the trigger, it "kicks back" in the moment after firing. The effect is somewhat akin to adding power steering to the trigger, and by helping the user release the trigger faster, the user can pull the trigger for the next shot sooner, leading to higher rates of fire.
Concurrent with the release of the E-Mag, Airgun Designs released the RT Pro, a replacement for the Automag RT. Both of the new 'mags feature the Retro Valve.
Pneumatics wise, the E-Mag operates exactly the same as a Retro Valve equipped Automag - accuracy, valve recharge rates, gas efficiency are all the same. The difference lies in the electro mechanical grip which either fully controls, or assists in controlling the electronics.
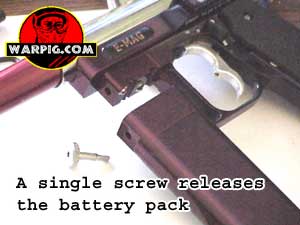
Alternatively, players could remove the stock battery, and install a pair of 9 volt batteries, wiring two 9v battery clips in series to the spring connector at the top of the battery pack, or directly to the circuit board, mounting the batteries around a drop-forward. The NiMH battery pack can be recharged with an adapter that plugs into an automobile cigarette lighter plug. The charger includes an LED indicator to show both when it is charging, and when the battery has a full charge.
Rather than a power switch, the E-Mag
uses a simple plastic pin to break the connection between one of the battery
contacts and a contact in the grip frame. Only the positive lead
from the battery is wired back to the circuit board - the frame of the
Automag is used as the circuit ground. The pin is small and could
easily be lost. Many players have taken to using the lanyards that
paintball companies The E-Mag solenoid is controlled by a microprocessor driven circuit board. The board takes the signals from the trigger, and then activates the solenoid, firing based on the selected mode. In 1998, I had the opportunity to look over an electronic trigger Micromag prototype that never made it to market. It was, as one would expect, 'Mag performance with a light electronic trigger. In 1999, I had the chance to try an early E-Mag prototype, and Airgun Designs President Tom Kaye commented on a feature that I had not expected at all - the electronics are in addition to the mechanics, meaning that with the flip of a selector switch, the E-Mag can be operating completely mechanically. This is a coup in the world of electronic paintguns. The E-Mag is the first electronic paintgun that can still be used if the batteries or electronics fail on the field. The E-Mag trigger is one of the most unique ever designed. Compared to an Automag, it sits a little further forward relative to the trigger rod reaching out from the sear. A limiter prevents the trigger from pulling back far enough to reach the trigger rod. Instead of return springs and a mechanical switch as found in most electronic paintguns, the E-Mag relies on magnets.
A screw adjustment in the middle of the trigger moves this magnet forward or back, adjusting how far the trigger must be pulled to activate the firing circuit. Another set screw limits the rear travel of the trigger, defining how long the trigger pull will be. While the fully adjustable trigger allows easy tuning by the user, the factory settings are reasonably close to the minimal limits. A few minutes tweaking can give the "perfect" adjustment.
If a player is faced with battery or electronics failure on the field, all they need to do is rotate the limit selector to the M position and keep playing. No screws or other parts must changed or removed. With the switch in the manual position, and the electronics activated, the E-Mag operates with a hybrid trigger. A light pull activates the electronics, and the solenoid trips the sear, but the reactive trigger kicks in, mechanically pushing the trigger back for more rapid firing. Access to the solenoid and control circuit is gained by removing the E-Mag's grip panels. Due to the size and shape of the grip, the grip panels are not of a standard size or screw configuration, so until the aftermarket companies get on the ball, E-Mag owners will need to stay with the stock grip panels. At the rear top of the grip frame is the E-Mag safety. Rather than blocking the trigger from movement, it blocks the sear, protecting from both mechanical, or electrical firing. The new placement has fooled a few players new to the E-Mag unable to figure out why the could not fire. The circuit board which controls the solenoid is responsible for the firing modes, and timing factors (how long the solenoid is actuated for each shot, minimum time between shots, etc.) The "brain" of the circuit board is an Amtel microcontroller - a microprocessor with built in Electronically Programmed Read Only Memory (EPROM.) In addition to the Hall Effect sensor there are two control buttons which serve as input. Additional connectors on the circuit board include tournament log, and firing signal (which can be used to activate a loader - a channel in the bottom of the grip even allows for routing of a connecting wire). They are located on the back of the grip frame in small groves which protects them from accidental activation but makes them easy to press with a thumbnail. An 8 character alpha numeric Light Emitting Diode (LED) array serves as the display to communicate information to the user.
When power is activated, the display first shows a boot message for six seconds, indicating which version of the operating software is loaded into the microcontrller's EPROM. The software version described here is V 1.35, which displays "AGD 1.35" on startup.
Cycling further will select shot mode. "1 SHOT" is standard semi-auto mode, while "3 SHOT" and "6 SHOT" burst modes are also available. A six conductor connector on the circuit board has a loop of brown wire. When this wire is and connector is removed, the circuit board does not offer a choice of shot modes. This serves as a tournament lock making the E-Mag legal at fields and events that allow only semi-auto firing mode (NPPL, Pan Am, WPF, Zap IAO, Etc.) It is expected by some that "semi capable only" will be adopted by all major manufacturers at the end of 2001, so this feature may not remain in the E-Mag design.
The next menu item is labeled as "SPS" which stands for Shots Per Second." This is the rate of fire restriction for electronic mode. In semi automatic mode, the ROF limiter can be set from 8 to 16 shots per second. In theory, a player could fire faster than the ROF setting in mechanical or hybrid mode, however finding a player capable of doing so is extremely unlikely. The ROF limiter goes to lower rates to prevent ball chopping with hoppers that can not keep up under rapid fire. In 3 and 6 round burst modes, the ROF limiter can be set from 3 to 9 shots per second. The final menu item is "GAME.T" - the time setting for the game timer. The timer can be set to count down from 5 to 35 minutes. The E-Mag is available with multiple main body options. The standard body is a powerfeed set up for the hopper on the left side of the paintgun. Alternatively, the Warp Feed body has a shorter power feed tube that allows a hopper to be placed on the right, or a Warp Feed to be attached low on the left. The stock barrel - nearly identical to the Automag RT barrel, is designed for hopper left powerfeed use, and not compatible with the Warp Feed body (it won't twist to lock in the proper position). Most aftermarket barrels will lock to the left or right, making them compatible with hopper left or right Automags. The stock barrel features two ball detent nubbins, while "ambidextrous" barrels only have one. Some players have expressed concerns that having to use a single nubbin barrel will result in feed problems. According to AGD president, Tom Kaye the second nubbin in the barrel is not needed for proper feeding, but rather acts as a backup, in case the first should fail, reducing service and support problems. While many players rush to by an aftermarket barrel, expecting a huge performance increase, the stock E-Mag barrel is of very high quality and should not be overlooked. It is finely honed hard anodized aluminum in .690-.691 diameter with a polished muzzle brake. The most important thing about the E-Mag is not the list of features, but how if performs on the field. For field testing, A wine to blue fade E-Mag was configured with both the powerfeed body, and a Teflon(R) coated Warp Feed body. Centerflag Products Hyperflow 201 adjustable and 420 screw in preset 4500 psi compressed air systems, as well as a Crossfire 3,000 psi preset screw in system, all mounted on a Shocktech drop forward - though not at the same time. :-) An Airgun Designs Warp Feed was used with a 12volt Revolution loader, and the stock barrel, as well as a Check It stainless steel, and J&J ceramic barrels. Diablo and Great American Paintballs were used at Spacecoast Paintball, and Command Post's Cow Town field. Recommended input pressure for the E-Mag is 600-800 psi. This makes it easily compatible with preset screw in compressed air systems which not only tend to be lower in price than adjustable systems but also more convenient to break down and pack in a gear bag. Many people mistakenly refer to the Automag as a high pressure paintgun when seeing the 600-800 psi input requirement. In reality the E-Mag is more adequately described as medium pressure. The AIR or Retro Valve regulates the gas down to around 400 psi inside the paintgun. This pressure drops even further as the volume of space holding the gas increases with the power tube piston moving forward to fire. In testing, both preset and adjustable systems ran equally well on the E-Mag. Also used in field testing was an Armson Pro Dot site from Pro Team Products. As a testament to how similar the general layout of the E-Mag is to the Automag RT, the Pro Dot, which was removed from an RT was already perfectly sighted in when installed on the E-Mag sight rail. At the chrono station, the E-Mag must be chronoed with the electronics off, and the limiter switch set to manual. The trigger must be held down, then quickly released and pulled to simulate rapid firing. This gives the highest possible velocity at which the E-Mag can fire at it's velocity setting.
Initially setting up the Warp Feed's hose around the front of the Revolution loader provided a bit of a surprise on the field. The hose popped free from the powerfeed, creating a small fountain of paintballs as the Warp feed spun. This was easily taken care of by rotating the add-on powerfeed so that the Revolution placed pressure on the hose, keeping it firmly on the powerfeed. Changing to the Warp body, provided a cleaner profile, and less protrusion above the top of the E-Mag's body. On the field, all of the reliability and performance of an Automag was there with the added rate of fire, and more accurate shooting provided by the light magnetic trigger (a lighter, smoother trigger pull means less movement by the shooter while firing.) Switching between Electronic and manual modes in case of battery failure (which didn't happen) proved simple to do during a game. Switching to Hybrid mode proved to crank up the available firepower. A popular approach to preventing ball breaks in electronic paintguns is to use a breech sensor to detect when the ball has fallen completely into place. This allows the electronics to react, and skip a shot when the loader can't keep up with the player's rate of fire. Airgun Designs has taken a different approach by releasing the Warp Feed at the same time as the E-Mag. Instead of skipping a shot, the Warp/E-Mag combo uses a positive drive feed to make sure a ball is always in the chamber before the next shot can be fired. During testing only one ball was broken, and this was after a large piece of paint shell landed in the Powerfeed window from splatter on a bunker. Performance was top-notch, and well received by numerous players who tried it out. The unique trigger feel drew the most reactions. Placing the Warp Feed on the left hand side made viewing the LED display a bit awkward on the field, and with no alarm to sound or vibrate when the count-down is completed many players are likely to rely on a wristwatch or hopper mounted timer instead. Mode changes and adjustments proved easy enough to make, and the LED was easily readable under clear and sunny skies.
The author would like to thank Tom Kaye, and the Airgun Designs Master Techs - Brad, Rob, Kayle and Rod for being a ready source of Automag technical knowledge over the years. Teflon is a registered trademark of the Du Pont corporation who's lawyers threaten legal action against WARPIG.com and it's sponsors if we don't remember to tell you that. |
| Copyright © 1992-2019
Corinthian Media Services. WARPIG's webmasters can be reached through our feedback form. All articles and images are copyrighted and may not be redistributed without the written permission of their original creators and Corinthian Media Services. The WARPIG paintball page is a collection of information and pointers to sources from around the internet and other locations. As such, Corinthian Media Services makes no claims to the trustworthiness or reliability of said information. The information contained in, and referenced by WARPIG, should not be used as a substitute for safety information from trained professionals in the paintball industry. |
 The
E-Mag made its public debut at the Zap International Amateur Open in Pittsburgh,
PA, in August of 2000. It came as Airgun Design's awaited move into
the arena of electronic paintguns. Essentially the E-Mag builds on
the existing Automag technology, adding an electronic triggering system
to Airgun Design's performance proven Retro Valve technology.
The
E-Mag made its public debut at the Zap International Amateur Open in Pittsburgh,
PA, in August of 2000. It came as Airgun Design's awaited move into
the arena of electronic paintguns. Essentially the E-Mag builds on
the existing Automag technology, adding an electronic triggering system
to Airgun Design's performance proven Retro Valve technology.
 The
sear is a seesaw arrangement, pivoting on a pin in the Automag's grip rail.
Waiting to fire, gas pressure in the on/off valve pushes on the back arm
of the sear, keeping the front catch of the sear securely engaged on the
bolt. A rod on a pivoting clevis extends out from a lobe on the sear,
through the grip frame to the back of the trigger. When the trigger
is pulled, it presses on the rod, rotating the sear counter clockwise (when
viewed from the left) a couple of degrees. This completes two steps
at the same time. First it releases the bolt from the front of the
sear, second, it presses the pin of the on/off valve turning it off.
The fixed volume of gas in the air chamber expands as it presses the piston
in the center of the bolt forward.
The
sear is a seesaw arrangement, pivoting on a pin in the Automag's grip rail.
Waiting to fire, gas pressure in the on/off valve pushes on the back arm
of the sear, keeping the front catch of the sear securely engaged on the
bolt. A rod on a pivoting clevis extends out from a lobe on the sear,
through the grip frame to the back of the trigger. When the trigger
is pulled, it presses on the rod, rotating the sear counter clockwise (when
viewed from the left) a couple of degrees. This completes two steps
at the same time. First it releases the bolt from the front of the
sear, second, it presses the pin of the on/off valve turning it off.
The fixed volume of gas in the air chamber expands as it presses the piston
in the center of the bolt forward.
 With
the air pressure vented out the barrel, a spring returns the bolt to the
rear position. When the operator releases the trigger, air pressure
in the on/off valve causes it to open. This rotates the sear to its
original position, pushing the trigger back to its rest position, and latching
the bolt in place with the front of the sear. With the on/off valve
opened again, the AIR recharges the gas chamber for the next shot.
With
the air pressure vented out the barrel, a spring returns the bolt to the
rear position. When the operator releases the trigger, air pressure
in the on/off valve causes it to open. This rotates the sear to its
original position, pushing the trigger back to its rest position, and latching
the bolt in place with the front of the sear. With the on/off valve
opened again, the AIR recharges the gas chamber for the next shot.
 Following
the Automag RT with its RT valve, Airgun Designs released the Retro Valve.
The Retro Valve works exactly the same as the RT valve, but is externally
shaped and fitted to provide compatibility with traditional Automags.
The Retro Valve first came to market in Pro Team Products Micromag RTs
(the Micro Mag is an Aluminum after market body for the Automag) and shipped
soon after as an upgrade part for Automags.
Following
the Automag RT with its RT valve, Airgun Designs released the Retro Valve.
The Retro Valve works exactly the same as the RT valve, but is externally
shaped and fitted to provide compatibility with traditional Automags.
The Retro Valve first came to market in Pro Team Products Micromag RTs
(the Micro Mag is an Aluminum after market body for the Automag) and shipped
soon after as an upgrade part for Automags.
 The
E-Mag however, is much more than an Automag with a Retro Valve, and the
differences go past the "E-Mag" logo laser engraved on the side of the
valve. The grip rail has a boat-tail shape, similar to the Automag
RT, and a similar 3/8" sight rail. In the rail is a screw locked
pin on which the sear pivots - this is important, as keeping sear alignment
tight is important to the electronic functions. On the front of the
trigger guard is a hefty fore grip containing a Nickel Metal Halide (NiMH)
battery pack, and the grip itself is bristling with electronics.
The
E-Mag however, is much more than an Automag with a Retro Valve, and the
differences go past the "E-Mag" logo laser engraved on the side of the
valve. The grip rail has a boat-tail shape, similar to the Automag
RT, and a similar 3/8" sight rail. In the rail is a screw locked
pin on which the sear pivots - this is important, as keeping sear alignment
tight is important to the electronic functions. On the front of the
trigger guard is a hefty fore grip containing a Nickel Metal Halide (NiMH)
battery pack, and the grip itself is bristling with electronics.
 The
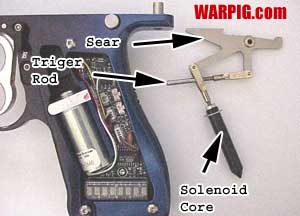
E-Mag sear has an extra lobe, when compared to a normal 'Mag sear.
A clevis pin attaches to this, allowing a solenoid to pull the sear.
A solenoid is basically an electro magnet. It is made of a coil of
wire that either pulls or repels a metallic core, converting electrical
power into mechanical motion. In most electronic paintguns very small
solenoids are used to actuate small control valves (these are typically
integrated into a single unit referred to as a solenoid valve) that route
gas to control larger operational valves. In the E-Mag on the other
hand, a rather beefy solenoid actually does the work of tripping the sear
against the pressure of the on/off valve. Because of this, a strong
power supply is needed, hence the 18v operation.
The
E-Mag sear has an extra lobe, when compared to a normal 'Mag sear.
A clevis pin attaches to this, allowing a solenoid to pull the sear.
A solenoid is basically an electro magnet. It is made of a coil of
wire that either pulls or repels a metallic core, converting electrical
power into mechanical motion. In most electronic paintguns very small
solenoids are used to actuate small control valves (these are typically
integrated into a single unit referred to as a solenoid valve) that route
gas to control larger operational valves. In the E-Mag on the other
hand, a rather beefy solenoid actually does the work of tripping the sear
against the pressure of the on/off valve. Because of this, a strong
power supply is needed, hence the 18v operation.
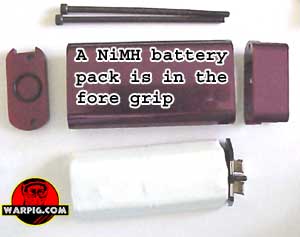 The
18 volts are supplied by a NiMH battery. NiMH is more expensive than
the more common Nickel Cadmium batteries (NiCAD). NiCADs suffer a
problem referred to as "memory." If they are not fully drained before
recharging, they can develop a "memory" and only accept partial charges
after that. NiMH batteries are immune to this effect.
The
18 volts are supplied by a NiMH battery. NiMH is more expensive than
the more common Nickel Cadmium batteries (NiCAD). NiCADs suffer a
problem referred to as "memory." If they are not fully drained before
recharging, they can develop a "memory" and only accept partial charges
after that. NiMH batteries are immune to this effect.
 Also,
a 12 volt transformer can be connected to the charger to use an AC electrical
outlet. Radio Shack
Also,
a 12 volt transformer can be connected to the charger to use an AC electrical
outlet. Radio Shack 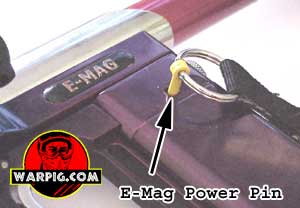 use
as promotional items to store the E-Mag power pin, or some sort of short
leash to keep them with the E-Mag.
use
as promotional items to store the E-Mag power pin, or some sort of short
leash to keep them with the E-Mag.
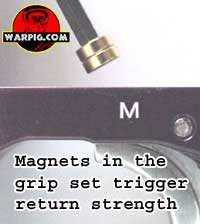 A
magnet in the top of the trigger is attracted to powerful rare earth magnets
stacked in the grip frame to provide trigger return. Unlike a trigger
return spring, which provides more resistance the further the trigger is
pulled, the E-Mag's trigger actually provides less resistance as the magnets
move further apart, for a very unique feel. The weight of the trigger
pull is adjusted by the number of magnets stacked in the grip frame.
The E-Mag ships with two magnets in the frame, and room for a total of
four.
A
magnet in the top of the trigger is attracted to powerful rare earth magnets
stacked in the grip frame to provide trigger return. Unlike a trigger
return spring, which provides more resistance the further the trigger is
pulled, the E-Mag's trigger actually provides less resistance as the magnets
move further apart, for a very unique feel. The weight of the trigger
pull is adjusted by the number of magnets stacked in the grip frame.
The E-Mag ships with two magnets in the frame, and room for a total of
four.
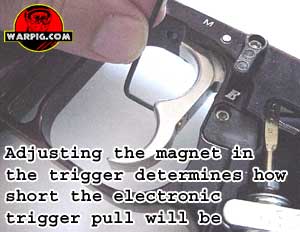 Another
magnet is mounted in the center of the trigger. This magnet takes
the place of a microswitch. As the trigger moves this magnet's field
sweeps over a hall effect sensor in the grip frame. It is the signal
from the hall effect sensor that lets the E-Mag's circuit board know the
trigger has been pulled.
Another
magnet is mounted in the center of the trigger. This magnet takes
the place of a microswitch. As the trigger moves this magnet's field
sweeps over a hall effect sensor in the grip frame. It is the signal
from the hall effect sensor that lets the E-Mag's circuit board know the
trigger has been pulled.
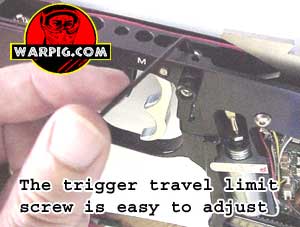 The
limiter that sets the rear travel limit for the trigger can be disengaged
by flipping a lever near the top of the trigger. Switching it from
the E position to the M position allows the trigger to move back further
- far enough to engage the link pin from the sear and fire the E-Mag without
the electronics. With the electronics turned off, the E-Mag can operate
identical to an Automag RT.
The
limiter that sets the rear travel limit for the trigger can be disengaged
by flipping a lever near the top of the trigger. Switching it from
the E position to the M position allows the trigger to move back further
- far enough to engage the link pin from the sear and fire the E-Mag without
the electronics. With the electronics turned off, the E-Mag can operate
identical to an Automag RT.
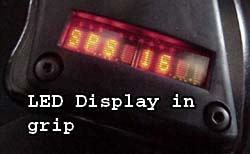 For
those who are old enough to remember the early digital watches with their
red glowing displays that only showed the time when a button was pressed,
the LED display should be familiar. While the display is not bright
enough to be read in full direct sunlight, it is very legible if simply
turned away from the sun, and does not need to be fully shaded. Due
to its power requirements, the LED only displays information when mode
changes are made, not constantly through operation. During normal
use, a single pixel will blink once every four seconds to indicate that
the E-Mag is on.
For
those who are old enough to remember the early digital watches with their
red glowing displays that only showed the time when a button was pressed,
the LED display should be familiar. While the display is not bright
enough to be read in full direct sunlight, it is very legible if simply
turned away from the sun, and does not need to be fully shaded. Due
to its power requirements, the LED only displays information when mode
changes are made, not constantly through operation. During normal
use, a single pixel will blink once every four seconds to indicate that
the E-Mag is on.
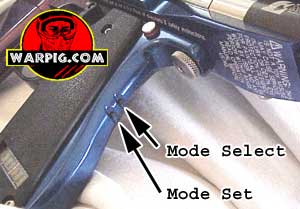 Cycling
through the menus and displays of the E-Mag is surprisingly intuitive.
The top button selects the menu item, while the lower button changes values
for that setting. On first press of the upper button, the E-Mag displays
the current time in the game timer. The game timer is started either
by pressing the lower button or by firing the E-Mag. Once the timer
is started, the display goes dark. The remaining game time can be
displayed by pressing the top button, which will show the time in minutes
and seconds for six seconds before going dark again. Pressing the
second button while the counting time is displayed stops the clock, resetting
it to the start value. The top button will always display the game
time first, cycling to other menu items after multiple presses.
Cycling
through the menus and displays of the E-Mag is surprisingly intuitive.
The top button selects the menu item, while the lower button changes values
for that setting. On first press of the upper button, the E-Mag displays
the current time in the game timer. The game timer is started either
by pressing the lower button or by firing the E-Mag. Once the timer
is started, the display goes dark. The remaining game time can be
displayed by pressing the top button, which will show the time in minutes
and seconds for six seconds before going dark again. Pressing the
second button while the counting time is displayed stops the clock, resetting
it to the start value. The top button will always display the game
time first, cycling to other menu items after multiple presses.
 The
Shot Counter "SHTS" displays the number of shots fired using the electronic
and hybrid modes since the E-Mag was turned on. The next item is
"TS" - total number of shots fired in electronic and hybrid modes since
the EPROM was programmed and assembled at the Airgun Designs factory.
The
Shot Counter "SHTS" displays the number of shots fired using the electronic
and hybrid modes since the E-Mag was turned on. The next item is
"TS" - total number of shots fired in electronic and hybrid modes since
the EPROM was programmed and assembled at the Airgun Designs factory.
 Mounting
the Warp Feed on the left side (for right handed use) of the E-Mag with
the hopper left powerfeed body requires a second powerfeed (made of molded
durable plastic, and included with the AGD Warp Feed). The Warp Feed
includes a vibration sensor which allows it to activate with each shot
without needing to wire it to the E-Mag's circuit board.
Mounting
the Warp Feed on the left side (for right handed use) of the E-Mag with
the hopper left powerfeed body requires a second powerfeed (made of molded
durable plastic, and included with the AGD Warp Feed). The Warp Feed
includes a vibration sensor which allows it to activate with each shot
without needing to wire it to the E-Mag's circuit board.
 All
in all, the E-Mag is an exciting new product marrying the performance and
reliability that made Airgun Designs famous with not only the speed of
an electronic trigger, but the innovative feel and performance of an electromagnetic
trigger. It is ground breaking as the first electronic paintgun to
offer fully mechanical operation as a back up in case of a dead battery
or failed electronics.
All
in all, the E-Mag is an exciting new product marrying the performance and
reliability that made Airgun Designs famous with not only the speed of
an electronic trigger, but the innovative feel and performance of an electromagnetic
trigger. It is ground breaking as the first electronic paintgun to
offer fully mechanical operation as a back up in case of a dead battery
or failed electronics.