  |
|
|
|
|
|
|
| |
|
|
|
|
|
|
Advanced Paintball Electronics
What
do you think?
|
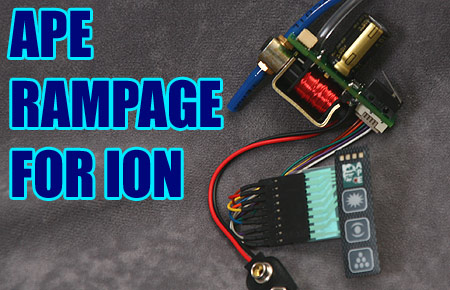
Rampage Board for Ion/SP-8
The Rampage Ion board is a product of Advanced Paintball Electronics, also known as APE, out of Riverview, Florida. This replacement Ion circuit board compliments the company's other offerings of a Rampage board for Tippmanns, trigger assemblies, and a soon to be released Shocker board.
The web site goes on to explain their philosophy of working to simplify the physical structure, while offering their customers a robust feature set in the marker's software.
The membrane keypad features three control buttons, and four very small yet bright light emitting diodes (LEDs.) During review we found these needed to be shaded with a hand to be viewed in direct sunlight – they were however bright enough to be seen without problem outdoors. Everything from power to mode selection and timing programming can be achieved through the keypad.
The Rampage fit and functioned properly in both an Ion and SP-8 during testing for review. The extra step of installation comes with the Rampage membrane keypad. The keypad is equipped with a strong peel and stick adhesive on its back, allowing it to adhere to the rear of the marker's grip frame. The keypad's flexible circuit material wraps around the left side of the grip frame, and under the marker's rubber grips. Inside the grip frame a flat plug connects the keypad to a wiring harness consisting of 9 wires, which then plugs into the Rampage board.
Basic operation of the Rampage board is simple, with no programming required. Its default dwell and delay values are set conservatively enough to ensure proper operation of most Ion based markers – though not necessarily the most efficient. This makes it literally ready to plug and play. Pressing the top button on the keypad for just a moment turns the marker on, greeting the player with either the red and blue (right and leftmost) LEDs lit to indicate that the marker's breech is empty, or the red LED to indicate that it has turned on in semi-automatic mode. Unlike many markers the power button does not need to be held down for multiple seconds – the marker turns on quickly. The power button is identified by a sunburst icon, while the eye control button below it has an eye shaped symbol. The bottommost button bears a triangular arrangement of circles and is the mode select button. Once the marker is on, pressing the eye button can be used to turn the eyes off. While it may not seem so intuitive, pressing and holding the eye button down for two seconds is what turns the marker off. While much easier to press while wearing gloves than the stock Ion power button, the membrane buttons proved resistant against accidental button presses while the marker was handled in a typical manner. Nothing could be worse than accidentally turning off your marker while squeezing the grip tight in the middle of a game, but this was not a problem with the Rampage.
Additionally, a solid glow of the blue and red LEDs indicates that the infrared eye has detected that the marker's breech is empty. Unfortunately, the lighting of the red and blue LEDs overrides the current mode display. During normal operation the marker must be loaded with paint, with eye mode on, in order for the firing mode to be properly displayed. When programming an unloaded marker, pressing the eye mode twice will clear the empty breech alert and show the current firing mode. The mode button cycles through the Rampage board's firing modes. In standard configuration, eight modes are immediately available. The first mode, indicated by the red LED is semi-automatic. This is a traditional semi-auto mode, and fires one shot per trigger pull. The next available mode is a configurable burst that fires anywhere from two to five shots per trigger pull, so long as the trigger is held down. If the trigger is released before the burst is complete, it stops firing. Burst mode is indicated by a steady glow of the yellow LED. By default burst mode is configured to fire three shots. Reactive mode is indicated by the steady lighting of the green LED. Like the burst mode, reactive is configurable. In its default mode it works like a response trigger. Mechanical response triggers were introduced to paintball in the mid 1990s for the PMI-III and Automag, and almost immediately banned by name from tournament use. Response modes made a resurgence with electronic markers to which adding a mode is as simple as adding software, and can be easily turned off where not allowed. Response triggers fire one paintball when the trigger is pulled and another when it is released, effectively doubling the rate of fire beyond semi-automatic. The Rampage's reactive mode operates on this same principle, but goes a step further by being configurable. The number of shots fired when the trigger is pulled and the number of shots fired when it is released can both be individually set. The fourth mode, indicated by the blue LED is full-automatic. When the trigger is pulled and held the marker will fire repeatedly until the trigger is released.
Rampage 2 mode blinks the yellow LED, and it too is user definable. By default it is set to a ramping full-automatic mode. This is a full automatic that increases its rate of fire in three stages, the longer the trigger is held down. The green LED blinks to show that the marker has been placed in PSP3 mode. In this mode, the marker fires as a semi-automatic, until three shots are fired in rapid succession, at which point it switches to three round burst, moving back to semi-auto style shooting after one second of inactivity. This mode is designed to operate within the bounds of PSP's ramping rules. The final mode is NXL ramping, and is indicated by flashing of the blue LED. Here the marker fires as semi-auto until three rapid shots are fired, at which point it switches into full-automatic, as the NXL rules allow. One second of inactivity reverts NXL mode to firing as a semi-automatic. When the Rampage board is unlocked, the modes can be freely changed from the membrane keypad, giving the Ion or SP-8 true select fire operation. When it comes to programming, the Rampage board offers so many options and so much control that learning to fully configure it can be a somewhat daunting task. Lighting of patterns on the four LEDs are used in a logical arrangement that allows programming variable selection to be represented in the Rampage instruction sheet via simple charts. For computer geek types the progression is logical as it represents an increasing binary count going down the list of variables. If one were to envision the Rampage menu as a pyramid, at any given point, the menu button moves down the pyramid to whatever option is currently indicated by the LEDs, while the eye button moves back up a level toward the top of the pyramid and the topmost level which are the setpoint groups. The variables, or setpoints are broken into four categories, one containing setpoints for the firing mode, one for the marker, and one each for the two programmable Rampage firing modes. Each group is represented by one of the four LED colors. Making programming changes starts by pressing and holding the mode (bottommost) button for about two seconds. The Rampage replies by rapidly blinking all four LEDs, and then blinking red. This means that the board is now ready to edit setpoints in the firing mode category. From here, pulling the trigger scrolls through the four available categories – blinking yellow indicates the marker mode setpoint group, blinking green for Rampage 1, and blinking blue for Rampage 2. Pressing the mode button once while the red LED is blinking chooses the firing mode setpoints group, from here the LEDs glow solidly to indicate the particular setpoint to be adjusted. Under the firing mode group, there are 11 setpoints, and pulling the trigger cycles between them. The Rampage instruction sheet is critical here, to know the full list of color codes that correspond to the setpoints. Under the firing mode group, setpoints are available for the following: Cap mode. This turns on or off the board's rate of fire caps. If the cap is turned off, the marker can fire as fast as its timing values allow – with it on, the appropriate rate of fire caps will be used depending on the mode selected. By default the cap is turned on. Max Global Rate Of Fire, or MGRF is the overall rate of fire cap that will be used in non-ramping modes if the cap is turned on and eyes are in use. The default setting for MGRF is 15. MGRF eyes off, is the rate of fire limit that will be used in all non-ramping firing modes when the eyes are off. Its default value is 12. This is designed to prevent the marker from outshooting its hopper if the eyes fail or are manually turned off. Burst mode rounds count how many shots will be fired in burst mode. The default setting is three and they are adjustable from 2 to 5. Reactive pull rounds are adjustable from 1 to 5 and are set at 1 by default. This is the number of shots that will be fired when the trigger is pulled in reactive mode.
The Rampage board includes a tournament lock switch. When the board is locked (more on this later) the tournament mode setting determines what one of the board's 8 firing modes will be used. By default, it is set to mode 7, PSP3. The next setting group has 16 possibilities, each corresponding to a combination of the first four of the Rampage's firing modes. The following setting works the same, but affects the last four of the board's eight firing modes. Between the two firing group setpoints, any combination of the marker's modes can be activated or de-activated – in essence removing them from direct access via the mode button. The Rampage board could be set, for example, to be selectable between only semi-auto and full-auto, or just semi-auto and PSP. These two setpoints determine just what select-fire options the Rampage will deliver. By default, all eight modes are available.
The last setting lets the player select between one of a dozen breakout modes. Breakout functions offer an extra firing mode on the first, second or third trigger pull. Breakout offers a fairly effective way for a player to skirt the rules in a paintball game or tournament, because it would be difficult for a referee to detect. With breakout implemented, the Rampage LEDs still display the main selected mode, but fire more aggressively off the break. The first breakout mode for example fires full-automatic the first time the trigger is pulled and held, but then reverts to the marker's selected mode on all of the following trigger pulls. This allows a full auto burst at the start of a game to maximize firepower off the break. After that burst, the marker operates in its selected mode. If the marker is examined or tested, it will not fire in the breakout mode again unless it is turned off then back on again, something a referee is not likely to do when reviewing a marker (in fact in tournaments like the NPPL Super 7, if a player is ordered to surrender their marker for testing they are prohibited from turning it off or adjusting it.) By default this setpoint keeps breakout disabled. An additional note in the Rampage instruction sheet states “Note – these modes are for practice only. They are illegal to use in a game or tournament.” The breakout feature is not automatically disabled by the tournament lock. The blinking yellow menu of marker setpoints controls the interface between the hardware and software of the marker. These include Trigger debounce, which is a minimum wait time between trigger pulls designed to filter out electronic switch noise from being considered as a trigger pull. This can be set between one and 20 milleseconds long and is set for 10 by default. Trigger buffering is on be default and determines whether or not the software will look for a trigger pull while the marker is going through the shooting cycle. This is a key feature that allows modern electronic markers to shoot as fast as they do in semi-auto mode. Anti mechanical bounce is a setting which only has an effect in semi-auto mode. It is designed to filter out trigger pulls that come as a result of the marker's recoil – this is set to a value of 30 by default, though it may be adjusted up as high as 40. Solenoid dwell sets the amount of time power is applied to the board's solenoid valve. It is adjustable from 1 to 40 millseconds, with a default setting of 30, a little lower than the 34 ms default of a stock Ion or SP-8 board. This setting does not directly correlate to the dwell setting of a stock Ion board in “blinks” because 0 blinks on the stock board is 8 milliseconds, and each blink represents a half-millisecond increase. The Rampage board dwell values are adjustable in full millisecond steps. Dwell modulation controls how the power is pulsed into the solenoid. Rather than delivering a constant full current, the Rampage board uses pulse width modulation to send pulses of power into the electromagnetic coil. This results in less total power consumption per shot, and a longer battery life. The modulation is adjustable in 20 steps, and defaults halfway through its range. A lower value means more power is delivered into the pulse, and a higher value delivers less. The downside of high modulation rates are the potential for less reliable operation, which may not be worth the extra battery life it gains. Either way, this setpoint is an excellent example of the depth of control offered in the Rampage interface. Two more settings adjust an anti bolt stick feature. Sometimes if an Ion is sitting for a while, it's bolt may seize to the point that the first shot fired has low velocity, because the bolt is slower to get moving. The anti-bolt stick combats this by increasing the dwell time on the first shot after a marker has been sitting idle. The Bolt stick dwell value ranges from 1 to 16 milliseconds – this is how much time will be added to the first shot in order to unstick the bolt. The default value is 16, meaning that the anti-bolt stick is normally in effect. The reset time can be set from 1 to 25 seconds, and defaults to 15. Players will need to take this into consideration when adjusting their dwell times and test firing. The breech load delay sets how much time must elapse between the moment the infrared beam in the breech is broken before the marker will fire. This can be used to allow for the fact that the ball is not completely seated when the beam is broken, and can be used to make sure brittle paint is handled more delicately. This delay can be set from 1 to 40 milliseconds and defaults to 20. Bolt return delay sets how long the marker will expect the bolt to take to retract and clear the eyes, and for the valve chamber to recharge for the next shot. It is analogous to the ROFDelay in the stock Ion board, and can be set from 1 to 40 milliseconds in 1 ms steps. Its default is 20 milliseconds, as compared to the stock Ion setting of 50 milliseconds. Eye mode selects how the infra-red eye modes are handled. APE calls their eye checking software routines that disable eye-mode if the eye appears to not be functioning properly, iFault. Ifault will also re-engage the eye system if it appears to start working again. In testing with simulated eye failures, iFault proved effective enough that it simply made sense to leave it always on and never worry about the Rampage's eye modes. The eye mode setting determines how the eyes will be handled on start-up of the marker – on with iFault, on without iFault, eye bypass with iFault, eye bypass demo mode, or completely disabling of the eyes. By default, the Rampage turns on with eyes enabled and without iFault. Autoshutoff sets how long the marker will sit unused before it turns itself off. This can be set from 6 minutes to one hour in 3 minute steps. By default, Autoshutoff is not used. Lightbar mode sets how the light bar is used, whether it plays pre-programmed blink patterns, shows the currently selected firing mode, or is completely off for concealment during night play. By default, the LEDs will show the firing mode. The lightbar pattern selects one of seven flash sequences that can be activated with the lightbar mode setpoint. This feature seems to fit well for the type of people that like to add lots of blinking LED accessories to their cell phones. Each of the setpoints are adjusted with a series of trigger pulls. For example to set the Max Global Rate of Fire, the marker must be on. The mode button is then pressed and held until all four LEDs blink rapidly, indicating programming mode has been entered. The red LED will then flash, indicating the firing mode setpoints group is available (pulling the trigger here would cycle to other groups.) Pressing the mode button once selects the firing mode setpoint group, and the red LED glows to indicate the first setpoint in the group – cap mode. Pulling the trigger once changes the display to the yellow LED glowing, and a look at the programming chart shows that is the indicator for the Max Global Rate of Fire setting. Pressing the mode button will cause the blue LED to blink 15 times, as that had been the default setting for the Max Global Rate of Fire. Pressing the mode button again, readies the board to accept a new value. Twenty pulls of the trigger, with the blue LED flashing each time tells the Rampage board to set a new MGRF of 20 balls per second, and pressing the mode button again will lock in the value. The blue LED will blink out the value to confirm it has been entered. Pressing the eye button exits the setpoint, allowing the trigger to select other setpoints, and pressing the eye button again, exits to the higher menu, where the blinking red LED shows the firing mode setpoints group. One more press of the eye button, and all four LEDs blink to indicate that programming mode has been exited, and the marker is ready to go. The two remaining setpoint groups allow the designing of the board's two custom ramping modes, Rampage 1 and Rampage 2. Each is a three-step ramping mode. Choosing from the marker's four base modes (semi, burst, reactive and auto) the user can define what mode will be used for each of the three ramping levels, as well as how many trigger pulls must happen at what rate to advance from one mode to the next, as well as how long inactivity will result in the mode resetting. An example mode could easily be set up to fire as a semi-auto until the player pulls the trigger three times in a row at 3bps or faster, at which point the marker ramps up to a response mode, and 3 pulls at 6 bps or faster move it into a full-auto mode. The intricacies of how the ramping works are completely user definable. The two rampage modes allow a pair of different custom ramping configurations to be stored and selected as easily as the base or league specific modes. As programmable as the Rampage is, it can be adjusted to the point that multiple settings interact in a way that causes problems, or at least undesireable effects. APE has given its customers an easy parachute with which to bail out of setting problems. When the board is off, holding down the mode button, and then pressing and holding the power button will cause the board to completely reset to the factory defaults. Since the defaults are designed ready to go, this is an “instant rescue” from over-adjustment. To add to the instant restore, the Rampage board also can store or retrieve four individual profiles. These work like four save game positions on a video game. All of the board's settings can be stored in one of the positions, which is useful to either save a configuration that works very well for one marker setup, allowing a fresh configuration to be used for a different bolt, QEV, or hopper combination.
In tournament mode the Rampage board will boot into whichever tournament mode was selected in the firing mode setpoints group. This is PSP3 with a 15 bps cap by default. Additionally the mode button does not function in tournament mode, preventing any programming adjustments from being made. The tournament switch makes it simple to have the board instantly pop into a tournament ready mode, without having to navigate its menu system. [Editor's note: the following paragraph pertains to the sample Rampage board reviewed. We have been notified by APE that their software has seince been revised to eliminate this unintended method of bypassing the tournament lock.] The tournament lock switch can not be accessed without opening the grip, which requires tools. This is designed to meet the requirements of most paintball tournaments and fields. Because this single switch locks the dwell settings (which affect velocity) and mode selection, the Rampage marker can't be used as a select-fire paintgun under most paintball field rules, as the dwell can not be locked without locking the modes as well. It should also be be noted that the reset to defaults function operates even when the board is "locked" meaning that a so-called "locked" board can be reset from semi-automatic to the default ramping mode without using any tools and is not legal at many tournaments or fields. The APE Rampage board installed with little more complexity than the stock board, and offers not only a huge increase in the modes of fire available to the player, and features like the self-monitoring iFault software, but also far more in-depth control of how the marker functions than is available with the stock board. Its simple to install membrane keypad interface offers color coded feedback to all of the control features and can be locked with an internal switch to become field and tournament legal. The membrane buttons delivered positive control and proved to be durable enough to withstand the abuse of typical paintball play.
|
| Copyright © 1992-2019
Corinthian Media Services. WARPIG's webmasters can be reached through our feedback form. All articles and images are copyrighted and may not be redistributed without the written permission of their original creators and Corinthian Media Services. The WARPIG paintball page is a collection of information and pointers to sources from around the internet and other locations. As such, Corinthian Media Services makes no claims to the trustworthiness or reliability of said information. The information contained in, and referenced by WARPIG, should not be used as a substitute for safety information from trained professionals in the paintball industry. |
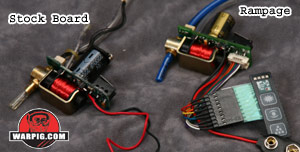 On first glance the Rampage board looks very much like the stock Ion board. It is roughly the same size with a very similar trigger switch, capacitor and solenoid valve in the same locations – though the capacitor is rated to tighter tolerances than stock. This fits with the refreshingly open question and answer that appear on the company's web site:
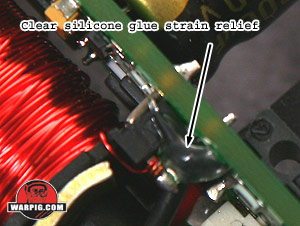 A nice but easily overlooked feature are a couple of blobs of clear silicone glue on the battery wires where they lead into the circuit board. These secure the wires to the base of the solenoid coil, acting as strain reliefs. This provides additional protection from premature breaking of the battery wires from the board.
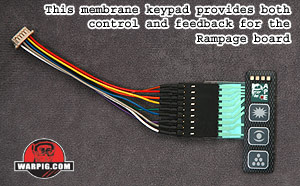 Looking closer at the Rampage board, two components are conspicuously missing compared to the stock board – the power and programming buttons. These are replaced instead with a 10 pin connector at the bottom of the board. The connector is fitted with a wiring harness that connects to the APE membrane keypad.
 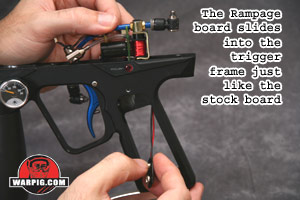 Because it is so physically similar to the stock circuit board, the Rampage board installs the same way. The grip frame is removed from the receiver, the hose fittings disconnected from the grip frame and receiver, then the circuit board slides easily up and out of the grip, and the Rampage replaces it, being connected to the same hoses.
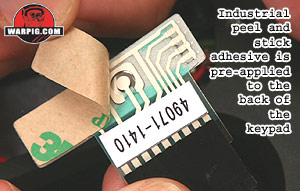 Players looking for a higher-end installation can have an airsmith mill an indentation in their grip frame which will provide the keypad with additional protection, but this extra step is not required.
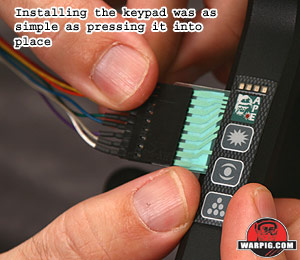 With a single press of the eye button, the Rampage board ignores the infra-red anti-chop eyes in the marker. Eye mode off is indicated by the red and blue (left and rightmost) LEDs blinking.
 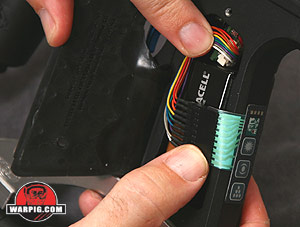 Pressing the mode button again selects Rampage 1 which is indicated by the red LED blinking. This is a user definable ramping mode. By default, it is burst based ramping mode.
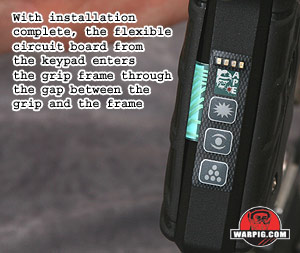 The Reactive Release rounds setpoint has the same adjustment range, but sets the number of balls fired on release of the trigger while in reactive mode.
 The trigger trainer setpoint selects which trigger trainer mode the marker will use. Trigger training is a feature designed to help a player learn to shoot their marker faster. By turning the marker on while holding the trigger down, trigger training is activated, and how it works will depend on this setpoint. The trigger trainer has four operational modes. These allow practice shooting either with or without a very small puff of air, rather than a full shot, and with the player's achieved rate of fire displayed either bar graph style, or in binary, on the grip frame LEDs.
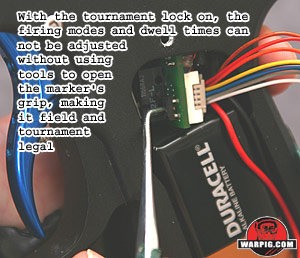 Located on the circuit board next to the trigger switch is the Rampage's tournament lock. This lock is accessible when the marker is assembled, by removing the left side grip. It ships with a thin piece of protective film over it, which can be easily removed with a fingernail. An o-ring pick or similar tool is appropriate for activating the switch. The Rampage board is locked by sliding the switch to the on position (down – noted by a white dot on the switch body.) Tournament mode will take effect the next time the board is turned on.