Tippmann A5 E Trigger
by Bill Mills - Dec 2003
 The
name Tippmann has been synonymous with paintball since the mid 1980s, and
Tippmann Pneumatics has built a solid reputation for both reliability in
their products and excellent customer support. The Tippmann A5, their
current flagship product has drawn attention both for utilizing a built
in force feed hopper system, and for resembling an H&K MP-5 submachinegun.
Often overlooked is the modular construction of the A-5 that makes it one
of the simplest paintguns to maintain or repair. The
name Tippmann has been synonymous with paintball since the mid 1980s, and
Tippmann Pneumatics has built a solid reputation for both reliability in
their products and excellent customer support. The Tippmann A5, their
current flagship product has drawn attention both for utilizing a built
in force feed hopper system, and for resembling an H&K MP-5 submachinegun.
Often overlooked is the modular construction of the A-5 that makes it one
of the simplest paintguns to maintain or repair.
 The
A5 is a blowback powered semi-automatic, and with electronic paintguns
being state of the art, an electronic trigger conversion for the A-5 was
a natural add on for Tippmann to produce. While Tippmann manufactured
a couple of electronic trigger options for the Model 98, both where somewhat
complex to install not so with the A-5 E-grip. The 98s conversions
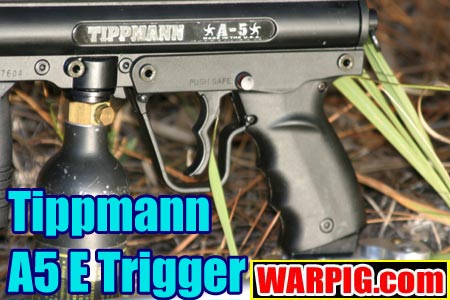
also had associated components mounted below the grip frame. The
E Trigger for the A5, in contrast, has all of its components housed inside
the grip assembly, and from the outside looks no different than a stock
A5. The
A5 is a blowback powered semi-automatic, and with electronic paintguns
being state of the art, an electronic trigger conversion for the A-5 was
a natural add on for Tippmann to produce. While Tippmann manufactured
a couple of electronic trigger options for the Model 98, both where somewhat
complex to install not so with the A-5 E-grip. The 98s conversions
also had associated components mounted below the grip frame. The
E Trigger for the A5, in contrast, has all of its components housed inside
the grip assembly, and from the outside looks no different than a stock
A5.
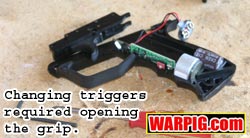
 Installing
the E Trigger is as simple as swapping the E Trigger grip frame for the
stock frame. Between the two grip assemblies, many of the parts,
including the trigger, sear and most of the trigger group are identical
to the original. Installing
the E Trigger is as simple as swapping the E Trigger grip frame for the
stock frame. Between the two grip assemblies, many of the parts,
including the trigger, sear and most of the trigger group are identical
to the original.
Not only does the switch to an electronic
trigger mean a lighter, more precise trigger pull, but electronic control
makes the addition of various modes of fire such as 3 shot burst, full
auto and turbo mode practical.
 Functionally,
the trigger frame is rather simple. The standard A5 trigger is used,
but the small folded metal latch on its top rear edge used to trip the
sear is removed. When the trigger is pulled it releases a small lever
microswitch. This is opposite of most electronic paintguns which
push a switch when the trigger is pulled, rather than release it.
The trigger switch is wired to an electronic control board, which features
an onboard, preprogrammed microprocessor. The board is powered by
a 9volt battery, which is also housed in the grip. A capacitor is
connected to the board by a pair of wires. The capacitor temporarily
holds the charges used to pulse the grips solenoid, and placing it on
wires rather than soldering it directly to the circuit board allows it
to be placed low in the grip frame, which is an effective use of available
space. Functionally,
the trigger frame is rather simple. The standard A5 trigger is used,
but the small folded metal latch on its top rear edge used to trip the
sear is removed. When the trigger is pulled it releases a small lever
microswitch. This is opposite of most electronic paintguns which
push a switch when the trigger is pulled, rather than release it.
The trigger switch is wired to an electronic control board, which features
an onboard, preprogrammed microprocessor. The board is powered by
a 9volt battery, which is also housed in the grip. A capacitor is
connected to the board by a pair of wires. The capacitor temporarily
holds the charges used to pulse the grips solenoid, and placing it on
wires rather than soldering it directly to the circuit board allows it
to be placed low in the grip frame, which is an effective use of available
space.
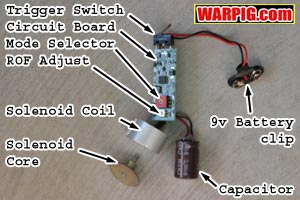 Also
wired to the control board is the solenoid, a coil of wire with an iron
core. When the control circuit dumps electricity into the coil, it
draws the iron core upward with electromagnetic force. The core presses
on a stainless steel link rod, which Tippmann calls the armature pin.
The armature pin is what caries the movement from the solenoid at the bottom
of the grip up to the front of the sear. When the armature pin presses
up on the front of the sear, the back of the sear is lowered, releasing
the A5s hammer to strike the valve and fire the paintgun. Also
wired to the control board is the solenoid, a coil of wire with an iron
core. When the control circuit dumps electricity into the coil, it
draws the iron core upward with electromagnetic force. The core presses
on a stainless steel link rod, which Tippmann calls the armature pin.
The armature pin is what caries the movement from the solenoid at the bottom
of the grip up to the front of the sear. When the armature pin presses
up on the front of the sear, the back of the sear is lowered, releasing
the A5s hammer to strike the valve and fire the paintgun.
Installing the A-5 E-Trigger is surprisingly
easy, but there are still a couple of catches to look out for. First,
is the most complicated part installing or changing the battery.
While a fairly simple procedure changing the battery on an A-5 is more
complicated than most paintguns a price to pay for the electronics being
so well integrated and concealed into the paintgun.
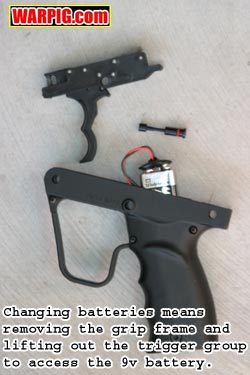 Starting
with the grip frame fresh out of the box, the safety is slide out of the
side of the grip frame, which allows the trigger group and sear to lift
out of the top in a single move. With this done, the 9 volt battery
clip is clearly visible in the center of the grip frame. A word of
caution that is missing from the double sided instruction sheet the solenoid
may fire when the battery is first connected. This can send the armature
pin flying out of the grip frame. A fingertip resting on top of the
armature pin remedies this problem, and if it does fall out, it is a simple
matter to drop it back into place. Starting
with the grip frame fresh out of the box, the safety is slide out of the
side of the grip frame, which allows the trigger group and sear to lift
out of the top in a single move. With this done, the 9 volt battery
clip is clearly visible in the center of the grip frame. A word of
caution that is missing from the double sided instruction sheet the solenoid
may fire when the battery is first connected. This can send the armature
pin flying out of the grip frame. A fingertip resting on top of the
armature pin remedies this problem, and if it does fall out, it is a simple
matter to drop it back into place.
With the battery connected it is slid
down into the center of the grip frame, and the battery wires are tucked
on top of it. The trigger group is carefully set back in place, and
the safety returned. Unlike some paintguns where the safety is commonly
removed as part of a trigger job the safety must be installed on the
A-5, it is an integral, piece which secures the trigger group in place.
At this point, the grip is ready to
mount on the A-5. That is simply a matter of removing the A-5s two
grip frame pins, and pulling off the grip. If a bottom-line is attached
to the stock grip it is removed at this point in the process. The
E Trigger slides onto the A5, the two lock pins are put in place, and the
A5 was upgraded to an electronic trigger system that fast and easy.
That is the beauty of Tippmanns modular construction.
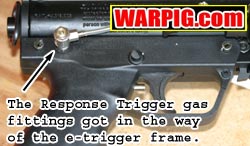 For
A-5s which have a Response Trigger installed, this is where a small problem
arises. First, the E-Trigger will not work also as a response trigger
the electronics get in the way of where the response ram needs to be.
Thats not a big issue, the user just needs to chose between an E-Trigger
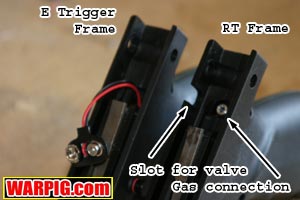
or a Response Trigger. The real issue is that the gas fitting on
the rear of the A-5 receiver which is used to route gas down into the grip
frame gets in the way of the E-Trigger frame. There are two solutions
to this. One is to cut a couple of slots in the side of the E-Trigger
frame, which is what Tippmann does to the Response frames at the factory,
and the other is to remove the gas fitting from the receiver. For
A-5s which have a Response Trigger installed, this is where a small problem
arises. First, the E-Trigger will not work also as a response trigger
the electronics get in the way of where the response ram needs to be.
Thats not a big issue, the user just needs to chose between an E-Trigger
or a Response Trigger. The real issue is that the gas fitting on
the rear of the A-5 receiver which is used to route gas down into the grip
frame gets in the way of the E-Trigger frame. There are two solutions
to this. One is to cut a couple of slots in the side of the E-Trigger
frame, which is what Tippmann does to the Response frames at the factory,
and the other is to remove the gas fitting from the receiver.
For the purpose of review, a slot was
cut in the E-Trigger frame. While removing the air fitting from the
receiver is not a tough task for an airsmith, modifying the grip frame
instead means that it will take only seconds to swap from the 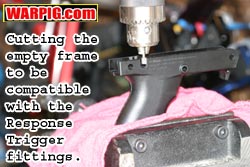 E-Trigger
frame to the Response Trigger frame, keeping the system completely modular.
The location for the side slot is marked with an indent on the inside of
the trigger frame, and cutting it out takes only a couple of minutes with
a rotary tool, such as a Dremel. Another slot had to be cut inside
the frame to make room for the internal gas fitting. On the frame
used for review all electronics were removed from the grip frame, and the
cuts were milled, to allow precise control and clean workmanship. E-Trigger
frame to the Response Trigger frame, keeping the system completely modular.
The location for the side slot is marked with an indent on the inside of
the trigger frame, and cutting it out takes only a couple of minutes with
a rotary tool, such as a Dremel. Another slot had to be cut inside
the frame to make room for the internal gas fitting. On the frame
used for review all electronics were removed from the grip frame, and the
cuts were milled, to allow precise control and clean workmanship.
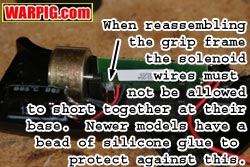 An
additional note: For airsmiths removing and reinstalling the grip's
electronics. The wire leads for the solenoid are not insulated for
the first one or two millimeters coming out of the circuit board.
It is important to make sure they do not touch each other and short circuit.
This can be a problem with early model E Triggers that are not reassembled
carefully. On later model E Triggers Tippmann added a drop of silicone
glue to insulate the wire leads and prevent them from shorting. An
additional note: For airsmiths removing and reinstalling the grip's
electronics. The wire leads for the solenoid are not insulated for
the first one or two millimeters coming out of the circuit board.
It is important to make sure they do not touch each other and short circuit.
This can be a problem with early model E Triggers that are not reassembled
carefully. On later model E Triggers Tippmann added a drop of silicone
glue to insulate the wire leads and prevent them from shorting.
With the slot cuts, the grip frame slid
right onto the A5 RT as it would with a standard A5, and the RT adjuster
valve was closed off, to prevent blowing a blast of gas down into the grip
frame when each shot is fired. With the bottom-line (if used) mounted
on the E-Trigger frame, the A-5 is ready to go with a new, electronic trigger.
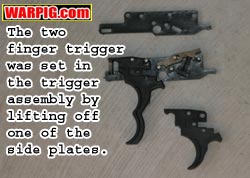 For
review the E-Trigger setup was not kept completely stock. Instead
a Psychoballistics two finger trigger was added. Because of the parts
compatibility, the two finger trigger parts for the standard A-5 work on
the E Trigger frame as well. The trigger group lifts out and comes apart
to swap triggers. A slight modification needs to be done to the 2
finger trigger the metal clip on the back, used to trip the sear is popped
off, since the sear will be tripped by the armature pin. For
review the E-Trigger setup was not kept completely stock. Instead
a Psychoballistics two finger trigger was added. Because of the parts
compatibility, the two finger trigger parts for the standard A-5 work on
the E Trigger frame as well. The trigger group lifts out and comes apart
to swap triggers. A slight modification needs to be done to the 2
finger trigger the metal clip on the back, used to trip the sear is popped
off, since the sear will be tripped by the armature pin. 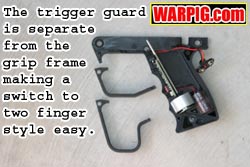 The
trigger guard must also be replaced to make room for the new trigger.
A larger trigger guard is included with the Psycho Ballistics trigger,
and it drops place while the grip is in half. Finally the whole thing
is reassembled and mounted on the A5. The
trigger guard must also be replaced to make room for the new trigger.
A larger trigger guard is included with the Psycho Ballistics trigger,
and it drops place while the grip is in half. Finally the whole thing
is reassembled and mounted on the A5.
Using the E-Trigger is easy it works
just like the standard trigger with the safety used to lock it out when
not in use. It ships from the factory in semi-automatic mode pull
the trigger and it shoots but the trigger is noticeably more crisp and
light than the mechanical trigger.
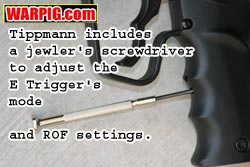 Included
with the E-Trigger frame is a small jewlers scredriver which is used to
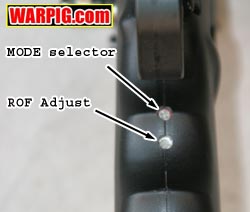
adjust the frames mode and rate of fire. In the front of the grip
are two small holes. The top hole gives access to a rotary switch
for mode selection, and the lower switch provides access to the variable
resistor used to set the rate of fire. Included
with the E-Trigger frame is a small jewlers scredriver which is used to
adjust the frames mode and rate of fire. In the front of the grip
are two small holes. The top hole gives access to a rotary switch
for mode selection, and the lower switch provides access to the variable
resistor used to set the rate of fire.
 The
rotary switch has off positions alternating between the modes. It
can be a little tricky, in that there is no start or stop, it can be turned
continuously in any direction, so it requires testing the particular mode,
rather than counting the number of clicks from a starting position, in
order to set to a particular mode. Looking at the rotary switch from
the front, an arrow, like the hand on a clock points to the switch position.
When it is pointing up toward the trigger it in position 0. The
rotary switch has off positions alternating between the modes. It
can be a little tricky, in that there is no start or stop, it can be turned
continuously in any direction, so it requires testing the particular mode,
rather than counting the number of clicks from a starting position, in
order to set to a particular mode. Looking at the rotary switch from
the front, an arrow, like the hand on a clock points to the switch position.
When it is pointing up toward the trigger it in position 0.
3 round burst fires a burst of 3 shots,
or less, if the trigger is released before the burst is complete.
Full automatic fires repeatedly as long as the trigger is held down.
Auto Response mode fires a ball once when the trigger is pulled, and then
again when the trigger is released, in essence doubling the users rate
of fire. If the trigger is held down for an extended period of time,
the E-Trigger will not shoot when it is released. The final mode
is called Turbo mode, though it is not the same as the original Shocker
Turbo Mode. Instead the Tippmann Turbo mode acts as a normal semi-auto
until the trigger is pulled at 4 shots per second or faster at which point
it switches into Auto Response mode.

It is important to note that the only
one of these modes allowed at most paintball fields, and under most paintball
insurance programs is semi-automatic mode. Because the modes can
only be changed with the use of a tool, the E-Trigger is legal in semi-auto
mode at most fields and tournaments. Once set in semi-auto mode it
is locked there since a tool is required to change it. In addition
to setting the rate of fire for the automatic modes, the rate of fire adjustment
also sets a limit for semi-auto mode. From the factory this adjustment
was near the middle of its range, capping fire at around 6 shots per second.
Turning it down to the extreme of its range set the rate of fire around
4 shots per second. Dialing it all the way up set it up to its maximum
of 11 shots per second.
 On
the field, the E-Trigger made the A-5 easier to shoot fast, and the light
trigger pull made it easier to shoot multiple shots without the grouping
being thrown off by tugging on a heavy trigger. The trigger it had
some extra room in its pull, especially in the rear end of the stroke after
the switch had been actuated. A custom trigger job to improve and
shorten the overall trigger stroke with the addition of a pair of set screws
would be a relatively simple task for an airsmith. Even with the
extra space in the pull, the author was able to achieve the frames maximum
11 shots per second in semi-auto mode without difficulty, a marked improvement
over the stock, and even Response Trigger A5 configurations. On
the field, the E-Trigger made the A-5 easier to shoot fast, and the light
trigger pull made it easier to shoot multiple shots without the grouping
being thrown off by tugging on a heavy trigger. The trigger it had
some extra room in its pull, especially in the rear end of the stroke after
the switch had been actuated. A custom trigger job to improve and
shorten the overall trigger stroke with the addition of a pair of set screws
would be a relatively simple task for an airsmith. Even with the
extra space in the pull, the author was able to achieve the frames maximum
11 shots per second in semi-auto mode without difficulty, a marked improvement
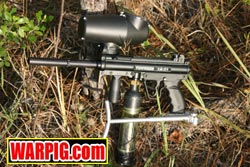
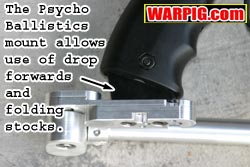
over the stock, and even Response Trigger A5 configurations. 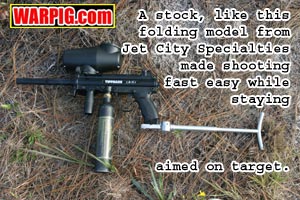 The
use of a folding stock from Jet City Specialties made shooting fast while
staying on target a simple task. The
use of a folding stock from Jet City Specialties made shooting fast while
staying on target a simple task.
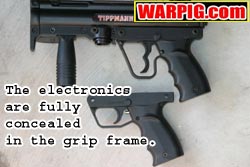
Equally impressive to the E-Triggers
performance was its look completely concealed inside the grip frame,
an E-Trigger equipped A-5 looks no different from a standard retaining
the looks and durability that are the reason many players choose the A-5.
|