
WDP's AIR
by Bill Mills
December 2001
In 1999, when WDP unveiled the LCD Angel,
they also announced AIR, their LCD equipped compressed air system.
While the LCD shipped, AIR was in the factory being refined and tuned until
it was ready for release more than a year later. Today, AIR stands
as the most advanced compressed air system on the market.
WDP has built a reputation as a purveyor
of high end products with all the bells and whistles, and the AIR is no
exception. To start with, it is a 4,500 psi adjustable compressed
air system, giving it more shots per fill at any given tank size than 3,000
psi systems.
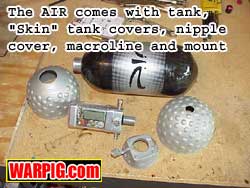 Included
standard with the AIR is a set of Skin Lok-Sok tank covers. These
molded rubber like covers protect the front and back ends of the tank from
abrasion (all it takes is a scratch through the fiber wrap of a compressed
air tank to condemn it from service) and keep paint and dirt out from around
the tank neck. Included with the Lok-Sok is a nipple cover on a leash.
Dust piled into a fill nipple while playing gets blown into an air system
during fills, and is one of the most common problems of regulator problems
and complaints of "dirty air." Keeping the fill nipple covered should
be a priority, which is why WDP ships a nipple cover - on a short leash
so it won't get lost - with the AIR. Included
standard with the AIR is a set of Skin Lok-Sok tank covers. These
molded rubber like covers protect the front and back ends of the tank from
abrasion (all it takes is a scratch through the fiber wrap of a compressed
air tank to condemn it from service) and keep paint and dirt out from around
the tank neck. Included with the Lok-Sok is a nipple cover on a leash.
Dust piled into a fill nipple while playing gets blown into an air system
during fills, and is one of the most common problems of regulator problems
and complaints of "dirty air." Keeping the fill nipple covered should
be a priority, which is why WDP ships a nipple cover - on a short leash
so it won't get lost - with the AIR.
Also included with the AIR is it's bottom-line
mount. This bracket fits to the bottom of a paintgun's grip frame
with standard inline screw spacing and locks onto the AIR with a single
screw. This is unfortunately a take it or leave it set-up as the
AIR doesn't use a standard dovetail mount. Because of the screw placement,
it can also be very tricky to fit it on a two screw drop forward.
It is likely only a matter of time until an aftermarket manufacturer produces
an adapter which will make the AIR compatible with many more drop forward
options.
That's not all that is in the box with
the AIR. It also ships with a macroline hose and fitting, ready to
plug right in to an Angel.
 What
really sets the AIR aside from other HPA systems is not just the extra
accessories, but its onboard computer. That's right, computer.
Instead of analog gauges, the AIR has a pair of electronic pressure transducers
which feed analog data to a microprocessor and LCD display. This
has a two fold advantage. First digital gauges can provide readings
that are much more precise and accurate than compact analog gauges (analog
gauges can be had which are very accurate - but they are quite bulky and
oil filled). Secondly, the onboard computer can calculate information
more complex than simple gas pressures. What
really sets the AIR aside from other HPA systems is not just the extra
accessories, but its onboard computer. That's right, computer.
Instead of analog gauges, the AIR has a pair of electronic pressure transducers
which feed analog data to a microprocessor and LCD display. This
has a two fold advantage. First digital gauges can provide readings
that are much more precise and accurate than compact analog gauges (analog
gauges can be had which are very accurate - but they are quite bulky and
oil filled). Secondly, the onboard computer can calculate information
more complex than simple gas pressures.
It is important to note, that all of
the electronics in the AIR only perform tasks related to providing the
player with information, they do not control air pressure. The AIR
operates as a standard regulated compressed air system, and will keep running,
even if the electronics or batteries fail.
Putting the AIR to use is quite straigforward.
The mount is attached to the paintgun, the AIR locked into the mount with
its screw, and the macroline cut to length, ends cleaned and installed.
That's it.
As WDP is a British company, installation,
set up and operation of the AIR does require the use of metric hex wrenches.
It can be tempting to fudge and use the nearest size inch hex wrenches
but this is a bad idea that can lead to stripped out sockets.
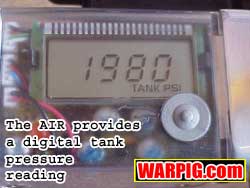
At rest, the AIR LCD display is blank.
With a press of the single control button, it jumps to life. A red
LED blinks to indicate that the button was pressed, and the LCD will read
"DATA," then begin displaying tank data. It takes a moment for the
onboard computer to sample data from the transducers, calculate it, resample
and error check it, before displaying a pressure value - about 3 seconds.
Once it does, it will give the tank pressure in PSI. Pressing the
button while the display is on cycles it through the two other display
modes - the output pressure and number of shots remaining in the tank.
That's right - the number of shots remaining - this is where the computer
technology shows its advantage. The AIR is able to measure the amount
of gas used with each shot (this works for any paintgun, not just an Angel)
and compare that to the tank pressure to calculate an estimate of how many
shots are left in the tank.
If there is one thing that is missing
from the AIR, it is an on/off valve. This means that for the AIR
to be taken off of a paintgun while charged, the output adjustment is lost
when it is turned to zero. When questioned about this, WDP's John
Rice stated that he had considered adding an on/off but the designs which
met WDP's standards for ease of operation and quality would have added
$100 to $150 to the price of the AIR. Already priced as one of the
most expensive compressed air systems on the market, the choice to omit
this feature is understandable. An attractive "upgrade" for the AIR
is to replace the macroline with braided hose and a pro connect quick disconnect
and valve. This provides an easy way to disconnect the AIR without
changing its output settings.
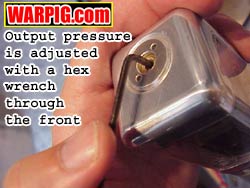 Setting
the output however is rather painless. A hex wrench in the front
end of the regulator dials it up. Turning the adjustment screw inward
increases the output pressure, while turning it outward decreases the output
(a shot must be fired after each downturn to see what the output pressure
is). It is important to note that the AIR will not give a pressure
reading when the pressure is below 100 psi, it will only read "LO-P." Setting
the output however is rather painless. A hex wrench in the front
end of the regulator dials it up. Turning the adjustment screw inward
increases the output pressure, while turning it outward decreases the output
(a shot must be fired after each downturn to see what the output pressure
is). It is important to note that the AIR will not give a pressure
reading when the pressure is below 100 psi, it will only read "LO-P."
The Low Pressure reading avoids tech
support confusion for WDP. If the AIR gave an absolute, accurate
pressure reading, when the tanks was empty changes in atmospheric pressure
would show up - leading to customer complaints if it read 5 psi for example
when the tank was empty. Simply giving a reading of LO-P avoids this
confusion.
Once the output pressure has been adjusted
for the paintgun on which the AIR will be used, and the velocity has been
set, the shot counter can be calibrated. It is important to understand
that the shot counter works by measuring the pressure drop in the tank
with each shot. This means that any change to the paintgun set-up
- barrel, velocity, paint, etc. that will affect air consumption, will
throw off the shot count and require recalibration.
Calibrating the shot counter is pretty
simple. Pressing the mode button cycles the display to the Shots
Left display. Holding the button down for two seconds changes the
display to read "CALC Shots Left." For up to 30 seconds the AIR will
be in shot count calibration mode. It will switch out of this mode
when the time expires, or there have been enough shots fired to calibrate.
At this point the paintgun must be fired several times. The AIR will
then calculate an estimate of shots remaining, or if not enough shots were
fired within the 30 second period, display a series of dashes to indicate
that it is not calibrated.
During game use, the shot count will
show its estimate each time Shots Left is selected in the display.
The number will drop as shots are fired. It will not drop one shot
at a time, as it is not an exact count, but rather an estimate that is
expected to be +/- 10% accurate. The counter updates in blocks of
5 to 7 shots, though it can be as many as 25 according to WDP's documentation.
With all of the AIR's features, one
can tend to forget about what is most important - delivering consistent
air pressure. For field testing, the AIR was mounted on an AirTech
E-Matrix. With the 1.1 litre tank and the stock bottom line mount,
the AIR balanced well, with the regulator body lining up beneath the grip
frame. The lack of protruding gauges leaves the rectangular body
with clean, elegant lines. The LCD display is on the left hand side,
definitely biased toward right handed users. The AIR had no problems
keeping up with the E-Matrix, and the 4500 psi capacity came in handy with
the Matrix's heavy gas consumption.
In practical use the digital gauge system
has both benefits and drawbacks. It is much easier to read the clear
bold numbers than see where the tiny needle on a micro gauge is pointing.
The delay while waiting for the gauge to calculate a number display can
be troublesome until the player gets used to it. You can't just glance
at the AIR and tell how full it is. Using the remaining shot count
estimator becomes a practiced move of tapping the button twice, waiting
a moment, then glancing down at the LCD display.
 NOTE:
Disassembly/Assembly information is provided to give the reader a better
understanding of the function of this regulator. Air system service
should only be performed by a qualified airsmith. NOTE:
Disassembly/Assembly information is provided to give the reader a better
understanding of the function of this regulator. Air system service
should only be performed by a qualified airsmith.
When compared to other compressed air
systems, the AIR is definitely complex, and thorough repair and maintenance
is more involved. While the addition of electronics can make the
task more intimidating, the AIR is laid out in a modular, straightforward
fashion making it practical to service.
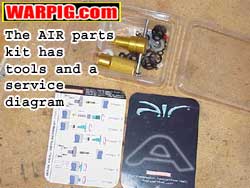 Working
with the AIR requires more than basic tools. Two specialty valve
tools (one of which is also used on an Angel) are required. They
are both included in the AIR maintenance kit which also has spare seals.
Additionally, WDP only recommends WDP Love Juice grease for lubricating
the AIR. In fact it is required to maintain the AIR's warranty.
When dealing with high pressure air, and thus higher partial pressures
of oxygen, the flammability of any materials involved must be considered.
According to WDP's John Rice, Working
with the AIR requires more than basic tools. Two specialty valve
tools (one of which is also used on an Angel) are required. They
are both included in the AIR maintenance kit which also has spare seals.
Additionally, WDP only recommends WDP Love Juice grease for lubricating
the AIR. In fact it is required to maintain the AIR's warranty.
When dealing with high pressure air, and thus higher partial pressures
of oxygen, the flammability of any materials involved must be considered.
According to WDP's John Rice,  Love Juice, which is a relabled industrial pneumatics lubricant is approved
by their insurance carrier. The AIR manual states that only Rocol
Sapphire Endure is an acceptable lubricant, though one will quickly find
that the smaller size Love Juice bottles are much more cost effective than
a full tube of Rocol Sapphire Endure.
Love Juice, which is a relabled industrial pneumatics lubricant is approved
by their insurance carrier. The AIR manual states that only Rocol
Sapphire Endure is an acceptable lubricant, though one will quickly find
that the smaller size Love Juice bottles are much more cost effective than
a full tube of Rocol Sapphire Endure.
While most manufacturers lock their
regulators onto tanks with thread sealing adhesives, WDP recommends using
no adhesives or sealants on the regulator or tank threads. An o-ring
seals the regulator to the tank. This means that the tank, when completely
empty, can be removed from the regulator with only hand pressure.
 When
reinstalling the regulator to the tank, WDP recommends first inspecting
and cleaning the tank and regulator threads and then placing a thin strip
of Love Juice on the regulator threads. It is critical to not cross
thread the regulator. Some of the most common damage to tanks which
causes them to fail DOT recertification is thread damage. It can
be avoided by the use of caution and a light touch when screwing the regulator
back into the tank. When
reinstalling the regulator to the tank, WDP recommends first inspecting
and cleaning the tank and regulator threads and then placing a thin strip
of Love Juice on the regulator threads. It is critical to not cross
thread the regulator. Some of the most common damage to tanks which
causes them to fail DOT recertification is thread damage. It can
be avoided by the use of caution and a light touch when screwing the regulator
back into the tank.
Inspecting the main seal, piston and
spring pack does not require removing the AIR from the bottle, but it is
a good idea to have the two separated during work on the AIR, to avoid
the possibility of trapped air pressure. Leaks out the front indicate
damage or debris to the piston or adjuster o-rings, while a slow rise in
output pressure indicates damage or debris on the main seal. The
main seal's o-ring wont leak, it doesn't hold back air pressure, it simply
acts as a bumper for the main seal. Either problem is dealt with
from the front of the AIR.
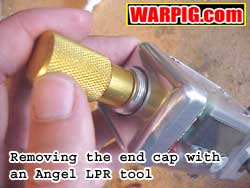 The
two pronged regulator tool (which doubles as an Angel LPR tool) is used
to remove the regulator cap from over and around the adjuster cap.
Inside, a stack of 12 spring washers puts pressure on the main piston.
It is important when inspecting, or reinstalling the spring washers that
they go back in the proper order. They are stacked in pairs, two
parallel to each other, two parallel facing the opposite direction, etc.
The AIR manual does an excellent job of illustrating component placement
both with drawn images and 3 dimensional exploded views. The
two pronged regulator tool (which doubles as an Angel LPR tool) is used
to remove the regulator cap from over and around the adjuster cap.
Inside, a stack of 12 spring washers puts pressure on the main piston.
It is important when inspecting, or reinstalling the spring washers that
they go back in the proper order. They are stacked in pairs, two
parallel to each other, two parallel facing the opposite direction, etc.
The AIR manual does an excellent job of illustrating component placement
both with drawn images and 3 dimensional exploded views.
Inline with the spring pack is the main
piston and inside of that, the adjuster rod which is used to set the AIR's
output pressure. Both have o-ring seals which should be inspected,
and like all of the other o-ring seals lightly with Love Juice.
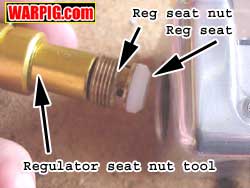 Deeper
inside the AIR is the regulator seat nut, which WDP calls the seal retainer.
The seal retainer holds the main seal in place and must be removed with
a special T handled main seal tool (found in the AIR service kit).
The main seal performs the function of a part typically called a regulator
seat. It is unscrewed and slides easily out of the AIR body.
Beneath it is the main seal, a hard white nylon-like seal, and beneath
the main seal is its o-ring. In theory this seal can be taken out
from the front of the regulator body. It fits very snugly into the
body, and in practice can be more easily removed by pressing it out with
a pick from the opposite side of the body when the rest of the internals
are also removed. Deeper
inside the AIR is the regulator seat nut, which WDP calls the seal retainer.
The seal retainer holds the main seal in place and must be removed with
a special T handled main seal tool (found in the AIR service kit).
The main seal performs the function of a part typically called a regulator
seat. It is unscrewed and slides easily out of the AIR body.
Beneath it is the main seal, a hard white nylon-like seal, and beneath
the main seal is its o-ring. In theory this seal can be taken out
from the front of the regulator body. It fits very snugly into the
body, and in practice can be more easily removed by pressing it out with
a pick from the opposite side of the body when the rest of the internals
are also removed.
Regardless of how it is removed, the
main seal is not meant to be re-used. Once it is taken out, it is
discarded and replaced with a new main seal which will deform to fit the
regulator body and the inner surfaces of the seal retainer.
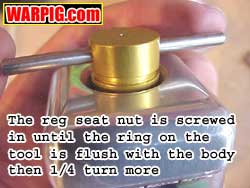 When
installing the new main seal, the chamfered side (the one with the angled
edges) faces inward to the AIR body. The main seal snaps in place
on its seal retainer, and both are screwed into the AIR body over the main
seal o-ring with the main seal tool. The tool is calibrated with
a groove to show how far to tighten the main seal. It should be screwed
in until the groove is flush with the AIR body, and then turned an additional
quarter turn. This proves to be a far more convenient method than
using a torque wrench. When
installing the new main seal, the chamfered side (the one with the angled
edges) faces inward to the AIR body. The main seal snaps in place
on its seal retainer, and both are screwed into the AIR body over the main
seal o-ring with the main seal tool. The tool is calibrated with
a groove to show how far to tighten the main seal. It should be screwed
in until the groove is flush with the AIR body, and then turned an additional
quarter turn. This proves to be a far more convenient method than
using a torque wrench.
 The
body of the AIR has two parts. There is the body itself, and the
flange. The AIR flange comes off like a narrow slice from the back
of the AIR body. It has the threaded neck which fits into the compressed
air bottle, and serves as a platform to hold the AIR body proper, as well
as a manifold for several gas paths. The
body of the AIR has two parts. There is the body itself, and the
flange. The AIR flange comes off like a narrow slice from the back
of the AIR body. It has the threaded neck which fits into the compressed
air bottle, and serves as a platform to hold the AIR body proper, as well
as a manifold for several gas paths.
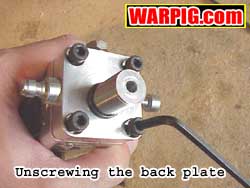
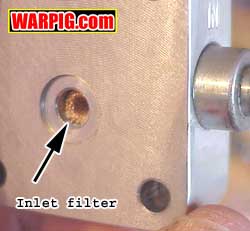 Four
socket head screws hold the flange onto the body and are easily removed.
In addition to holding the AIR body in place, the flange has ports for
the burst disk and the fill nipple, as well as an internal sintered metallic
bead air filter. The filter cleans the air that is going into the
tank, keeping debris out of both the tank, and the regulator, but it is
no excuse for not using the fill nipple cover and keeping air hoses as
clean as possible. If the filter is clogged and needs replacement
it can be dislodged from the flange by tapping it out with a wooden dowel. Four
socket head screws hold the flange onto the body and are easily removed.
In addition to holding the AIR body in place, the flange has ports for
the burst disk and the fill nipple, as well as an internal sintered metallic
bead air filter. The filter cleans the air that is going into the
tank, keeping debris out of both the tank, and the regulator, but it is
no excuse for not using the fill nipple cover and keeping air hoses as
clean as possible. If the filter is clogged and needs replacement
it can be dislodged from the flange by tapping it out with a wooden dowel.
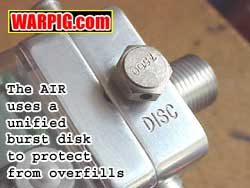 The
burst disk assembly protects the regulator and tank from overfilling.
WDP uses a 7,500 psi unified burst disk and nut assembly, and that is the
ONLY acceptable replacement. Unified disks have their copper burst
element crimped to their nut, rather than as two separate pieces which
could be dangerously mismatched. The burst disk assembly should be
tightened into the flange with no more than 55lbf/in of torque. The
burst disk assembly protects the regulator and tank from overfilling.
WDP uses a 7,500 psi unified burst disk and nut assembly, and that is the
ONLY acceptable replacement. Unified disks have their copper burst
element crimped to their nut, rather than as two separate pieces which
could be dangerously mismatched. The burst disk assembly should be
tightened into the flange with no more than 55lbf/in of torque.
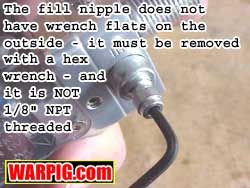 It
is important to note that the fill nipple on the AIR, while of standard
shape, does not have 1/8" NPT threads like most fill nipples used in paintball.
It's easy to tell it apart from standard fill nipples, as it has no wrench
flats on the outside. Instead it must be removed with a hex wrench
in its center. The fill nipple seal is accessible for inspection
and replacement. If the nipple itself is damaged, it can only be
replaced with a WDP fill nipple. A standard threaded nipple would
strip out the threading on the flange. It
is important to note that the fill nipple on the AIR, while of standard
shape, does not have 1/8" NPT threads like most fill nipples used in paintball.
It's easy to tell it apart from standard fill nipples, as it has no wrench
flats on the outside. Instead it must be removed with a hex wrench
in its center. The fill nipple seal is accessible for inspection
and replacement. If the nipple itself is damaged, it can only be
replaced with a WDP fill nipple. A standard threaded nipple would
strip out the threading on the flange.
 There
are two small o-rings that fit into recesses in the back of the AIR body,
and butt up against the flange. They do not route air back to the
flange, but simply seal the ends of the holes that were drilled to create
gas passages deeper inside the body. For earlier models of the AIR
that have a problem with a slow pressure loss over time (tank empties overnight),
this is likely the area of the cause. WDP has updated the design
and has a fix of putting a small ball bearing in the center of each of
the two o-rings. It an easy install, but the first time putting the
AIR body and flange back together will be a bit tight. After that,
a pair of dents will be visible in the front interior surface of the flange,
a sure sign that the update ball bearings have been installed. There
are two small o-rings that fit into recesses in the back of the AIR body,
and butt up against the flange. They do not route air back to the
flange, but simply seal the ends of the holes that were drilled to create
gas passages deeper inside the body. For earlier models of the AIR
that have a problem with a slow pressure loss over time (tank empties overnight),
this is likely the area of the cause. WDP has updated the design
and has a fix of putting a small ball bearing in the center of each of
the two o-rings. It an easy install, but the first time putting the
AIR body and flange back together will be a bit tight. After that,
a pair of dents will be visible in the front interior surface of the flange,
a sure sign that the update ball bearings have been installed.
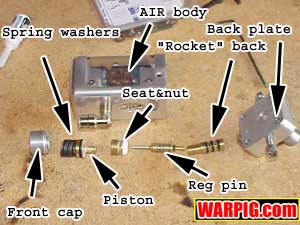 Through
the core of the AIR body runs a brass multipiece regulator pin. WDP
calls this assembly the Rocket, due to its shape. With the flange
removed from the body, the rocket removes easily from the back. The
rocket disassembles easily, and all of its o-rings are easily inspected.
These seals are typically the culprit when the output pressure rises quickly
to the point that it leaks out of the safety vent valve. It is important
to differentiate the o-rings in the spare parts kit. There are some
o-rings that are close in size to the three that fit on the outside of
the rocket, but are smaller. If these are accidentally put on the
rocket they will leak. The rocket's outer o-rings should bump slightly
above the rocket's outer surface. Through
the core of the AIR body runs a brass multipiece regulator pin. WDP
calls this assembly the Rocket, due to its shape. With the flange
removed from the body, the rocket removes easily from the back. The
rocket disassembles easily, and all of its o-rings are easily inspected.
These seals are typically the culprit when the output pressure rises quickly
to the point that it leaks out of the safety vent valve. It is important
to differentiate the o-rings in the spare parts kit. There are some
o-rings that are close in size to the three that fit on the outside of
the rocket, but are smaller. If these are accidentally put on the
rocket they will leak. The rocket's outer o-rings should bump slightly
above the rocket's outer surface.
When reinstalling the rocket into the
body, it should of course be lightly greased with Love Juice, and care
should be taken to damage its seals on the edge of the body, as they will
have a snug fit going back in.
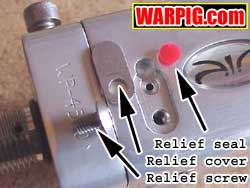 On
the outside rear of the body is the overpressure vent. This vent
protects the paintgun, in case of a leak in the rocket or main seal.
If the low pressure side of the AIR goes above around 850 psi, the overpressure
vent will release gas, lowering the pressure. A hex socket head screw
holds a small metal plate over the overpressure seal, and is easily removed.
The overpressure seal, like the main seal deforms to fit against a seal
face, and must be replaced after removal. Fortunately, it is the
same on both sides, so it can be flipped over to get two uses out of a
single seal. When reinstalling, the overpressure plate must go back
in the right direction. It is stamped from sheet metal, and one side
has smoother edges than the other, the smooth side must go down. On
the outside rear of the body is the overpressure vent. This vent
protects the paintgun, in case of a leak in the rocket or main seal.
If the low pressure side of the AIR goes above around 850 psi, the overpressure
vent will release gas, lowering the pressure. A hex socket head screw
holds a small metal plate over the overpressure seal, and is easily removed.
The overpressure seal, like the main seal deforms to fit against a seal
face, and must be replaced after removal. Fortunately, it is the
same on both sides, so it can be flipped over to get two uses out of a
single seal. When reinstalling, the overpressure plate must go back
in the right direction. It is stamped from sheet metal, and one side
has smoother edges than the other, the smooth side must go down.
All but two of the seals in the AIR,
and the ones that most often need maintenance can be accessed without touching
the electronics.
The electronics of the AIR are protected
inside a shield of clear polycarbonate. It is extremely durable as
John Rice demonstrated at the 2001 NPPL World Cup by stomping on one without
cracking it. Four screws hold the shield in place, when they are
removed it slides off easily. WDP produces not only replacements
for shields that are scratched, but also color tinted models.
 The
primary reason to dive under the shield is to replace the AIR's batteries.
It uses a pair of three volt lithium disk batteries that are held on opposing
sides of a small carrier circuit. The batteries are connected to
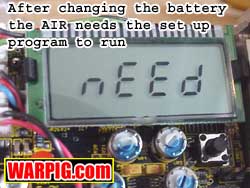
the main circuit board by a two prong connector. When a new set of
batteries is plugged in, the AIR will need to be re zeroed. The LCD
display
will display "need set up." The
primary reason to dive under the shield is to replace the AIR's batteries.
It uses a pair of three volt lithium disk batteries that are held on opposing
sides of a small carrier circuit. The batteries are connected to
the main circuit board by a two prong connector. When a new set of
batteries is plugged in, the AIR will need to be re zeroed. The LCD
display
will display "need set up."
 Although
the pressure transducers have been factory calibrated, the onboard circuitry
needs to be told when it is at 0 psi to have a reference base. With
the tank empty (or disconnected) and the output to the paintgun disconnected,
pressing the control button for a full second runs the set up program.
It runs quickly, then the AIR is ready for action. Although
the pressure transducers have been factory calibrated, the onboard circuitry
needs to be told when it is at 0 psi to have a reference base. With
the tank empty (or disconnected) and the output to the paintgun disconnected,
pressing the control button for a full second runs the set up program.
It runs quickly, then the AIR is ready for action.
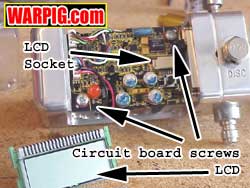 If
the LCD is somehow damaged, it can be easily replaced. A pair of
clips on either side release it from the main circuit board. It is
electrically connected by a flat ribbon connector which slides into a locking
socket. The brown latch on the socket must be slid upward to release
the ribbon, or back down to lock it in place. If the transducers
or the main circuit board need replacing, lifting out the LCD must be done
first. If
the LCD is somehow damaged, it can be easily replaced. A pair of
clips on either side release it from the main circuit board. It is
electrically connected by a flat ribbon connector which slides into a locking
socket. The brown latch on the socket must be slid upward to release
the ribbon, or back down to lock it in place. If the transducers
or the main circuit board need replacing, lifting out the LCD must be done
first.
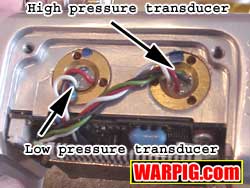 The
pressure transducers are linked to the circuit board via four wire connectors.
These wire bundles are color coded. The transducer with the blue
wire installs closer to the tank, and has longer wires to plug into the
lower plug on the circuit board. The
pressure transducers are linked to the circuit board via four wire connectors.
These wire bundles are color coded. The transducer with the blue
wire installs closer to the tank, and has longer wires to plug into the
lower plug on the circuit board.
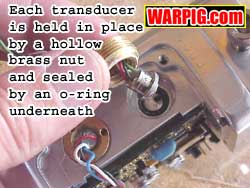 The
transducer on the left side, with the blue wire, and shorter bundle of
wires plugs into the upper plug. It is the low pressure transducer.
Hollow brass nuts hold the transducers in place. Beneath them are
o-rings which seal them airtight. These are the two remaining seals
that are possible locations for leaks. WDP, or WDP service techs
will usually mark the transducer nuts with a dot of paint to indicate whether
the transducers have been removed. The
transducer on the left side, with the blue wire, and shorter bundle of
wires plugs into the upper plug. It is the low pressure transducer.
Hollow brass nuts hold the transducers in place. Beneath them are
o-rings which seal them airtight. These are the two remaining seals
that are possible locations for leaks. WDP, or WDP service techs
will usually mark the transducer nuts with a dot of paint to indicate whether
the transducers have been removed.
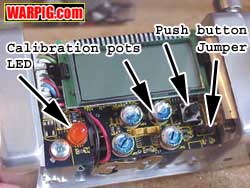 On
the face of the main circuit board are 4 trimmer pots. These are
used to calibrate the microprocessor's conversion of the analog signal
from the transducers to a digital pressure reading. Because calibration
requires about $2,000 worth of computer equipment, this is a step done
at WDP's factory, and the pots are sealed in with a drop of paint.
Altering of their settings can destroy the ability of the AIR to provide
pressure readings. Because of the need for calibration at the factory,
WDP sells the circuit board and transducers in matched sets for repair,
they are not available separately. On
the face of the main circuit board are 4 trimmer pots. These are
used to calibrate the microprocessor's conversion of the analog signal
from the transducers to a digital pressure reading. Because calibration
requires about $2,000 worth of computer equipment, this is a step done
at WDP's factory, and the pots are sealed in with a drop of paint.
Altering of their settings can destroy the ability of the AIR to provide
pressure readings. Because of the need for calibration at the factory,
WDP sells the circuit board and transducers in matched sets for repair,
they are not available separately.
To the right of the push button is a
pair of pins that put the AIR into a diagnostic mode. In this
mode, the Lo-P display is bypassed and the AIR displays pressure measurements
below 100 psi, and it also stays on, instead of turning off after a few
seconds. The AIR can be put briefly into diagnostic mode by simply
shorting the two pins with a screwdriver, or putting an electronic jumper
on them will leave it in diagnostic mode. The drawback to diagnostic
mode is that it consumes the batteries in only a couple of days.
This may be advantageous for tournament players who want to glance at the
AIR at any time to see the tank pressure or shot estimator.
WDP's AIR is not only a solid performing
compressed air system, but its electronics package also redefines state
of the art and it gets major points for style. Equally important,
all the necessary parts to use it are included in the package, so the price
on the box is actually the price to move up to AIR.
|