  |
|
|
|
|
|
|
| |
|
|
|
|
|
|

What
do you think?
|
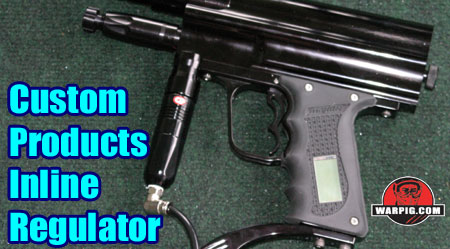
Custom Products Inline Reg March 2004 Since their introduction to paintball, inline regulators have thankfully, become smaller and lighter, as well as more efficient. Custom Products, a company which specializes in various aftermarket accessories, has thrown their hat into the inline regulator ring with the CP Inline Regulator. A regulator has a simple purpose, to allow gas out of a high pressure source as needed to maintain a lower pressure output. A common use for inline regulators in paintball is between a compressed air system that is feeding out 400 to 800 psi, and a paintgun that is expecting an input pressure of 200 to 300 psi. The regulator steps down the pressure. Theres more to a regulator than a pressure drop though. As gas is used by the paintgun, the regulator must react fast enough to re-supply the paintguns valve. If the regulator responds slowly, or has a restricted flow rate, the paintgun will not recharge quickly, and velocity will drop off during rapid fired strings. CPs regulator has a compact, ergonomic design. It is constructed in three sections. The top section features ASA threading and an o-ring. This allows it to mount in a vertical ASA, such as on an Angel IR3, Autococker, Matrix or other paintgun. The vertical placement also allows the reg to act as a fore grip. Adorning the bottom of the first section are a pair of CP logo jewels. The interior of the first section is primarily an empty space, which acts as a reservoir for air on the low-pressure side.
The third segment of the regulator contains the regulator seal and its adjustment mechanism. Six teardrop shaped cuts in the body look decorative, but actually serve as wrench flats. When installing a macroline, elbow or other hose fitting to the regulators input port at the bottom, an adjustable wrench (lined with a shop rag to prevent scratches) can get a sure grip in the bodys flats. Placement of the input port at the bottom rather than the side, makes it easy to mount the regulator in a paintgun with gas fittings attached, with no conflict between the fittings and a trigger guard.
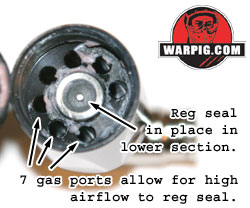
In the regulators bottom section a ring of seven holes bring gas up from the input to the regulator seal, the large number of holes is to prevent that gas path from becoming a flow bottleneck.
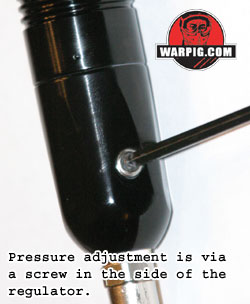
With the lower part of the regulator removed, the seal face, and the regulator seal itself are easily accessed for inspection and cleaning. The CP Inline Regulator reviewed was one of a number of upgrades performed by Generation E when upgrading a Slide Switch Matrix to an LCD. In the summer of 2003, Gen E adopted the CP reg as their standard for use with the Matrix, citing its consistency and high flow rates at lower pressures as the reason. On the field, driving the LCD bolt in the Matrix, the CP Inline regulator has performed without problem, and with no visible shoot down problems. It should be noted that the adjustment arrangement with the ball bearing changing pressure on the regulator seal means that adjustment is sensitive. Dialing in the pressure of the CP Inline Regulator is done in very small steps, with fractions of a turn, unlike most regulators in which the adjuster screw is linked directly to a spring driving pressure to the piston. In addition to the compact version of
the regulator reviewed, versions are available with a longer bottom section
featuring a recessed macroline fitting in the bottom, and an optional fitting
for an output pressure gauge.
|
| Copyright © 1992-2019
Corinthian Media Services. WARPIG's webmasters can be reached through our feedback form. All articles and images are copyrighted and may not be redistributed without the written permission of their original creators and Corinthian Media Services. The WARPIG paintball page is a collection of information and pointers to sources from around the internet and other locations. As such, Corinthian Media Services makes no claims to the trustworthiness or reliability of said information. The information contained in, and referenced by WARPIG, should not be used as a substitute for safety information from trained professionals in the paintball industry. |
 The
next section is marked by a series of cosmetic rings on the outside.
On the interior is the regulators piston. The piston pits the pressure
of a set of disk springs against the gas that is on the low pressure side
of the regulator. When the pressure is too low, the piston moves
upward, and allows air to pass through it until the pressure is great enough
that it is pressed back against the regulator seal, sealing the air flow
until the paintgun uses gas, and the pressure once again drops.
The
next section is marked by a series of cosmetic rings on the outside.
On the interior is the regulators piston. The piston pits the pressure
of a set of disk springs against the gas that is on the low pressure side
of the regulator. When the pressure is too low, the piston moves
upward, and allows air to pass through it until the pressure is great enough
that it is pressed back against the regulator seal, sealing the air flow
until the paintgun uses gas, and the pressure once again drops.
 A
barehanded twist is enough to separate the lower regulator section to inspect
or clean the regulator seal. On the middle section of the regulator
is the seal face, a cone shaped protrusion with a fine edge. The
seal face is the bottom of a hollow rod connecting to the regulator piston.
This surface must remain unscratched, undented and clean for proper performance.
The opening in the seal face is approximately 5/32 inches. The size
of this opening is the limiting factor the volume of airflow through the
regulator, and it is generous.
A
barehanded twist is enough to separate the lower regulator section to inspect
or clean the regulator seal. On the middle section of the regulator
is the seal face, a cone shaped protrusion with a fine edge. The
seal face is the bottom of a hollow rod connecting to the regulator piston.
This surface must remain unscratched, undented and clean for proper performance.
The opening in the seal face is approximately 5/32 inches. The size
of this opening is the limiting factor the volume of airflow through the
regulator, and it is generous.
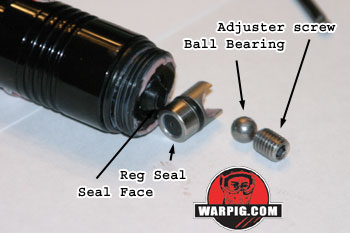
 In
the core of the lower section is the regulator seal cylinder. This
cylinder has an angled base and sits atop a ball bearing. When the
Ball bearing is pushed in by the velocity adjuster screw on the side of
the regulator, it wedges the regulator cylinder higher up into the regulator
body, causing the seal to close against the seal face at lower pressures.
Backing the screw out adjusts the regulator to operate at higher pressure.
In
the core of the lower section is the regulator seal cylinder. This
cylinder has an angled base and sits atop a ball bearing. When the
Ball bearing is pushed in by the velocity adjuster screw on the side of
the regulator, it wedges the regulator cylinder higher up into the regulator
body, causing the seal to close against the seal face at lower pressures.
Backing the screw out adjusts the regulator to operate at higher pressure.