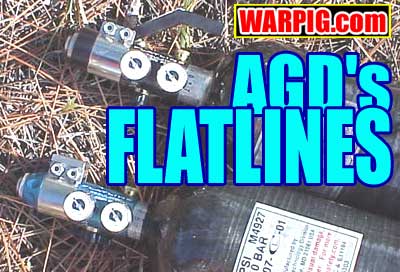
Airgun Designs Flatline
Compressed Air Systems
by Bill Mills
November 2001
Airgun Designs set a new standard in
paintball when it produced the 68 Automag, the first paintgun to include
a regulator integrated into it's design. AGD also pioneered the use
of compressed air, with Tom Kaye's mantra of "CO2
sucks" being based on how much more reliable the Automag was with compressed
air as a power source. In the early 90s the paintball industry in
general said the higher pressures of compressed air were too dangerous
for the sport, so Airgun Designs concentrated on their paintguns instead,
leaving it to Air America and Paintball Mania to fight the uphill battles
that eventually resulted in compressed air becoming the accepted standard
for a high end paintball energy source.
 Eventually,
Airgun Designs threw its hat into the compressed air ring with the 3,000
psi Flatline compressed air system. At first the name caused some
confusion, with both the AGD Flatline, and Tippmann's Flatline barrel being
released at the International Amateur Open. Eventually,
Airgun Designs threw its hat into the compressed air ring with the 3,000
psi Flatline compressed air system. At first the name caused some
confusion, with both the AGD Flatline, and Tippmann's Flatline barrel being
released at the International Amateur Open.
The Flatline is a full featured, adjustable
compressed air system. Initially released in bundles with the Automag
Classic, it provided a "package deal" for players to get into a complete
Automag set-up and not have to deal with CO2 related
problems. The 3,000 psi Flatline soon became available as a separate
product, with it's adjustability and high flow rate giving it a great deal
of versatility.
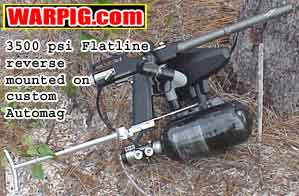
 Soon
to be released to the general public is the 4500 psi Flatline air system.
It has the same features as its lower pressured predecessor, but slightly
different internals, and the expected increase in the number of shots available
per tank fill. Soon
to be released to the general public is the 4500 psi Flatline air system.
It has the same features as its lower pressured predecessor, but slightly
different internals, and the expected increase in the number of shots available
per tank fill.
The Flatline regulator body is a cylinder,
the same outer diameter as the necks of the fiber wrapped bottles with
which it ships.
Nearest to the bottle neck is the burst
disk. Designed to rupture and allow the tank to empty in case of
an overfill, the Flatline uses a unified burst disk in which the disk and
nut are a single unit. This avoids problems related to mismatching
disks and nuts, or accidentally installing double-disks.
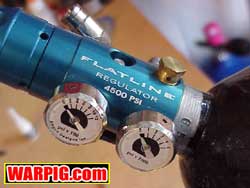 The
next item up the neck is the high pressure gauge. This shows the
pressure of the gas stored in the bottle whether the tank is turned on
or not. AGD uses micro gauges on the Flatlines. They have a
definite advantage in their compact size and durability, but sacrifice
accuracy in trade. In practical use however, they do their job well. The
next item up the neck is the high pressure gauge. This shows the
pressure of the gas stored in the bottle whether the tank is turned on
or not. AGD uses micro gauges on the Flatlines. They have a
definite advantage in their compact size and durability, but sacrifice
accuracy in trade. In practical use however, they do their job well.
Between the tank pressure and output
gauges is the shutoff valve. The Flatlines have one of the nicest
shutoff valves seen on any of today's compressed air systems.
A small winged knob turns as easily as a faucet, regardless of tank pressure.
On other compressed air systems the shutoff valves typically require much
more force to operate. This is an important feature on an adjustable
system as it means the output pressure can be set and forgotten.
 A
1/8" NPT opening allows elbows, braided hose, microline, or macroline to
route the output from the Flatline to the paintgun on which it is installed.
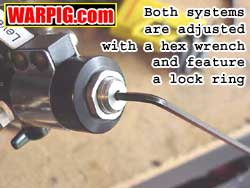
On the front of the regulator is the adjuster. Much like the rear
of an Automag, the adjuster is screwed in with a hex wrench to increase
the regulator's output pressure. A nut on the adjuster is used to
lock it in place, both to make it tournament legal and prevent it from
creeping under the vibration of firing. A
1/8" NPT opening allows elbows, braided hose, microline, or macroline to
route the output from the Flatline to the paintgun on which it is installed.
On the front of the regulator is the adjuster. Much like the rear
of an Automag, the adjuster is screwed in with a hex wrench to increase
the regulator's output pressure. A nut on the adjuster is used to
lock it in place, both to make it tournament legal and prevent it from
creeping under the vibration of firing.
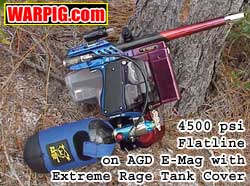
Externally, the 4,500 psi systems are
differentiated from the 3K models by both color and shape. The 4500
psi models are anodized in teal as opposed to black, and they feature cosmetic
teardrop milling around the adjuster.
 Both
models use the same type of cradle to mount on the paintgun. A band
of sheet metal wraps around the regulator body. This cradle mounts
to the sides of AGD's proprietary drop forward. While this mounting
system is perfectly functional, it is definitely utilitarian, and does
not allow the end user to take advantage of the wide variety of bottle
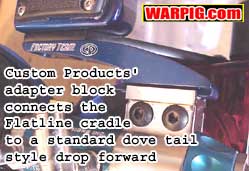
mounts on the market today. Custom
Products produces an adapter block which mounts on the AGD cradle in
place of AGD's drop forward. The adapter block is slotted for a standard
air system dovetail, allowing the Flatline to be mounted with standard
drop forwards. In the photographs for this review, the 4500 psi Flatline
is equipped with this adapter and mounted on a Custom Products mini drop
forward. Both
models use the same type of cradle to mount on the paintgun. A band
of sheet metal wraps around the regulator body. This cradle mounts
to the sides of AGD's proprietary drop forward. While this mounting
system is perfectly functional, it is definitely utilitarian, and does
not allow the end user to take advantage of the wide variety of bottle
mounts on the market today. Custom
Products produces an adapter block which mounts on the AGD cradle in
place of AGD's drop forward. The adapter block is slotted for a standard
air system dovetail, allowing the Flatline to be mounted with standard
drop forwards. In the photographs for this review, the 4500 psi Flatline
is equipped with this adapter and mounted on a Custom Products mini drop
forward.
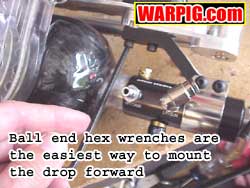 The
AGD drop forward provides little room for a hex wrench between the regulator
and the screws. When mounting the Flatline to a paintgun using the
stock drop forward, a ball end hex wrench can greatly simplify the task
at hand, because it can be inserted into the screws and turned while at
an angle. The
AGD drop forward provides little room for a hex wrench between the regulator
and the screws. When mounting the Flatline to a paintgun using the
stock drop forward, a ball end hex wrench can greatly simplify the task
at hand, because it can be inserted into the screws and turned while at
an angle.
 Once
mounted and hosed to the paintgun, adjustment of the Flatline is straightforward.
With a full bottle, the shutoff valve is turned on. An open end or
adjustable wrench is used to loosen the adjuster's lock nut. A hex
wrench is then used to screw the adjuster inward, which increases the regulator's
output pressure. This can be monitored on the low pressure gauge.
Lowering the pressure is achieved by backing the adjuster out of the regulator
body, but changes decreasing the pressure will not be reflected on the
gauge until after one or two shots are fired through the paintgun.
Once the proper output pressure setting is achieved the adjuster's lock
nut is tightened down with a wrench. Once
mounted and hosed to the paintgun, adjustment of the Flatline is straightforward.
With a full bottle, the shutoff valve is turned on. An open end or
adjustable wrench is used to loosen the adjuster's lock nut. A hex
wrench is then used to screw the adjuster inward, which increases the regulator's
output pressure. This can be monitored on the low pressure gauge.
Lowering the pressure is achieved by backing the adjuster out of the regulator
body, but changes decreasing the pressure will not be reflected on the
gauge until after one or two shots are fired through the paintgun.
Once the proper output pressure setting is achieved the adjuster's lock
nut is tightened down with a wrench.
On the field, both of these systems
have proven themselves to be durable and reliable. Their adjustability
makes them ideal for tuning the trigger reactiveness of Automags equipped
with the RT or ReTro Valve, while their flow rate has no problem keeping
a 'mag supplied with enough air for rapid firing. Conveniently both
gauges are on the same side, the left, making them easy to glance at for
right handed shooters during a game.
 CAUTION:
Air system maintenance should be performed only by qualified airsmiths.
The following information is provided to give the reader a better understanding
of how the Flatline regulator operates. CAUTION:
Air system maintenance should be performed only by qualified airsmiths.
The following information is provided to give the reader a better understanding
of how the Flatline regulator operates.
For experienced Automag airsmiths the
general structure of the Flatline should be familiar. A spring pack
places pressure on the regulator piston. Output pressure moves the
piston against the spring pack. When the output pressure is low,
the piston moves inward, separating the regulator pin from the regulator
seat, allowing gas to move past until the pressure is high enough to push
the piston back, closing the regulator at the set pressure. What
is different between the Flatline regulator and the Automag's AIR valve
is that the regulator pin is connected to the piston, rather than being
pushed against the piston by a spring from the opposite side.
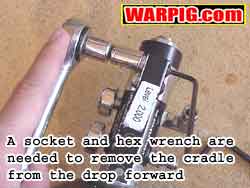 The
internals of the Flatline are first accessed by removing the Flatline cradle.
This is done with a hex wrench and a box end or socket wrench. Two
hex head socket screws go through the cradle and drop forward into lock
nuts on the opposite side. It is important to keep in mind that the
cradle offers outward spring pressure and may "pop" open when the screws
are released from the nuts. The
internals of the Flatline are first accessed by removing the Flatline cradle.
This is done with a hex wrench and a box end or socket wrench. Two
hex head socket screws go through the cradle and drop forward into lock
nuts on the opposite side. It is important to keep in mind that the
cradle offers outward spring pressure and may "pop" open when the screws
are released from the nuts.
With the screws removed the cradle can
be flexed outward and slid off of the regulator body. This exposes
the gap between the upper and lower halves of the regulator, as well as
giving more room to work on the shutoff valve assembly.
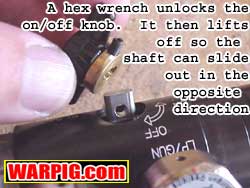 With
no air pressure in the bottle, the Flatline regulator can be disassembled
for maintenance and inspection. A small hex wrench is used to remove
a set screw from the shutoff valve handle. The handle then lifts
off of the valve's cam shaft. With
no air pressure in the bottle, the Flatline regulator can be disassembled
for maintenance and inspection. A small hex wrench is used to remove
a set screw from the shutoff valve handle. The handle then lifts
off of the valve's cam shaft.
 With
the shaft twisted to the on position, it can be slid out of the regulator
body on the side opposite the knob. This will reveal the two o-rings
which seal it from the outside. If there is an air leak on either
end of the shutoff valve shaft, it is one of these o-rings that will need
to be replaced. Much like the camshaft in an automobile engine, the
shaft of the Flatline's shutoff valve has an elliptical lobe shaped cam
which pushes on a valve when it is rotated. It is this cam which
is the secret to the Flatline's shutoff valve success. It provides
ample leverage to make operation under pressure very easy. With
the shaft twisted to the on position, it can be slid out of the regulator
body on the side opposite the knob. This will reveal the two o-rings
which seal it from the outside. If there is an air leak on either
end of the shutoff valve shaft, it is one of these o-rings that will need
to be replaced. Much like the camshaft in an automobile engine, the
shaft of the Flatline's shutoff valve has an elliptical lobe shaped cam
which pushes on a valve when it is rotated. It is this cam which
is the secret to the Flatline's shutoff valve success. It provides
ample leverage to make operation under pressure very easy.
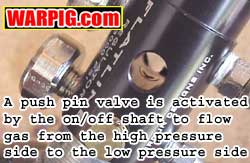 The
actual shutoff valve is a pin valve inside the lower half of the regulator
body. It is accessible only by removing the regulator from the bottle.
It can be seen from the side openings when the shutoff valve shaft is removed.
It becomes readily apparent why the shutoff valve must be turned to the
on position for removal. In the on position, the valve's cam presses
the pin valve flush with the regulator body wall. The
actual shutoff valve is a pin valve inside the lower half of the regulator
body. It is accessible only by removing the regulator from the bottle.
It can be seen from the side openings when the shutoff valve shaft is removed.
It becomes readily apparent why the shutoff valve must be turned to the
on position for removal. In the on position, the valve's cam presses
the pin valve flush with the regulator body wall.
 Between
the shutoff valve and the regulator itself is a caged ball bearing which
can be rocked back and forth by gas flow. Between
the shutoff valve and the regulator itself is a caged ball bearing which
can be rocked back and forth by gas flow.
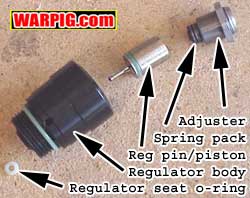
Much like the Automag's AIR regulator,
the Flatline body is opened by unscrewing the end half to expose the regulator
seat and regulator pin.
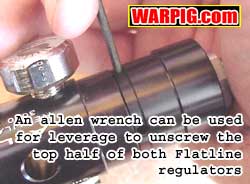 A
series of four holes around the regulator body allows the use of a spanner
wrench to get a solid grip on the top half of the regulator body in order
to unscrew it from the base. As spanner wrenches aren't sitting around
most airsmith's tool chests, it's easy enough to drop a hex wrench in one
of the holes and use to to twist off the reg top. Much like the AIR
regulator, a thick o-ring seals the two halves, and is easily inspected
for rips or tears. A
series of four holes around the regulator body allows the use of a spanner
wrench to get a solid grip on the top half of the regulator body in order
to unscrew it from the base. As spanner wrenches aren't sitting around
most airsmith's tool chests, it's easy enough to drop a hex wrench in one
of the holes and use to to twist off the reg top. Much like the AIR
regulator, a thick o-ring seals the two halves, and is easily inspected
for rips or tears.
 When
the regulators are apart, the differences with the AIR and each other are
readily apparent. When
the regulators are apart, the differences with the AIR and each other are
readily apparent.
The regulator pin, instead of pushing
up against the regulator seat and through it to the piston instead extends
out from the piston through the seat, and then flares out on its end to
seal against the seat.
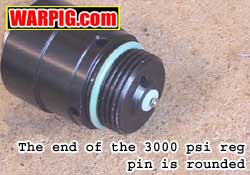
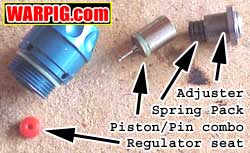
In the 3000 psi Flatline, the end of
the regulator pin is rounded almost to a ball shape, and the regulator
seat is simply a white o-ring. This makes inspection and reassembly
very easy. The o-ring simply stretches over the end of the regulator
pin for replacement.
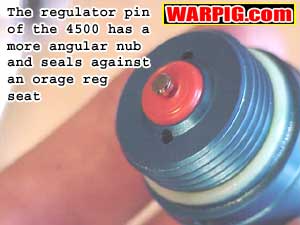 In
contrast, the 4500 psi Flatline reg pin has a more angular nub on its end,
and fits through a flat cylindrical seat that is much more reminiscent
of the seat in an AIR regulator. Note that the 4500 psi regulator
seat pictured here is slightly different than the final production model,
where the regulator seat fits deeper into the surrounding aluminum in order
to protect it from deformation. In
contrast, the 4500 psi Flatline reg pin has a more angular nub on its end,
and fits through a flat cylindrical seat that is much more reminiscent
of the seat in an AIR regulator. Note that the 4500 psi regulator
seat pictured here is slightly different than the final production model,
where the regulator seat fits deeper into the surrounding aluminum in order
to protect it from deformation.
With both models of the Flatline regulator,
the regulator piston and spring pack are accessed by fully unscrewing the
adjuster cap.
3000 psi
4500 psi
Relief valves are located inside the
regulator pistons. These protect the paintgun from over pressurizing
in case of a leak in the regulator seat.
 A
hollow nut in the back of the regulator piston holds in the relief valve
assembly. It can be tempting to grab the piston with a pair of pliers
in order to grip it solidly enough to unscrew the relief valve nut.
This is a bad idea though, as it will result in scratches on the piston.
Instead it should be gripped gently in a cloth lined vise. A
hollow nut in the back of the regulator piston holds in the relief valve
assembly. It can be tempting to grab the piston with a pair of pliers
in order to grip it solidly enough to unscrew the relief valve nut.
This is a bad idea though, as it will result in scratches on the piston.
Instead it should be gripped gently in a cloth lined vise.
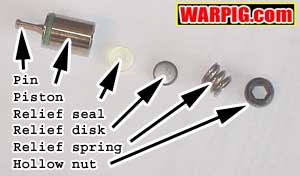 Beneath
the hollow nut is the relief valve spring, a metal backing disk and the
seal itself. The seal will deform to fit the valve face, and any
rips, tears or debris could lead to unwanted leaking out the center of
the adjuster cap. Beneath
the hollow nut is the relief valve spring, a metal backing disk and the
seal itself. The seal will deform to fit the valve face, and any
rips, tears or debris could lead to unwanted leaking out the center of
the adjuster cap.
After inspection, cleaning and lubrication,
the Flatline regulators are reassembled in the reverse order of disassembly.
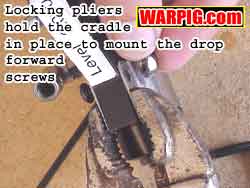 Getting
the cradle back onto the drop forward can be a bit tricky due to the outward
spring pressure involved. The task is most easily completed by holding
the cradle in place with a pair of locking pliers and inserting one screw
and nut, then removing the pliers and installing the other. Getting
the cradle back onto the drop forward can be a bit tricky due to the outward
spring pressure involved. The task is most easily completed by holding
the cradle in place with a pair of locking pliers and inserting one screw
and nut, then removing the pliers and installing the other.
Both the 3,000 psi and 4,500 psi Flatline
compressed air systems are feature rich adjustable air systems with solid
performance on the field. They additionally benefit from Airgun Designs'
warranty support which carries a reputation as one of the best in the sport
of paintball. The added shot count offered by the 4500 psi model
makes it an ideal companion for the E-Mag or ReTro valve equipped Automag.
|