AirGun
Designs
What
do you think?
Add
your comments in WARPIG's TECH TALK FORUMS.
|
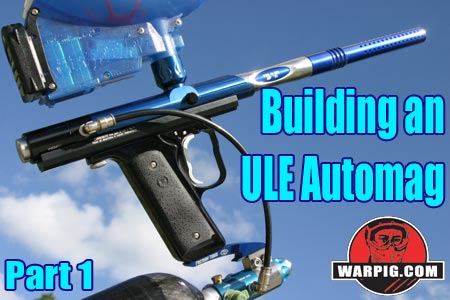
Building an ULE Automag
by Bill Mills
Through the years, Airgun Designs has
been developing new products, and improving on their previous models.
As with most paintgun manufacturers they have often simply released new
paintguns as new features come out, until some of their more recent products,
which have been mainly available as upgrades. Several components,
like their new Y frame and ULE bodies are not available in off-the shelf
models. For players who already own Automags, many of these components
are designed as upgrades. Now, there are enough of these upgrade
components that a player can custom build an Automag with the parts that
they want, rather go through the expense of buying a full paintgun and
replacing stock components with upgrades.
This two article series looks at several
of AGDs latest Automag components and builds them into a light-weight,
high performance paintgun.
 The
starting point for this paintgun is the body rail and sear pivot, as well
as a couple of grip frame screws. These parts are the only stock
Automag parts, and are all that would be left of the original Automag if
this project were an upgrade. The body rail is the piece that goes
between the body and the grip frame. A year ago, Extreme Rage made
an Omega body rail that was milled out to be extra light and would have
been ideal for this paintgun, unfortunately, it was a short lived product,
so a stock rail was used. The
starting point for this paintgun is the body rail and sear pivot, as well
as a couple of grip frame screws. These parts are the only stock
Automag parts, and are all that would be left of the original Automag if
this project were an upgrade. The body rail is the piece that goes
between the body and the grip frame. A year ago, Extreme Rage made
an Omega body rail that was milled out to be extra light and would have
been ideal for this paintgun, unfortunately, it was a short lived product,
so a stock rail was used.
An Automag sear and sear pivot were
dropped into the body rail. The sear is the heart of the Automag.
When the trigger rod (the pivoting rod attached to the bottom of the sear)
is pulled the sear rocks forward releasing the Automags bolt, and shutting
off the flow of gas to the guns air chamber. This allows a fixed
volume of gas to be used to fire a paintball out of the barrel.
 The
body chosen for this Automag was an Airgun Designs ULE, or Ultra Light
Engineering body. Until the relatively recent import of milled aluminum
bodies from AGD UK, all of AGDs Automags featured steel body tube construction.
A single tube held the barrel and valve components in place. The
Automags twist lock barrel system set the minimum size for a mag body.
While the original Automag twist lock barrel system changing barrels fast
for cleaning was easy. However, in recent years, as Airgun Designs
worked on refining their valve and bolt designs for better efficiency,
they discovered a problem with the twist lock barrel system. The
breech for the paintgun is a part of the barrel, and when players used
aftermarket barrels, they would be inserting a breech of a different diameter
into the paintgun. This made matching the bolt diameter to the breech
next to impossible. The solution to this was to switch to new bodies
in which the breech was a part of the receiver rather than the barrel.
All of Airgun Designs aluminum bodies do this, and utilize Autococker
style barrel threading for compatibility with a host of aftermarket barrels. The
body chosen for this Automag was an Airgun Designs ULE, or Ultra Light
Engineering body. Until the relatively recent import of milled aluminum
bodies from AGD UK, all of AGDs Automags featured steel body tube construction.
A single tube held the barrel and valve components in place. The
Automags twist lock barrel system set the minimum size for a mag body.
While the original Automag twist lock barrel system changing barrels fast
for cleaning was easy. However, in recent years, as Airgun Designs
worked on refining their valve and bolt designs for better efficiency,
they discovered a problem with the twist lock barrel system. The
breech for the paintgun is a part of the barrel, and when players used
aftermarket barrels, they would be inserting a breech of a different diameter
into the paintgun. This made matching the bolt diameter to the breech
next to impossible. The solution to this was to switch to new bodies
in which the breech was a part of the receiver rather than the barrel.
All of Airgun Designs aluminum bodies do this, and utilize Autococker
style barrel threading for compatibility with a host of aftermarket barrels.
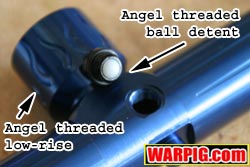
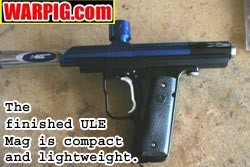
The ULE body is compact and lightweight,
weighing in at just under 4 ounces. It has a lowrise feed neck that
is attached with Angel style feedneck threads, allowing the use of aftermarket
locking feed necks. Also Angel threaded is the ball bearing style
ball detent which can be replaced with any number of aftermarket detents.
Minor cosmetic milling on the front of the body, and an angled front-end
style it to look like a little more than a colored aluminum pipe.
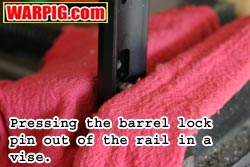 Because
the body rail was designed for the Automag, Minimag or Automag Classic,
it has a barrel detent pin installed in order to lock a barrel in place.
This is not used with the ULE body and must be removed. Pulling it
out was a matter of pressing the bottom of the pin into the rail by squeezing
the whole assembly in a vise, and then using a pair of pliers to wiggle
it the rest of the way out. Because
the body rail was designed for the Automag, Minimag or Automag Classic,
it has a barrel detent pin installed in order to lock a barrel in place.
This is not used with the ULE body and must be removed. Pulling it
out was a matter of pressing the bottom of the pin into the rail by squeezing
the whole assembly in a vise, and then using a pair of pliers to wiggle
it the rest of the way out.
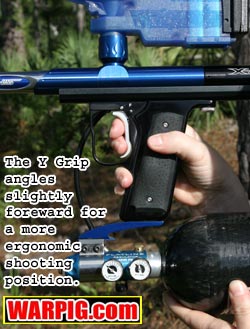 Completing
the body of the ULE Mag is a Y grip. In the late 1990s, Airgun Designs
released the Z grip for the Automag. The Z grip was angled at nearly
45 degrees backward. While this was impractical to hold in a shoot
from the hip position, it was in the right position for a player to hold
while tucked into a bunker with the air tank of their paintgun up to their
shoulder. The Z grip was not popular in its initial release, but
in recent years there has been renewed interest among Mag owners online,
and WDP as well as aftermarket grip manufacturers have begun producing
90 degree grips with lobed back edges which work on the same principle.
The Y grip is a re-design of the original Z grip, though the angle of the
grip frame is reduced, making it more comfortable to shoot from different
positions. Internally the Y grip, like AGDs Intelliframe has mount
screws to allow a switch to be installed for on demand electronic loader
activation. Completing
the body of the ULE Mag is a Y grip. In the late 1990s, Airgun Designs
released the Z grip for the Automag. The Z grip was angled at nearly
45 degrees backward. While this was impractical to hold in a shoot
from the hip position, it was in the right position for a player to hold
while tucked into a bunker with the air tank of their paintgun up to their
shoulder. The Z grip was not popular in its initial release, but
in recent years there has been renewed interest among Mag owners online,
and WDP as well as aftermarket grip manufacturers have begun producing
90 degree grips with lobed back edges which work on the same principle.
The Y grip is a re-design of the original Z grip, though the angle of the
grip frame is reduced, making it more comfortable to shoot from different
positions. Internally the Y grip, like AGDs Intelliframe has mount
screws to allow a switch to be installed for on demand electronic loader
activation.
The Y grip trigger is the same two-finger
trigger found on the Intelliframe. It is a blade style trigger with
a finger shaped curve at the bottom. This design naturally cradles
a players typical finger placement. A pair of Hogue Colt 1911 grip
panels are included, but installed backwards to fit the Y frames reverse
angle.
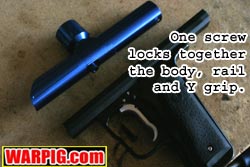 Installing
the grip frame to the body and rail consists of guiding the sears trigger
rod into place in the grip frame, setting the ULE body on the body rail,
and then installing the front grip frame screw to hold the entire assembly
together. At that point it looks like a paintgun, and is ready to
have the valve assembly dropped in. Installing
the grip frame to the body and rail consists of guiding the sears trigger
rod into place in the grip frame, setting the ULE body on the body rail,
and then installing the front grip frame screw to hold the entire assembly
together. At that point it looks like a paintgun, and is ready to
have the valve assembly dropped in.
The original Automag AIR (Air Integrated
Regulator) valve, often called the Classic, was found in the Automag, the
Minimag, and the more recent Automag Classic. As an assembly, it
consists of the regulator in the rear (the Automag was the first production
paintgun to use a regulated gas supply,) an on/off valve, an air chamber,
and the bolt. The Automag design was unique among paintguns up until
the late 1990s, as it lacked a hammer. Instead of using a hammer
to strike a valve, the Automag charges a fixed volume air chamber with
regulated gas, and then using that gas to both close the breech by sliding
the bolt forward, and to fire the paintball.
 The
Automag system provides consistent velocity using a fixed pressure and
volume of gas used to fire the ball. Once the air goes past the regulator,
it flows through the Mags on/off valve and fills the air chamber.
When the trigger is pulled, the sear performs two tasks. It releases
the bolt while simultaneously closing the on/off valve. The gas pressure
inside the air chamber pushes the bolt forward, and when the bolt reaches
the front end of its stroke that air is allowed to flow through the bolt,
into the breech and out of the barrel. The on/off valve being closed
prevents new gas from flowing into the air chamber from the regulator.
When the gas pressure in the air chamber is exhausted, the mainspring pushes
the bolt back to its starting position. When the trigger is released,
the sear once again latches onto the bolt, and allows the on/off valve
to open, refilling the air chamber with gas from the regulator, ready for
the next shot. The
Automag system provides consistent velocity using a fixed pressure and
volume of gas used to fire the ball. Once the air goes past the regulator,
it flows through the Mags on/off valve and fills the air chamber.
When the trigger is pulled, the sear performs two tasks. It releases
the bolt while simultaneously closing the on/off valve. The gas pressure
inside the air chamber pushes the bolt forward, and when the bolt reaches
the front end of its stroke that air is allowed to flow through the bolt,
into the breech and out of the barrel. The on/off valve being closed
prevents new gas from flowing into the air chamber from the regulator.
When the gas pressure in the air chamber is exhausted, the mainspring pushes
the bolt back to its starting position. When the trigger is released,
the sear once again latches onto the bolt, and allows the on/off valve
to open, refilling the air chamber with gas from the regulator, ready for
the next shot.
The original Automag valve assembly
was made of stainless steel, for extreme durability and corrosion resistance.
The original valve was followed by the Automag RT valve, a compressed air
only version with a faster recharge rate. While the RT valve was
technically superior, it was only compatible with the Automag RT paintgun,
because it used a unique banjo bolt that delivered air to the valve through
the rear grip frame screw rather than an external hose. The RT valve
was followed by the ReTro Valve, which was basically the RT valve in a
new package, it was styled to fit the original Automag bodies, giving older
Mag owners an upgrade path, and giving more modularity and interchangeability
to newer Automags like the E-Mag and RT Pro.
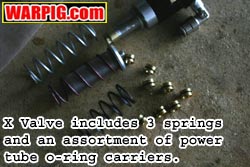
The most recent valve in the Airgun
design line is the X-Valve, and it incorporates two major design changes.
The first change is in materials. The X Valve is made primarily of
aluminum, with some stainless steel and brass components. The change
in main materials came about from AirGun Designs realizing that tournament
level paintball players were more interested in a lightweight, fast operating
paintgun than a paintgun that will last through more than a decade of use.
While the hard anodized aluminum valve body is very durable, and is considered
industry standard in paintball, it will wear faster than its stainless
steel counterparts. The change in materials allowed for not only
the look of a hard ano finish, but also meant a 3 ounce reduction in weight
for the valve assembly.
 The
other design change incorporated into the X Valve is more significant to
the modern Automag the Level 10 bolt. AirGun Designs has long fought
a reputation that its paintguns were ball choppers. The blow-forward
bolt system found in the Automags was never gentle on the ball. If
a player shot faster than paint could feed, a partially fed paintball was
sure to be chopped by the force of the closing bolt. AGD first combated
this with their powerfeed, to help prevent paintballs from bobbling back
up the feed tube when hit with blowback gas. The company later combated
ball chopping by again focusing on feeding issues with the Warp Feed.
The theory again was to focus on preventing ball chop by getting paintballs
into the breech fast enough. While the powerfeed helped, it was later
outpaced by increasing rates of fire. The Warp Feed was a sound solution.
While it also gave players the advantage of a decreased target profile,
it added weight to the paintgun, and was different enough that few upper
level tournament paintball players used it. Mainstream tournament
paintball was heading towards smaller, more compact paintguns with short,
vertical feed necks. The
other design change incorporated into the X Valve is more significant to
the modern Automag the Level 10 bolt. AirGun Designs has long fought
a reputation that its paintguns were ball choppers. The blow-forward
bolt system found in the Automags was never gentle on the ball. If
a player shot faster than paint could feed, a partially fed paintball was
sure to be chopped by the force of the closing bolt. AGD first combated
this with their powerfeed, to help prevent paintballs from bobbling back
up the feed tube when hit with blowback gas. The company later combated
ball chopping by again focusing on feeding issues with the Warp Feed.
The theory again was to focus on preventing ball chop by getting paintballs
into the breech fast enough. While the powerfeed helped, it was later
outpaced by increasing rates of fire. The Warp Feed was a sound solution.
While it also gave players the advantage of a decreased target profile,
it added weight to the paintgun, and was different enough that few upper
level tournament paintball players used it. Mainstream tournament
paintball was heading towards smaller, more compact paintguns with short,
vertical feed necks.
Enter Level 10, also known as Super
Bolt II. AGD experimented with the Super Bolt, releasing it to
beta-testers and sponsored players. It had a Delrin sheath, and stainless
steel core, but was a fraction of the weight of the original Automag bolt.
The light weight meant less moving mass in the Mag, and thus less recoil
when firing. The Delrin sleeve proved problematic, but the lessons
learned with the Super Bolt went into Level-10.
 The
Level 10 incorporates a lighter weight, thinner walled stainless steel
bolt with a new pressure based anti-chop system. While other manufacturers
have concentrated mainly on infrared or impact based feedback electronics
to prevent their paintguns from chopping a partially fed paintball (and
so has AGD with their X-Mag electronic paintgun) Level 10 approaches
the problem from a pneumatic perspective. Internally the Level
10 bolt has a two stage core. Like the original Automag bolt, this
core acts as a piston, driving the bolt forward under gas pressure.
By changing the diameter of the piston, and adding a vent hole, the bolts
closing pressure is reduced to the point that AGD President Tom Kaye has
performed public demonstrations where the bolt was stopped by his tongue
without injury. While the bolt still moves quickly, it does not chop
a partially fed paintball, but rather bumps into, it and resets. The
Level 10 incorporates a lighter weight, thinner walled stainless steel
bolt with a new pressure based anti-chop system. While other manufacturers
have concentrated mainly on infrared or impact based feedback electronics
to prevent their paintguns from chopping a partially fed paintball (and
so has AGD with their X-Mag electronic paintgun) Level 10 approaches
the problem from a pneumatic perspective. Internally the Level
10 bolt has a two stage core. Like the original Automag bolt, this
core acts as a piston, driving the bolt forward under gas pressure.
By changing the diameter of the piston, and adding a vent hole, the bolts
closing pressure is reduced to the point that AGD President Tom Kaye has
performed public demonstrations where the bolt was stopped by his tongue
without injury. While the bolt still moves quickly, it does not chop
a partially fed paintball, but rather bumps into, it and resets.
Continue to Part
2
|

