AirGun
Designs
What
do you think?
Add
your comments in WARPIG's TECH TALK FORUMS.
|
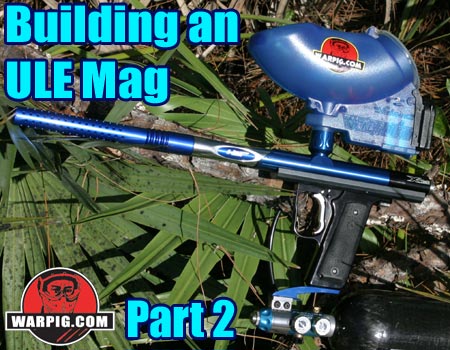
Building an ULE Automag
by Bill Mills - Part
1 - Part 2
Our construction and testing of an ULE
Automag continues with the installation of the X-Valve into the assembled
receiver.
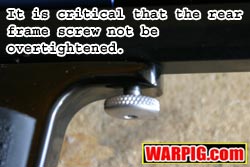
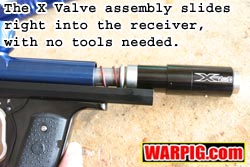 Initial
assembly of the X-Valve consisted simple of sliding the entire bolt and
valve assembly into the body, and locking it into place with the rear grip
frame screw. While this screw has a hole for a hex wrench, it is
meant to only be tightened finger tight – the hole is to use a wrench if
it is difficult to loosen by hand. Initial
assembly of the X-Valve consisted simple of sliding the entire bolt and
valve assembly into the body, and locking it into place with the rear grip
frame screw. While this screw has a hole for a hex wrench, it is
meant to only be tightened finger tight – the hole is to use a wrench if
it is difficult to loosen by hand.
 The
final item to complete this new ULE Mag as a paintgun is the ULE trigger
pull upgrade, a new product released in the summer of 2003. While
it is often referred to as the ULE trigger, it is actually an upgrade to
the on/off valve assembly which reduces both the length and the weight
of the trigger pull. To reduce trigger pull length, AGD looked at
how their on/off valve worked. A pin, that is pushed by the rear
of the sear slides up into the center of an o-ring sealing off that opening
between the regulator and air chamber. On previous Automag valve
designs the pin pushed up and through the o-ring. AGDs designers
realizes that this was unnecessary, instead of pushing up and through,
the on/off pin only needed to be pushed far enough to make contact with
the oring – just to the point that its edge pressed up to the o-ring’s
interior. This idea alone reduced the distance the pin needed to
theoretically move, and thus the length of the trigger pull. The
final item to complete this new ULE Mag as a paintgun is the ULE trigger
pull upgrade, a new product released in the summer of 2003. While
it is often referred to as the ULE trigger, it is actually an upgrade to
the on/off valve assembly which reduces both the length and the weight
of the trigger pull. To reduce trigger pull length, AGD looked at
how their on/off valve worked. A pin, that is pushed by the rear
of the sear slides up into the center of an o-ring sealing off that opening
between the regulator and air chamber. On previous Automag valve
designs the pin pushed up and through the o-ring. AGDs designers
realizes that this was unnecessary, instead of pushing up and through,
the on/off pin only needed to be pushed far enough to make contact with
the oring – just to the point that its edge pressed up to the o-ring’s
interior. This idea alone reduced the distance the pin needed to
theoretically move, and thus the length of the trigger pull.
Trigger pull weight was another matter.
The Automag has no trigger return spring. Gas pressure pushing against
the on/off valve pin resets both the valve and the trigger. The force
involved comes from both the pressure of the gas, and the diameter of the
on/off pin. Basic hydraulic ram principles dictate that the same
pressure (the pressure must be the same to maintain the same velocity in
the Automag) a larger diameter piston will provide more force than a smaller
diameter piston because there is more surface area for the gas or fluid
to press against.
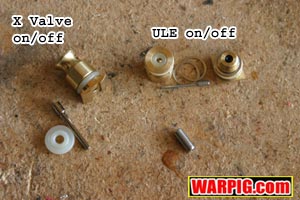 The
new ULE on/off assembly features an on/off pin that is made of two pieces.
The bottom piece is a larger diameter, so that the back of the sear can
press up against it. The top piece has a large enough head to seal
the on/off o-ring, but is extremely slender in the center. Slender
is perhaps an understatement. The center section of the ULE on/off
pin is 0.035 inches in diameter, or approximately the size of a bundle
of 10 human hairs. The
new ULE on/off assembly features an on/off pin that is made of two pieces.
The bottom piece is a larger diameter, so that the back of the sear can
press up against it. The top piece has a large enough head to seal
the on/off o-ring, but is extremely slender in the center. Slender
is perhaps an understatement. The center section of the ULE on/off
pin is 0.035 inches in diameter, or approximately the size of a bundle
of 10 human hairs.
When the on/off valve is open, that
diameter is what determines the resistance of the trigger pull. In
a properly set up Automag ULE trigger system, the trigger pull will not
only be short, but it will require less than one pound of force – something
previously only available in electronic paintguns. When the on/off
valve closes at the end of the trigger pull, the larger diameter of the
on/off pin top comes into play and the trigger pushes back to its reset
position with significantly more force. This is a reactive trigger
effect that makes certain the trigger fully resets and helps the user pull
the trigger faster.
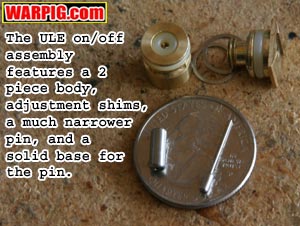 Installing
the ULE on/off has a few steps. First it must be assembled.
Some users opt to use a thread locker to glue the two on/off pin pieces
together. This is a good idea as it will make it difficult to lose,
however, it also makes changing the pins lower o-ring impossible.
The exact point at which the on/off valve closes, relative to when the
bolt is released is critical to the operation of the Automag, so much so
that putting a coat of paint on the body rail can put this fine balance
out of adjustment far enough to keep the ‘gun from working properly.
In the past some airsmiths have tuned up Automags by grinding down on/off
pins to get a custom fit. With the ULE on/off the fit is even more
critical, so making adjustments would be necessary. Installing
the ULE on/off has a few steps. First it must be assembled.
Some users opt to use a thread locker to glue the two on/off pin pieces
together. This is a good idea as it will make it difficult to lose,
however, it also makes changing the pins lower o-ring impossible.
The exact point at which the on/off valve closes, relative to when the
bolt is released is critical to the operation of the Automag, so much so
that putting a coat of paint on the body rail can put this fine balance
out of adjustment far enough to keep the ‘gun from working properly.
In the past some airsmiths have tuned up Automags by grinding down on/off
pins to get a custom fit. With the ULE on/off the fit is even more
critical, so making adjustments would be necessary.
Unfortunately it is not practical to
make a steel pin that small to be adjustable in length in the very fine
increments needed. There is an old saying, “if Mohammed can’t come
to the mountain, the mountain will come to Mohammed.” Rather than
adjusting the pin length, AGD’s designers added adjustability to the position
of the o-ring the pin seals against, in order to achieve the same effect.
The top half of the valve rests on the bottom half, held there by air pressure.
The two parts have screw threads so they can be taken out as a single unit
without bending the pin, but when putting them together the threads pass
each other and the parts float freely. A set of shims are included
in the ULE on/off kit to go between the two valve halves. More shims
mean that the top half of the valve will be higher up inside the X Valve
body, and has the same effect as shortening the on/off pin. Conversely
removing shims lowers the valve body and has the same effect as putting
in a longer on/off pin.
Once the ULE on/off valve is assembled,
it slips into the X Valve, replacing the stock on/off valve. It should
be noted, that the ULE trigger upgrade will only work on specific model
Automag valves, some valves which are designed to hold a single o-ring
on top of the on/off valve instead of two nested o-rings, will not accept
the ULE on/off.
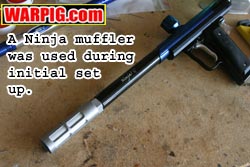 With
the ULE trigger mod in place, the new ULE Mag was assembled and ready for
an air system and adjustment. For review, and Airgun Designs Flatline
4500 psi compressed air system was used, mounted on a Custom Products drop
forward and hosed to the X Valve with macroline. During all the firing
needed for adjustment, a Centerflag Ninja muffler was used in place of
a barrel. With
the ULE trigger mod in place, the new ULE Mag was assembled and ready for
an air system and adjustment. For review, and Airgun Designs Flatline
4500 psi compressed air system was used, mounted on a Custom Products drop
forward and hosed to the X Valve with macroline. During all the firing
needed for adjustment, a Centerflag Ninja muffler was used in place of
a barrel.
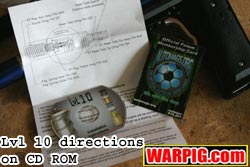 While
Level 10 and the ULE trigger Kit represent marked performance increases
for the Automag, they also represent an increase in set up and maintenance
time. To ease some set-up woes, AGD includes a credit card sized
CD-ROM manual with the Level-10 kit, but a more visual set-up video is
available on the Automags.org web forum site, produced by “Miscue,” one
of the forum moderators. To allow for manufacturing variances in
o-rings the Level-10 kit ships with several brass carriers, each with differing
inner diameters. These carriers are then fitted with the power tube
o-ring to find a fit that will seal against the piston in the bolt, sealing
it with the least amount of friction possible. Several selections
were used tried, as well as all three mainsprings, until a balance was
found that would fire reliably, yet allow the bolt to bounce back off of
a finger in the feed neck. Similarly several trials were made with
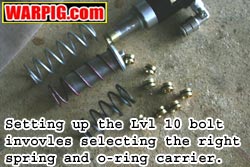
varying shim combinations in the ULE on/off assembly. While
Level 10 and the ULE trigger Kit represent marked performance increases
for the Automag, they also represent an increase in set up and maintenance
time. To ease some set-up woes, AGD includes a credit card sized
CD-ROM manual with the Level-10 kit, but a more visual set-up video is
available on the Automags.org web forum site, produced by “Miscue,” one
of the forum moderators. To allow for manufacturing variances in
o-rings the Level-10 kit ships with several brass carriers, each with differing
inner diameters. These carriers are then fitted with the power tube
o-ring to find a fit that will seal against the piston in the bolt, sealing
it with the least amount of friction possible. Several selections
were used tried, as well as all three mainsprings, until a balance was
found that would fire reliably, yet allow the bolt to bounce back off of
a finger in the feed neck. Similarly several trials were made with
varying shim combinations in the ULE on/off assembly.
 In
all, adjustment took approximately one hour, with each adjustment affecting
another. When the proper balance was found, the ULE Mag was ready
to go, and any further adjustments should be rather quick, as they will
just need to tweak a single variable at a time. For review, the ULE
Mag was fitted with an SM-1 barrel kit from Sanchez Machine, and a Revolution
loader with X Board and JMJ Impeller. In
all, adjustment took approximately one hour, with each adjustment affecting
another. When the proper balance was found, the ULE Mag was ready
to go, and any further adjustments should be rather quick, as they will
just need to tweak a single variable at a time. For review, the ULE
Mag was fitted with an SM-1 barrel kit from Sanchez Machine, and a Revolution
loader with X Board and JMJ Impeller.
 On
field, the ULE Mag delivered as promised. It was extremely lightweight,
did not chop any paint. Most notably it had a trigger pull comparable
to those of electronic paintguns. The trigger pull was extremely
light, and had an active length of less than 1mm in length measured at
mid-trigger. The only thing that seemed to be limiting shooting as
fast as most electros was an excess of trigger slop. That is, while
it took a pull of less than 1mm to fire, the trigger could still be pulled
back all the way up against the trigger frame. The addition of trigger
travel limit screw by an airsmith would stop the trigger just past the
firing point, making higher rates of fire very easily obtainable.
Also very significant was the overall size and weight. The ULE Mag
was markedly lighter than an E-Mag, due to the lack of battery pack.
It was also lighter, and smaller than many other paintguns on the market
while delivering a high end trigger pull and anti-chop capability.
At the present a ULE Mag can be built from components, but a similar configuration
is likely to be available ready to roll at some point in the future, from
AirGun Designs. On
field, the ULE Mag delivered as promised. It was extremely lightweight,
did not chop any paint. Most notably it had a trigger pull comparable
to those of electronic paintguns. The trigger pull was extremely
light, and had an active length of less than 1mm in length measured at
mid-trigger. The only thing that seemed to be limiting shooting as
fast as most electros was an excess of trigger slop. That is, while
it took a pull of less than 1mm to fire, the trigger could still be pulled
back all the way up against the trigger frame. The addition of trigger
travel limit screw by an airsmith would stop the trigger just past the
firing point, making higher rates of fire very easily obtainable.
Also very significant was the overall size and weight. The ULE Mag
was markedly lighter than an E-Mag, due to the lack of battery pack.
It was also lighter, and smaller than many other paintguns on the market
while delivering a high end trigger pull and anti-chop capability.
At the present a ULE Mag can be built from components, but a similar configuration
is likely to be available ready to roll at some point in the future, from
AirGun Designs.
|


