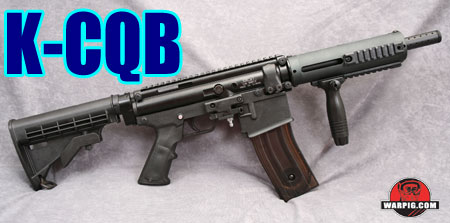
K-CQB
by Bill Mills - Photos by Dawn Mills - Aug 2007
Disassembly
Features HowItWorks Disassembly Testing Data
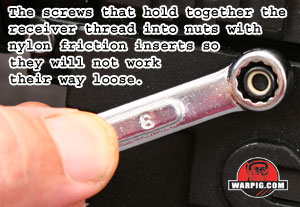 Being of a relatively simple blowback design, disassembly of the K-CQB is very straightforward. It requires a straight screwdriver, a wrench and a hex wrench, all of which are included – though use of a larger screwdriver for better grip makes things easier.
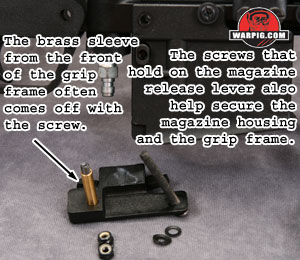 Disassembly starts with the marker completely un-loaded and degassed. Removing the two screws that go through the magazine release lever mounting bracket will free the back end of the magazine housing and likely also pull out the brass sleeve holding the front of the grip frame to the receiver. If the sleeve is not pulled out by the screw, it can be removed by pushing gently on it with a hex wrench.
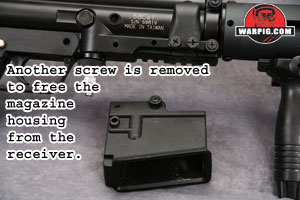 Removal of another screw allows the magazine housing to slide off the bottom of the receiver, exposing the lower receiver rail. This lower rail can be used to hold accessories such as a tactical flashlight if the K-Series marker is set up in a hopper-feed configuration where the magazine housing is not needed. The magazine feed port plug is shaped to create a continuous rail surface over the magazine feed port.
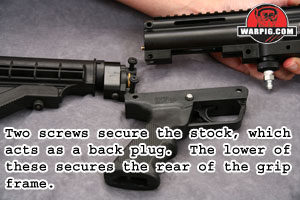 Removing the two screws at the back of the receiver frees the back of the grip frame so that it can be pulled down and off. This also frees the stock, so that it may be pulled out of the back of the receiver. If replacing the stock with another style, or a back plug, only these two screws must be pulled. Also, if the lower of these two screws is removed, the grip frame can pivot on its front screw to allow inspection or lubrication of the trigger and sear assembly.
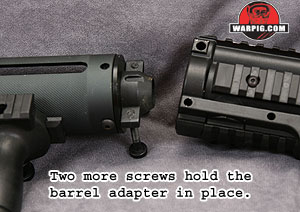 Two screws in the front of the receiver must be removed to take out the barrel adapter, which will take the barrel and shroud with it. To provide a secure mount point for foregrips these screws are threaded through the barrel adapter. Not only must they be unscrewed from their associated locknuts, but they must also be unscrewed from the barrel adapter, they will not simply slide out.
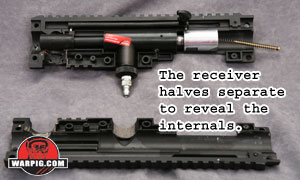 With the 6 screws out, and the grip, stock, magazine housing and barrel adapter removed, the two halves of the receiver can be lifted apart, exposing the inner workings of the K-CQB. The link rod can be lifted away, freeing the hammer and bolt to be removed, and the power tube (main valve assembly) can simply be lifted out.
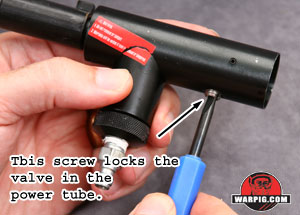 The valve itself, and the valve core (the stem and cup seal) are accessed by removing a lock screw from the bottom of the power tube. Care should be taken during this process as the pressure of the valve spring could launch the internal parts, causing them to be lost. All of the key internal seals can be inspected at this point. If the cup seal must be replaced, a spare is included, and a small hex head screw holds the brass top-hat clamp in place, securing the cup seal to the valve pin.
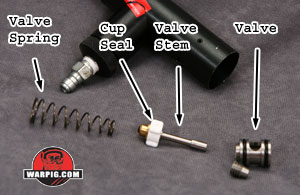 It should be noted that the rear valve body o-ring holds the valve aligned properly in the power tube, only the front valve o-ring must provide an airtight seal, thus if the front valve o-ring is damaged causing a leak “down the barrel” it can be swapped with the rear. Debris or damage to the cup seal is the other likely cause of a “down the barrel” leak.
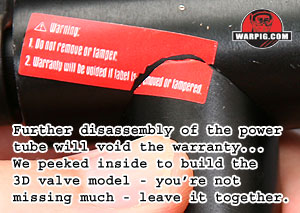 The power tube can be further disassembled by removing the bolt in the bottom of its ASA, providing access to the o-ring that seals the ASA to the main body of the power tube. Additional small set screws secure the internal aluminum sleeve and front power tube section to the rigid outer tube. None of these should ever require disassembly though, and the power tube is only available as a complete replacement assembly. In fact, a brittle warranty sticker is in place to provide evidence if the ASA is removed, which will void the warranty.
The K-Series instruction manual does not provide any lubrication recommendations for the marker. As the seals used are all common to paintball markers, it would be a safe bet to apply most paintgun oils to o-rings during reassembly, as well as to drip some onto the sear assembly.
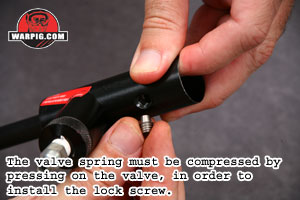 Reassembly is of course a reverse of the disassembly process. The valve core, valve body, and valve spring can be stacked together, and must be held in place against the resistance of the valve spring while the lock screw is installed. It is important to note, that the valve body must be aligned properly, one of the holes in its side must line up with the opening for the valve lock screw.
The receiver, grip, stock, barrel adapter and magazine housing all simply bolt back together.
Continue to Testing.