  |
|
|
|
|
|
|
| |
|
|
|
|
|
|
What
do you think?
|
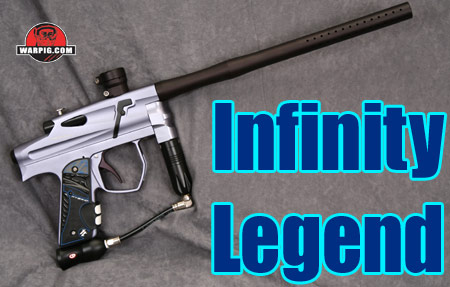
Infinity Legend by Bill Mills - Photos by Dawn Mills - April 2007 Overview - How It Works - Disassembly - Testing - Raw Test Data HOW IT WORKS
The Legend is relatively simple in operation, which allows it to be built with fairly few parts. Moreover the implementation of its design uses a minimal number of moving seals, ultimately reducing risk of component failure. The heart of the marker is a basic poppet valve, similar in structure to those found in pump markers tracing their way back to the PGP, or blowbacks semis like the Illustrator and Spyder. The Legend is a true electropneumatic marker. It uses uses air pressure to drive a ram against the poppet valve, while simultaneously closing the breech with a linked bolt.
The Legend's firing cycle begins with the marker at rest, the bolt in an open position. In this state, compressed gas is being fed into the front block of the Legend from its regulator and from there to the front of the lower of the receiver's two tubes.
A small brass hose barb and hose also directs gas from the front block to the Legend's solenoid valve which is mounted vertically inside the grip frame. It is notable that the front-block design would make use of an LPR a fairly simple matter of building a custom front-block – though it may not provide operational benefits. A shorter hose runs from the solenoid valve to a quick exhaust valve on the rear bottom of the receiver. From here, there is an open path to the ram housing.
When the hammer reaches the front of its stroke the bolt has closed, sealing against an o-ring in the breech. At this point the hammer presses forward on the valve pin, which pushes the cup seal back away from the body of the valve. This opens the valve.
When the Legend's circuit board stops sending power to its solenoid valve, the valve resets, and stops sending gas pressure to the ram assembly. Without force behind it to counteract the mainspring, the hammer and bolt quickly return to their rear position, forcing air out of the ram, and allowing the valve to close. Because the Legend comes equipped with a quick exhaust valve (QEV) the gas that is forced out of the ram assembly does not have to make a full return trip through the hose and solenoid valve. Instead the QEV flips positions and allows the air to vent directly into the grip frame. This arrangement decreases resistance for the exiting air, meaning the hammer and bolt can reset more quickly - ultimately increasing the potential rate of fire. Setup of the Legend for review went quickly. The barrel was threaded into place, a Pulse loader was fitted to the feedneck and a low pressure Crossfire compressed air system was screwed into the ASA. Infinity recommends that compressed air or nitrogen only (no CO2) be fed to the marker's regulator at a pressure range from 400 to 500 psi. The Legend ships with a battery already installed, so with a press of the power button it was ready to roll. The Legend turns on with its anti-chop eye system active. After an orange boot indication, the power LED will slowly blink green if the breech is empty, or flicker green if a ball has been detected and is ready to fire. The LED will flash red when the marker fires. Pressing the power button momentarily will disable the anti-chop eye system, and is useful if the system should ever become blocked by debris, or for dry-firing when degassing the marker at the end of the day. When the eye system is disabled, the LED will blink orange. Velocity adjustment was straightforward – the Legend's CP regulator is adjusted in the reverse of most regulators. Turning the regulator's adjustment screw counter-clockwise raises output pressure and thus velocity, while turning clockwise lowers both. Only small turn amounts are needed to make a significant adjustment. Despite the fact that the only user inputs to the Legend's circuit board are the power button and trigger, it is fully programmable. The Legend's programming mode is entered by holding down the trigger while pressing the power button to turn it on (it is important to note, all programming should be done with an unloaded, degassed marker with barrel blocker in place.) The Legend will respond by lighting its multiolor LED in green then turning it red when the trigger is released. Pulling and releasing the trigger will cycle through the Legend's programming menus:
Once a mode is selected for programming, the trigger is held down until the LED turns off. This takes about two seconds. After a pause of about two seconds, the LED will blink a number of times to show the current value for that setting. To change the setting, the trigger is simply pulled a number of times equal to the desired new value. After a five second pause, the LED will quickly give a multicolor flash, and return to the main programming level, where trigger pulls will cycle between menu choices. Pressing and holding the power button will turn the Legend off, exiting programming mode.
Because of the wide pressure range the solenoid can handle, as well as the wide adjustability of the dwell setting, the Legend can be configured to run at higher pressures with shorter dwell for better gas efficiency, or lower pressures with higher dwell for quieter operation. It is highly configurable in this regard. The Debounce setting defaults to 10 ms – it determines the minimum time the an electrical signal is received from the trigger switch, in order to be considered a valid trigger pull. The anti-chop logic is adjustable to one of four states, in addition to these states being able to be turned off by the power button during use. Mode 1 bypasses the eye system altogether (the Legend turns on “blind”.) Eye mode 1 (2 flashes) works in conjunction with the rate of fire cap. Eye mode 2 (3 flashes) ignores the rate of fire cap, and also monitors the bolt. In eye mode two, the Legend can self-detect eye system errors and warn the user by flashing the LED between red and green. Eye mode setting 4 is a simulation mode for test firing. By default, the Legend operates in Eye mode 2. BIP or Ball In Place delay sets the delay to be used between the time the infra-red “eye” beam in the breech is broken, until the Legend can fire. The beam itself is about ¼ of the way up the breech from the bottom, so this setting is used to allow time for the ball to continue to fall to the point where the bolt will push it into the barrel, rather than scissor it against the top of the breech. With force-feed loaders this setting can be minimized, because the ball will move into place faster than by gravity alone. This setting is also in milliseconds, with a default value of 3. The Rate Of Fire cap is set simply in number of balls per second. By default it is set to 20 balls per second. The eye power setting determines how much power is delivered to the infra-red LED in the breech – thus higher settings use more electricity from the battery and increase the likelyhood of the beam shining through a ball bright enough to pick up on the other side. The default value is 10.
Because the trigger menu system allows dwell adjustments (which can affect velocity) and mode adjustments, it must be locked out for legal use in all major tournaments, as well as most paintball fields. The Legend's tournament lock system is a bit more complex than with some other markers. Since it is designed as a tournament marker this makes good sense – the settings should only need to be tweaked during initial set-up, and then locked in place for league play. Locking the menu out requires the use of a piece of wire or other electrical conductor to make an electrical connection between the second and fifth metal contact pads (in order from the marker's left to right) on the top end of the board while the board is turned on. This will result in the LED cycling through all of its colors repeatedly, without stopping. The battery must then be unplugged, and the board allowed to sit for a minute or two, to give time for its internal capacitor to completely discharge. When power is next applied, the board will be locked. It will add a brief red flash to its power-on sequence, and the trigger programming menu will be inaccessible. The circuit board is unlocked using the same procedure.
Continue to Disassembly |
| Copyright © 1992-2019
Corinthian Media Services. WARPIG's webmasters can be reached through our feedback form. All articles and images are copyrighted and may not be redistributed without the written permission of their original creators and Corinthian Media Services. The WARPIG paintball page is a collection of information and pointers to sources from around the internet and other locations. As such, Corinthian Media Services makes no claims to the trustworthiness or reliability of said information. The information contained in, and referenced by WARPIG, should not be used as a substitute for safety information from trained professionals in the paintball industry. |

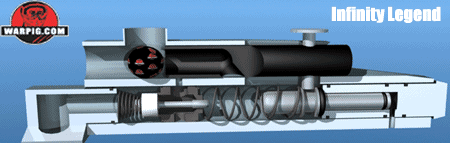
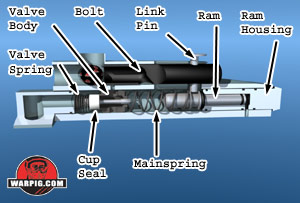 Rather than using blowback gas, or a two-directional ram system to return the ram and bolt to their resting positions at the rear of the marker, the Legend has a mainspring between the ram and valve. It is compressed during firing, and expands back out at rest.
 The gas stops at the valve. Here, the valve spring holds the cup-seal against the valve.
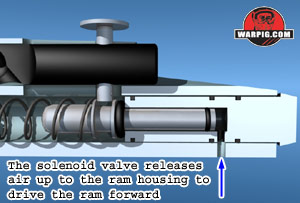 When the Legend fires, the solenoid valve delivers compressed gas to its output hose, which travels up to the ram housing. The gas pushes the ram shaft forward out of the ram housing. As the hammer moves forward it simultaneously closes the bolt, as the two parts are connected by the link pin. Sitting between the hammer and valve is the Legend's mainspring. As the hammer moves forward this spring is compressed.
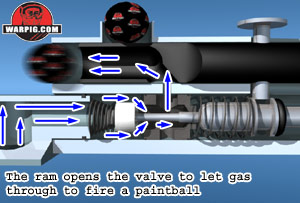 With the valve open, compressed gas now has a direct route to escape from the legend. It flows up from the valve chamber, around the cup seal and through the valve body, then up through a connecting passage in to the bolt's gas port. It passes through an angled passage in the bolt, and then out the bolt face where only one thing blocks its path to the atmosphere and pressure equalization – the paintball. The gas expands, pushing the paintball ahead of it and out the barrel.
 The Dwell setting is a little more complex than the others to program. After the Legend flashes out its current dwell setting, a number of trigger pulls may be made for each full millesecond of dwell timing to set. After a two second pause, the LED will flash orange once – the trigger may then be pulled to add tenths of a millisecond (.1ms). In this way the dwell time can be adjusted from 4.0 ms through 50.0ms (460 settings.) The stock dwell value is 10ms, and the solenoid is not designed to operate at below 6ms.
 The Legend features three firing modes. A setting of one is traditional semi-automatic – one shot per trigger pull. A setting of two produces PSP style ramping – after 3 rapid semi-auto shots the Legend fires in a 3-round burst mode until the trigger is left unpulled for a moment, at which point it reverts to one shot per pull. The third setting is NXL style ramping in which three rapid activation shots switch the marker into a full-automatic mode, firing continuously while the trigger is held. After a moment of released trigger, the Legend reverts to semi-auto mode. It should be noted that to meet PSP and NXL rules, the Legend would also need to be in eye mode 1, with a rate of fire cap set to 15 or lower.