  |
|
|
|
|
|
|
| |
|
|
|
|
|
|
Product Testing performed with DraXxus Paintballs
What
do you think?
|
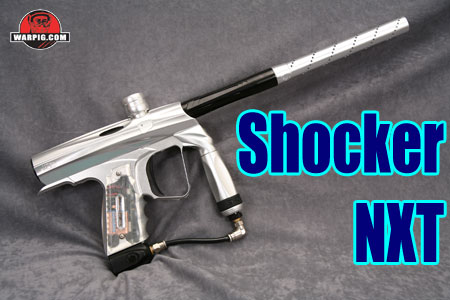
Shocker NXT
Disassembly Features HowItWorks Disassembly Adjustment Testing Data
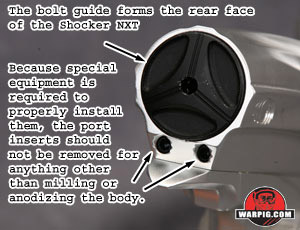
The rear face of the Shocker NXT's receiver is the back plug portion of the bolt guide, the core of the entire bolt/valve assembly.
Once out, the bolt guide slides free of the bolt, and the spool shaped bolt sleeve slides off the bolt. The fire chamber, where gas accumulates before it is used to fire the paintball, is held to the bolt, by the bolt's forward o-ring.
After cleaning the bolt and valve parts with a paper towel or cloth, and inspecting o-rings for damage, the parts are ready for reassembly. First, they are lightly greased. Smart Parts recommends only their proprietary SL33K lubricant, a small tube of which is included with the Shocker NXT.
The bolt/valve assembly is pushed in, and the bolt guide screwed back in – not over-tightened – to the receiver and the Shocker NXT is ready for action.
On early Shocker SFTs, removing the solenoid valve was a part of normal maintenance for cleaning, rebuilding or replacing. On the NXT however, Smart Parts considers the internal filtration good enough that removing the solenoid valve unnecessarily may actually cause more problems than it would hope to solve.
Continue to Adjustment .
|
| Copyright © 1992-2019
Corinthian Media Services. WARPIG's webmasters can be reached through our feedback form. All articles and images are copyrighted and may not be redistributed without the written permission of their original creators and Corinthian Media Services. The WARPIG paintball page is a collection of information and pointers to sources from around the internet and other locations. As such, Corinthian Media Services makes no claims to the trustworthiness or reliability of said information. The information contained in, and referenced by WARPIG, should not be used as a substitute for safety information from trained professionals in the paintball industry. |

 Disassembly of the Shocker NXT for general maintenance is relatively simple, owing to the fact that the bolt also serves as the exhaust valve. There simply aren't that many parts to maintain.
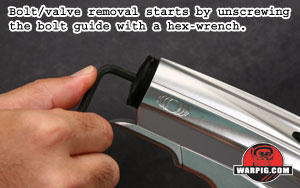 Once the marker has been unloaded and degassed, the bolt/valve assembly is unlocked from the receiver by unscrewing it with a hex wrench. Once it has been unscrewed, the entire assembly can be pushed out the back of the marker. In order to avoid scratching the bolt, fire can, or any o-rings it is important that a soft tool be used for this job. A wooden dowel, chopstick, or even plastic toothbrush can do the job as long as they are long enough and thin enough.
 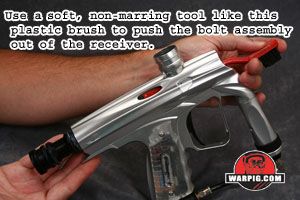 Careful angling and pushing of the soft tool will result in the entire bolt/valve assembly being pushed straight out.
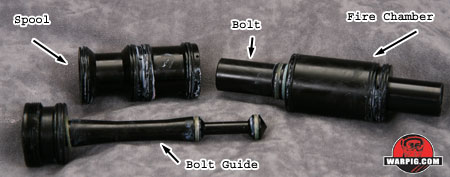
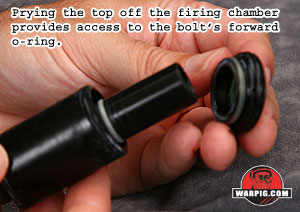 Popping the front cover, or lid off the fire chamber is done by simply grasping and pulling on it. With the cover off the bolt's front o-ring is visible for inspection. It can be removed with an o-ring pick if the fire chamber needs to be taken off of the bolt.
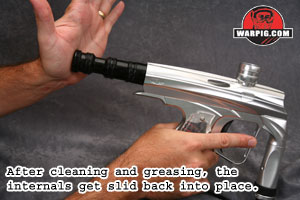 The fire can cover snaps back on, and the bolt sleeve slides on the rear of the bolt, spool end towards the back. The bolt guide slides into the rear of the bolt, and the bolt/valve assembly is ready to go back in the marker.
 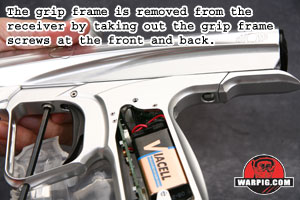 While not a part of regular maintenance, there are times when the grip frame must be removed from the Shocker NXT's receiver, especially if replacing damaged Vision eye components. The front and rear grip frame screws easily remove with a hex-wrench.
 Once they are not held together with screws, the grip frame can be lifted away from the receiver, as long as care is taken not to strain the solenoid valve. As the two pieces begin to come apart, it will quickly become apparent that they are joined by an umbilical bundle of wires. A wiring harness carries signals between the main circuit board and the solenoid valve's circuit board, and it can be unplugged on either end.
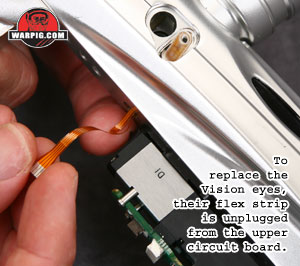 With the body removed from the grip fame, the flexible circuit strip for the Vision eyes can be unplugged from the upper circuit board, and the eyes can be removed. They are replaced by feeding a new set up through the their ports in the receiver and securing them with the ball detent covers. When plugging a Vision flex strip into the upper circuit board, the metalic side of the strip faces away from the receiver.
 When re-assembling the grip frame to the receiver the wiring harness must be plugged securely into both the upper and lower circuit boards. It is important to make sure that the wires to not bunch up between the solenoid valve and push button. This is most easily done by removing the rubber grip and tending slack in the wires through the grip.