  |
|
|
|
|
|
|
| |
|
|
|
|
|
|
Product Testing performed with DraXxus Paintballs
What
do you think?
|
Smart Parts' Vibe Adjustment Features HowItWorks Disassembly Adjustment Testing Data Just as the mechanical design of the Vibe has been streamlined and simplified to deliver both affordability and ease of use for new marker owners, so has its electronic design. The Vibe circuit board has only two adjustments, and both are limited to two options each, reducing the chance that an end user can make a mistake in configuring their marker. Both adjustments require the use of a hex-wrench to open the marker's grip. Since they have an effect on velocity and firing modes, this is important as it keeps the marker “tournament locked” preventing adjustment without tools.
When unlocked the Vibe turns on in semi-automatic mode, and tapping the power button cycles it to 3 round burst. Tapping again switches to full-auto, and another tap back to semi. Vibe markers manufactured February 2008 or earlier did not include select fire capability, but Smart Parts provides a software update free of charge through their customer service center (customer pays return shipping costs.)
Although the rear travel screw did offer adjustment, tightening up the trigger pull length to just what was needed to fire the marker would require slight customization - replacing that screw with one slightly longer, easily found at a hardware store.
Continute to Testing .
|
| Copyright © 1992-2019
Corinthian Media Services. WARPIG's webmasters can be reached through our feedback form. All articles and images are copyrighted and may not be redistributed without the written permission of their original creators and Corinthian Media Services. The WARPIG paintball page is a collection of information and pointers to sources from around the internet and other locations. As such, Corinthian Media Services makes no claims to the trustworthiness or reliability of said information. The information contained in, and referenced by WARPIG, should not be used as a substitute for safety information from trained professionals in the paintball industry. |

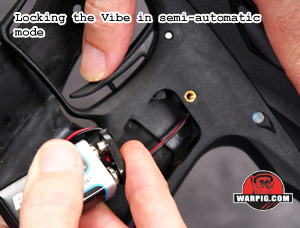 The firing mode lock is set by unloading and degassing the Vibe, then unplugging its battery, holding down the trigger, and plugging the battery back in. The Vibe's power button LED will blink once to indicate that it is locked in semi-automatic mode, or twice to indicated that it is unlocked for select fire. The procedure is simply repeated to change modes again.
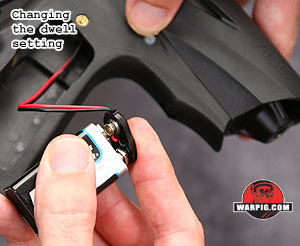 The Vibe has two pre-defined dwell modes, adjusting it for best performance on CO2 or compressed air. These are adjusted similarly to the firing mode. After unloading and degassing, the battery is removed, and then connected while holding down the power button. Here a single blink indicates that CO2 dwell timing has been selected, while a double-blink indicates HPA dwell time. Further dwell adjustment is not available, meaning that although the Vibe can accept after-market bolts built for the Ion, it lacks the dwell fine-tuning necessary to optimize the marker for their use.
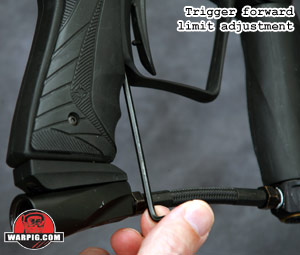 Two adjustment points are offered for the trigger pull, both of which are accessible without disassembling the marker. The trigger forward limit adjustment is located where the trigger guard meets the front of the grip frame, and although not required, for adjustment, access is easier with the rubber wraparound grip removed. Adjusted with a hex-wrench, this setting determines how far forward the trigger can travel after it is released. Adjusting clockwise drives the screw in, moving the trigger's rest position further back, and closer to the microswitch's activation point.
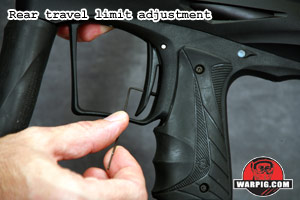 The rear limit adjustment screw is found inside the trigger itself, and acts as a stopper between the trigger and the grip frame. Adjusting it clockwise causes the screw to stick out further, stopping the trigger earlier in its swing. Without adjustment, the Vibe's trigger pull measured 0.28 inches at the bottom of the trigger, with only 0.13 inches of that pull needed to activate the marker.
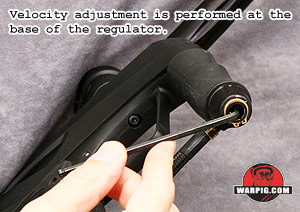 Adjusting the Vibe's velocity was performed as with most electropneumatic markers, by adjusting its regulator to change the pressure of the gas used to launch the paintball. A hex-wrench in the bottom of the regulator is used to change the depth of the aluminum face that the regulator seal seats against. The threading on the adjuster is left-handed, so turning it clockwise backs the face away from the seal. This results in less spring pressure to keep the piston closed, and thus a higher output pressure or higher velocity. The reverse-threading keeps the regulator consistent with the velocity adjustment of most markers in that clockwise raises velocity, while anti-clockwise lowers it.