  |
|
|
|
|
|
|
| |
|
|
|
|
|
|
What
do you think?
|
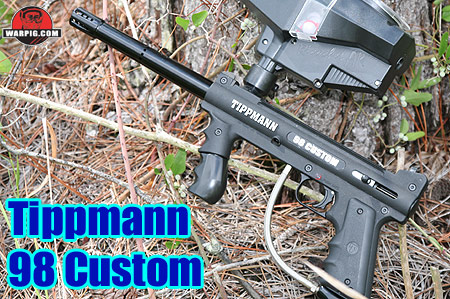
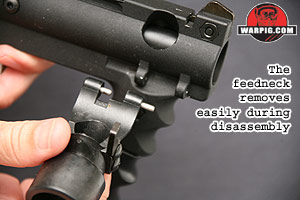
98 Custom - 2006 By Bill Mills - Photos By Dawn Mills - July 2006 Overview - How It Works - Disassembly - Testing - Raw Test Data DISASSEMBLY Disassembly of the 98 Custom for inspection or maintenance starts with field stripping. This entails making sure it is unloaded removing the CO2 or compressed air tanks (and if a regulator is used, dry firing in a safe area while all present are properly protected with goggles designed for paintball.) The barrel is then unscrewed, and once the feedneck is folded down, it can be slid backwards, which will disengage its hinge pins from the receiver.
It should be noted that Tippmann includes and recommends Hoppes #9 gun oil for use with the 98. Hoppes #9 is a brand name that makes several formulations, and some of their gun cleaning blends have gunpowder solvents that may shorten the lifespan of paintgun seals. When purchasing additional oil, make sure to get the same blend, or a specific paintgun oil, to maximize the service life of the seals in the paintgun.
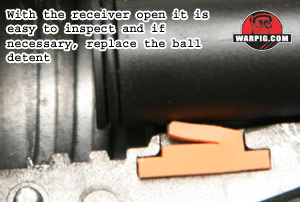
With the two halves open it is easy to inspect the orange rubber ball detent in the bottom of the breech to make sure it is not worn. If it is worn, it is an easy matter to replace it with a new one to avoid double-feeding of paintballs.
The hammer, link rod and bolt can be easily lifted from the receiver half by first sliding the hammer backwards out of the Power tube body, then lifting it out, and unhooking it from the link arm. Care should be taken when moving the hammer, as this will jostle the sear, a movement that could possibly send the sear spring flying. Either removing the sear spring and setting it aside, or holding it in place with a finger can prevent time spent searching for an AWOL spring. The link arm can then be removed from the bolt, and the bolt slid forward, off of the power tube. Each of these components can be inspected, cleaned and lightly lubricated with paintgun oil. The urathane o-ring on the front of the hammer, especially should be inspected for wear as its ability to seal against the interior surface of the back of the power tube is important for proper recocking. Dirt or debris should be cleared from the bolt and hammer areas of the receiver, as well as from around the trigger and sear.
Further disassembly of the valve requires removing the two valve body screws from the right side of the right receiver half.
While the valve body can be further disassembled to access the cup seal, pin and valve spring, Tippmann does not recommend this as a user-serviceable part.
Re-assembly is a reverse of the disassembly process. The valve body goes back into the power tube, carefully aligning the holes for the gas hose. The gas hose is tightened back in with a wrench detail oriented users are likely to ensure that it seals properly, either with a liquid thread sealant, or PFTE thread tape, being very careful not to allow excess sealing material to get inside of the valve where it could act as a contaminant. The valve assembly is secured back in the right receiver half with the two valve body screws, and the bolt, link arm and hammer can be set into place before the mainspring, ACT springs and rear plug are set into their positions.
Some users opt to put a small amount of threadlocking compound like blue Locktite 242 on all of the pins, to secure them in the right receiver half, which reduces their chance of falling out during maintenance disassembly. Care must be taken that only a bare minimum of thread locker is used, so that it will not ooze out and bind up any moving parts like the sear. In some areas, like the ACT pins, they may wear a little faster if they can not rotate in their position, but as inexpensive as they are to replace, some players may prefer the convenience of being less likely to use them if disassembling their paintgun at the field. All parts must be properly seated in
their niches, and then the two receiver halves can be put back together.
The receiver screws secure them in place. Five of these screws are
shorter, the sixth is longer and goes through the foregrip.
Continue to Testing |
| Copyright © 1992-2019
Corinthian Media Services. WARPIG's webmasters can be reached through our feedback form. All articles and images are copyrighted and may not be redistributed without the written permission of their original creators and Corinthian Media Services. The WARPIG paintball page is a collection of information and pointers to sources from around the internet and other locations. As such, Corinthian Media Services makes no claims to the trustworthiness or reliability of said information. The information contained in, and referenced by WARPIG, should not be used as a substitute for safety information from trained professionals in the paintball industry. |

 These
simple steps provide easy access to the barrel for a thorough cleaning
even dunking in water, and for the breech to be wiped clean. A
few drops of paintgun oil onto the mainspring, and then into ASA before
a CO2 tank is attached are all the 98 Custom
usually needs in terms of general care.
These
simple steps provide easy access to the barrel for a thorough cleaning
even dunking in water, and for the breech to be wiped clean. A
few drops of paintgun oil onto the mainspring, and then into ASA before
a CO2 tank is attached are all the 98 Custom
usually needs in terms of general care.
 Full
disassembly of the 98 Custom should be done on a clean tabletop or workbench
with ample workspace. Many of the pins and springs inside the 98
Custom are small, and in some cases under pressure. It is much easier
to find a sear spring that has popped out onto a table than into deep shag
carpet. The 98 Custom must be un-cocked, which means dry-firing with
no gas, while wearing paintball goggles. If equipped with an e-trigger
system, the power will need to be turned on.
Full
disassembly of the 98 Custom should be done on a clean tabletop or workbench
with ample workspace. Many of the pins and springs inside the 98
Custom are small, and in some cases under pressure. It is much easier
to find a sear spring that has popped out onto a table than into deep shag
carpet. The 98 Custom must be un-cocked, which means dry-firing with
no gas, while wearing paintball goggles. If equipped with an e-trigger
system, the power will need to be turned on.
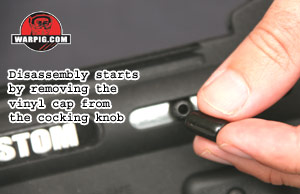
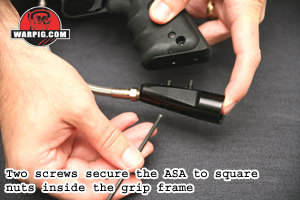 Disassembly
starts with field stripping, and then goes further. The vinyl cap
over the cocking knob must be removed, and then the two screws which hold
the ASA to the grip are removed with a hex wrench. If the valve body
is not going to be removed, these can be loosened about 1/8 of an inch,
and to not need to be taken all the way out.
Disassembly
starts with field stripping, and then goes further. The vinyl cap
over the cocking knob must be removed, and then the two screws which hold
the ASA to the grip are removed with a hex wrench. If the valve body
is not going to be removed, these can be loosened about 1/8 of an inch,
and to not need to be taken all the way out.
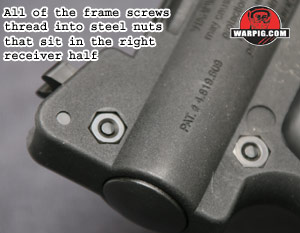 Six
1/8-inch hex head screws are visible on the left receiver half. These
screws must be removed and set aside. A nice side benefit of the
new rougher powder coating was noticed while disassembling the 98 Custom
for review. The nuts in the right receiver half remained securely
in their locations, which made reassembly easier, unlike earlier models
where one or two would often fall free during disassembly.
Six
1/8-inch hex head screws are visible on the left receiver half. These
screws must be removed and set aside. A nice side benefit of the
new rougher powder coating was noticed while disassembling the 98 Custom
for review. The nuts in the right receiver half remained securely
in their locations, which made reassembly easier, unlike earlier models
where one or two would often fall free during disassembly.
 With
the 98 Custom laying on a flat surface, pointing to the left, the left
side receiver half can be gently lifted away, making sure that no pins
or other internal parts are stuck in it. Any that do, can be removed
and set into place in the right receiver half. Positions of components
and springs should be noted for reassembly, and use of the exploded parts
diagram on Tippmanns web site can come into play here as well.
With
the 98 Custom laying on a flat surface, pointing to the left, the left
side receiver half can be gently lifted away, making sure that no pins
or other internal parts are stuck in it. Any that do, can be removed
and set into place in the right receiver half. Positions of components
and springs should be noted for reassembly, and use of the exploded parts
diagram on Tippmanns web site can come into play here as well.
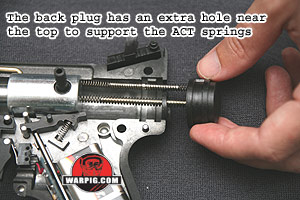 The
rear plug of the 98 is removed simply by lifting it out of the receiver.
Even de-cocked there is some pressure on the mainspring, and the ACT spring
system. Once the backplug is lifted out, it can be moved to the right,
relieving the pressure from the springs, and allowing them to be removed.
On the front of the ACT spring assembly is a slender sleeve that fits into
the top of the hammer. It too may be removed.
The
rear plug of the 98 is removed simply by lifting it out of the receiver.
Even de-cocked there is some pressure on the mainspring, and the ACT spring
system. Once the backplug is lifted out, it can be moved to the right,
relieving the pressure from the springs, and allowing them to be removed.
On the front of the ACT spring assembly is a slender sleeve that fits into
the top of the hammer. It too may be removed.

 With
the valve body screws out, the power tube, and the valve body inside of
it can be lifted out of the receiver, dragging the braided gas hose and
ASA behind them like a tail. The braided hose must be removed from
the valve body with a wrench.
With
the valve body screws out, the power tube, and the valve body inside of
it can be lifted out of the receiver, dragging the braided gas hose and
ASA behind them like a tail. The braided hose must be removed from
the valve body with a wrench.
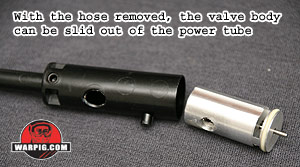 Once
the hose is removed, the valve body can be slid out the back of the black
power tube. This allows both parts to be cleaned and lubricated.
Paintgun oil can easily be dropped into the valve body.
Once
the hose is removed, the valve body can be slid out the back of the black
power tube. This allows both parts to be cleaned and lubricated.
Paintgun oil can easily be dropped into the valve body.
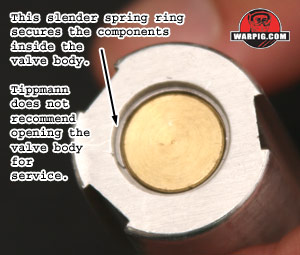 The
round spring pin which holds the components in side the valve body is very
thin, and rather tricky to get back in place once removed. Fortunately,
most 98 Custom owners will never need to open the valve, and those that
do have a problem can replace the entire assembly at once.
The
round spring pin which holds the components in side the valve body is very
thin, and rather tricky to get back in place once removed. Fortunately,
most 98 Custom owners will never need to open the valve, and those that
do have a problem can replace the entire assembly at once.
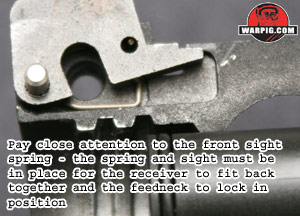 At
this point it is important to check over all of the parts, springs and
pins to make sure they are sitting properly in position. Of special
note should be the front sight spring and front sight, they must be seated
together within their cutout in the receiver. Other parts that have
a habit of shifting out of place are the square nuts that hold the ASA
screws, and the small coin shaped magnet which is used to reset the solenoid
on e-trigger systems.
At
this point it is important to check over all of the parts, springs and
pins to make sure they are sitting properly in position. Of special
note should be the front sight spring and front sight, they must be seated
together within their cutout in the receiver. Other parts that have
a habit of shifting out of place are the square nuts that hold the ASA
screws, and the small coin shaped magnet which is used to reset the solenoid
on e-trigger systems.