Limited
Edition Matrix Review
Generation
E Sports
What
do you think?
Add
your comments in WARPIG's TECH TALK FORUMS.
|

Matrix LCD
by Bill Mills
Page 1
Page
1 Page 2
Relatively quickly, the E Matrix has
risen from being a fringe paintgun not used by many high profile teams,
to being the paintgun of top professional teams including Ironmen, Trauma
and New York Xtreme. While this stems in part from the way it has
been marketed, it also was made possible by design improvements from the
original slide switch Matrix through the LED Matrix, and eventually the
Matrix LCD.
The original limited edition Matrix
reviewed on WARPIG.com was most easily identified by its slide switch in
the rear. A number of minor production changes came into play between
it and the next model, the LED Matrix. The most immediately recognized
change was replacing the slide power switch on the rear of the grip frame
with a push button, and power indicator LED. The cast metal grip
panels were also replaced by molded wraparound grips. Like the slide
switch model, dwell time settings on the LED Matrix are adjusted by setting
DIP-switches inside the grip frame.
A not so visible change is also in the
left hand side gas transfer tube. In the Matrix body, there are three
main internal shafts. The largest, on top houses the bolt and spool
valve assembly. The two smaller tubes below it on either side, on
the original Matrix transferred gas from the front of the gun where it
enters, to the back, where it is fed into the spool valve. On the
LED and LCD models of the Matrix, the left transfer tube is unused, left
available for use by custom versions of the paintgun. 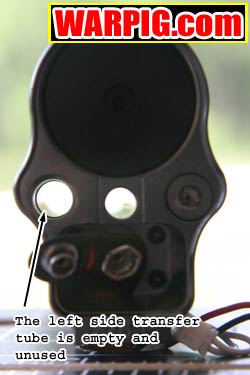 The
Freeflow Matrix uses the left transfer tube as a second gas passage, to
increase the volume of air available to the spool valve. The Ironmen
Matrix, on the other hand uses it to contain components for an anti-chop
eye. Another difference is the way the main vertical regulator is
mounted. The original Matrix design used a 1/8 NPT threaded fitting
to simply screw the top of the regulator into the body. This ultimately
stood as a weak point in the design, with stress from players holding the
gun by the lengthy vertical reg, and using it as a foregrip transferred
by leverage to that relatively narrow connection. This was changed
over to a vertical ASA connection that mounted in to the existing threaded
hole (meaning it could retrofit to earlier receivers.) The new ASA
braces up against the body, protecting against bending stress, and allows
the use of a wide variety of aftermarket regulators, as well as what became
the new stock regulator, Centerflags Hyper Inline. The
Freeflow Matrix uses the left transfer tube as a second gas passage, to
increase the volume of air available to the spool valve. The Ironmen
Matrix, on the other hand uses it to contain components for an anti-chop
eye. Another difference is the way the main vertical regulator is
mounted. The original Matrix design used a 1/8 NPT threaded fitting
to simply screw the top of the regulator into the body. This ultimately
stood as a weak point in the design, with stress from players holding the
gun by the lengthy vertical reg, and using it as a foregrip transferred
by leverage to that relatively narrow connection. This was changed
over to a vertical ASA connection that mounted in to the existing threaded
hole (meaning it could retrofit to earlier receivers.) The new ASA
braces up against the body, protecting against bending stress, and allows
the use of a wide variety of aftermarket regulators, as well as what became
the new stock regulator, Centerflags Hyper Inline.
 Then
came the LCD, which is the Matrix model seeing use on pro teams.
The in-grip LCD display is the most obvious difference between it and earlier
models, but there are two other significant changes as well. Both
of these changes work in tandem to address one of the drawbacks of the
LED and slide switch models low gas efficiency, which restricts the number
of shots that can be fired off of each tank fill. Then
came the LCD, which is the Matrix model seeing use on pro teams.
The in-grip LCD display is the most obvious difference between it and earlier
models, but there are two other significant changes as well. Both
of these changes work in tandem to address one of the drawbacks of the
LED and slide switch models low gas efficiency, which restricts the number
of shots that can be fired off of each tank fill.
Internally the Matrix has two main gas
channels. They are split by the transfer spool, a component that
screws into the receiver just below the breech. One path is used
to charge the dump chamber the air space that holds the gas that will
fire the gun. The other is fed to a solenoid valve, a small electronically
controlled pilot valve that directs air to one of two passages controlling
an internal piston arrangement which moves the spool valve back and forth.
The spool valve is the main, functional moving part of the Matrix.
It serves both to close the bolt at its front, and to release gas from
the dump chamber into the breech to fire a paintball out of the barrel.
 The
LED Matrix uses gas of the same pressure for both propelling the paintball,
and controlling the spool valve through the solenoid valve. Because
the solenoid valve can only handle a limited amount of pressure, an LED
Matrix is fed gas at 150-170 psi. Pressures above 170 psi risk damaging
the solenoid valve. The LCD Matrix on the other hand features a low-pressure
regulator in the front. The Matrix LPR screws into the receiver in
place of the transfer spool. In fact the rear half of the LPR, which
sits inside the receiver looks like a transfer spool. With the LPR
in place, the gas going to the solenoid valve can be limited to under 170
psi, while the pressure setting of the vertical regulator can be increased. The
LED Matrix uses gas of the same pressure for both propelling the paintball,
and controlling the spool valve through the solenoid valve. Because
the solenoid valve can only handle a limited amount of pressure, an LED
Matrix is fed gas at 150-170 psi. Pressures above 170 psi risk damaging
the solenoid valve. The LCD Matrix on the other hand features a low-pressure
regulator in the front. The Matrix LPR screws into the receiver in
place of the transfer spool. In fact the rear half of the LPR, which
sits inside the receiver looks like a transfer spool. With the LPR
in place, the gas going to the solenoid valve can be limited to under 170
psi, while the pressure setting of the vertical regulator can be increased.
The LPR alone has an additional benefit.
It allows the pressure of the gas controlling the spool valve, and thus
the closing force of the bolt to be adjusted. This pressure can be
decreased without effecting velocity, to the point that the Matrix will
rarely chop a paintball. The bolt will instead bounce back off of
a partially fed paintball most of the time.
LPRs were one of the earliest modifications
available for the Matrix, the first models were simply Autococker style
LPRs with a hose running to the left transfer tube, but soon Matrix specific
LPRs became available from Shocktech and Aardvark which mounted just like
a transfer spool.
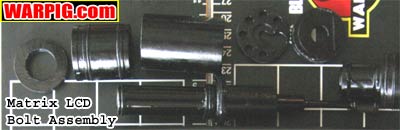
 The
LPR is also important in that it allows the use of the LCD bolt.
The LCD bolt assembly is an newer spool valve and bolt assembly.
While it has some minor differences from the original, like the stop being
machined so that it wont fall off the bolt while assembling the gun, its
major change is that the volume of air used by the LCD bolt is less than
the original bolt. Reduced volume allows the Matrix to achieve the
same velocities with a higher pressure air supply as the LED model does
with a higher volume and lower pressure. Higher pressure gas has
more potential energy, and thus helps give the LCD Matrix better gas efficiency.
The LCD bolt also has some minor changes effecting the way it slides forward
and how gas flows through it. These changes, combined with new timing
values set into the electronics also increase gas efficiency. It
was discovered with the LED Matrix that the paintball was already out of
the barrel while the bolt was forward and gas was still being vented out
of the dump chamber. This gas was wasted. The LCD Matrix moves
the bolt back, and closes the spool valve earlier. This means that
the gas is not wasted, and the dump chamber is already partially full,
so it will not take as long to refill for the next shot. This is
important for protection against shoot down at high rates of fire. The
LPR is also important in that it allows the use of the LCD bolt.
The LCD bolt assembly is an newer spool valve and bolt assembly.
While it has some minor differences from the original, like the stop being
machined so that it wont fall off the bolt while assembling the gun, its
major change is that the volume of air used by the LCD bolt is less than
the original bolt. Reduced volume allows the Matrix to achieve the
same velocities with a higher pressure air supply as the LED model does
with a higher volume and lower pressure. Higher pressure gas has
more potential energy, and thus helps give the LCD Matrix better gas efficiency.
The LCD bolt also has some minor changes effecting the way it slides forward
and how gas flows through it. These changes, combined with new timing
values set into the electronics also increase gas efficiency. It
was discovered with the LED Matrix that the paintball was already out of
the barrel while the bolt was forward and gas was still being vented out
of the dump chamber. This gas was wasted. The LCD Matrix moves
the bolt back, and closes the spool valve earlier. This means that
the gas is not wasted, and the dump chamber is already partially full,
so it will not take as long to refill for the next shot. This is
important for protection against shoot down at high rates of fire.
The Matrix has also changed hands a
number of times. It was originally produced by Airtech Industries
of Canada, and distributed by Diablo Direct. At nearly the same time
that Diablo Direct was purchased by National Paintball Supply, the Matrix
was bought by newly formed Generation E Sports. In the summer of
2003, Generation E sold the rights to the Matrix to DYE Precision in an
arrangement that allowed Generation E to still sell the Matrix as well
as custom models like the NYX and Trauma editions, while DYE would manufacture
and sell the Matrix as well as develop new versions.
The Matrix LCD reviewed was produced
by Generation E, and is a standard Matrix LCD. The Matrix LCD is
produced in a variety of colors, the unit reviewed was anodized in a Matte
Grey finish.
 While
the Matrix is threaded to accept Autococker style barrels, its breech is
a removable component. Custom breeches are available to allow it
to accept barrels with other thread standards, which can be a bonus to
a player who is upgrading from another paintgun and already has a selection
of barrels. The stock barrel is 12 inches in length with 4 rows of
6 ports each in its last 2-1/4 inches. The interior has a smooth
honed finish, and on the field, it performed well giving new Matrix owners
something that is very usable. The primary reason to switch barrels
would be to optimize paint to barrel matching. While
the Matrix is threaded to accept Autococker style barrels, its breech is
a removable component. Custom breeches are available to allow it
to accept barrels with other thread standards, which can be a bonus to
a player who is upgrading from another paintgun and already has a selection
of barrels. The stock barrel is 12 inches in length with 4 rows of
6 ports each in its last 2-1/4 inches. The interior has a smooth
honed finish, and on the field, it performed well giving new Matrix owners
something that is very usable. The primary reason to switch barrels
would be to optimize paint to barrel matching.
A small knob on the back of the Matrix
body is connected to a threaded rod, which runs the length of the guns
interior. At the front, it screws into a tab on the bottom of the
breech. This holds the back plate on the rear of the receiver, and
locks the breech securely in place. Three turns are all that is needed
to remove the threaded rod. The breech slides out of the front of
the receiver, allowing easy access to its twin rubber ball detents for
replacement or cleaning. The ball detents are one-piece parts that
simply push into place on opposite sides of the breech. They have
no springs or ball bearings.
 The
backplate is a sheet of aluminum approximately 1mm thick. When removed
it exposes the rear cap, which is the rearmost component of the bolt assembly.
Directly below it is the space for the electrical power source of the Matrix,
a 9 volt battery. For review, an 8.4 volt NiMH rechargeable battery,
designed to be use in place of a standard 9v was used. Extracting
a used battery can be a little tricky, since there is no access to grab
its edges. A knife tip, or fingernail can be used to dig into the
lip on the edge of the battery and slide it out far enough to grasp. The
backplate is a sheet of aluminum approximately 1mm thick. When removed
it exposes the rear cap, which is the rearmost component of the bolt assembly.
Directly below it is the space for the electrical power source of the Matrix,
a 9 volt battery. For review, an 8.4 volt NiMH rechargeable battery,
designed to be use in place of a standard 9v was used. Extracting
a used battery can be a little tricky, since there is no access to grab
its edges. A knife tip, or fingernail can be used to dig into the
lip on the edge of the battery and slide it out far enough to grasp.
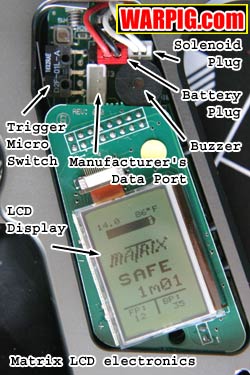
With the new battery in place, the electronics
of the Matrix LCD are ready to go.
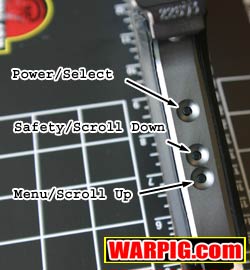 Pressing
and holding the top of the three buttons on the rear of the grip frame
turns on the gun. It will come on in safe mode, and after any button
press, the LCD display will be briefly backlit, for visibility, even in
dim light. The LCD display on the Matrix is a generic graphic display.
Some paintguns use custom made LCDs which have predesigned icons and symbols
as part of their display. While this allows for sharper images, it
also limits flexibility, as a symbol can only be used in its one location
on the display. In contrast, the display of the Matrix LCD is broken
up into small dots, or pixels, similar to a computer monitor. This
allows the complete display to change format, and custom icons to be used. Pressing
and holding the top of the three buttons on the rear of the grip frame
turns on the gun. It will come on in safe mode, and after any button
press, the LCD display will be briefly backlit, for visibility, even in
dim light. The LCD display on the Matrix is a generic graphic display.
Some paintguns use custom made LCDs which have predesigned icons and symbols
as part of their display. While this allows for sharper images, it
also limits flexibility, as a symbol can only be used in its one location
on the display. In contrast, the display of the Matrix LCD is broken
up into small dots, or pixels, similar to a computer monitor. This
allows the complete display to change format, and custom icons to be used. 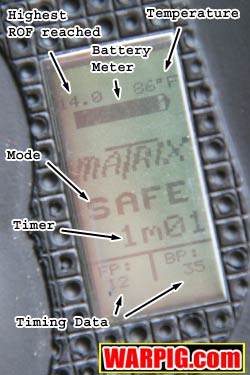 At
startup, the LCD will show a battery meter, the current temperature, software
version number, the name Matrix, the word SAFE, the default time on the
game timer, and the timing values used to control the gun. FP is
the amount of time the solenoid valve is energized to move the bolt forward
and fire, and BP is the amount of time the gun must wait before energizing
again to fire the next shot. Both timing values are expressed in
milliseconds. A fourth button lies inside the grip frame, accessible
by removing the grip panels. It is used to adjust settings which
are locked out of external access. At
startup, the LCD will show a battery meter, the current temperature, software
version number, the name Matrix, the word SAFE, the default time on the
game timer, and the timing values used to control the gun. FP is
the amount of time the solenoid valve is energized to move the bolt forward
and fire, and BP is the amount of time the gun must wait before energizing
again to fire the next shot. Both timing values are expressed in
milliseconds. A fourth button lies inside the grip frame, accessible
by removing the grip panels. It is used to adjust settings which
are locked out of external access.
 A
press and hold of the middle button brings the Matrix live, indicated by
the word LIVE on the LCD. It is now ready to fire in the guns one
mode semi-automatic. With the first shot, the game timer will begin
counting down. A
press and hold of the middle button brings the Matrix live, indicated by
the word LIVE on the LCD. It is now ready to fire in the guns one
mode semi-automatic. With the first shot, the game timer will begin
counting down.
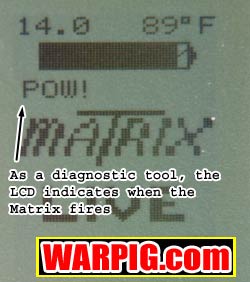
Each time the gun is fired, the word
POW! appears in small text just below the battery meter in the display.
This is a helpful troubleshooting feature. It shows that the circuit
board has detected a trigger pull, so if the gun does not fire, the problem
must lie either in the gas supply, bolt, or solenoid valve.
Switching back to safe mode by pressing
and holding the middle button, one can now cycle through the LCD menus.
The middle and lower button can be used to cycle a highlight over the icons
of each of 12 menus, laid out in 2 screens of 6 menus each. Pressing
the top button selects a menu. Oddly, selection of the menus is slightly
counter-intuitive. Pressing the middle button scrolls down through
the icons, while pressing the bottom button scrolls up opposite of what
one would expect. As each menu icon is highlighted, the name of the
menu appears at the top of the screen.
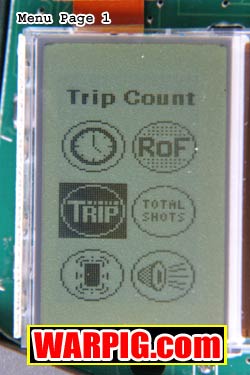 The
timer menu, represented by a clock is simple. The middle button scrolls
the time up, and the bottom scrolls down, while, like the rest of the menus,
pressing the top button sets the value and exits. The timer may be
set from 1 minute to one hour. The scrolling buttons change it in
one second increments, and roll through the numbers continuously, at a
rate of about 6 seconds per minute. The
timer menu, represented by a clock is simple. The middle button scrolls
the time up, and the bottom scrolls down, while, like the rest of the menus,
pressing the top button sets the value and exits. The timer may be
set from 1 minute to one hour. The scrolling buttons change it in
one second increments, and roll through the numbers continuously, at a
rate of about 6 seconds per minute.
The rate of fire menu, symbolized by
the letters ROF displays the maximum rate of fire at which the Matrix has
been fired. This is not continuous rate of fire, but the shortest
time between two shots recorded. It can be reset by pressing and
holding one of the two lower scrolling buttons.
The trip counter, is like the trip odometer
in a car. It counts the number of shots fired since it was last reset,
and is reset by holding one of the scrolling buttons. Similarly the
total shots counter shows the total number of shots fired on that circuit
board. The total shots counter cannot be user reset.
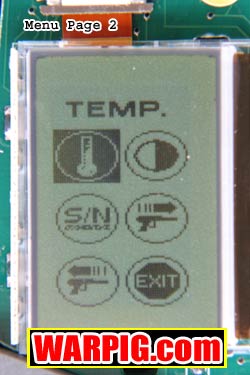 The
vibrate menu is represented by a small solid rectangle with lines progressing
out from its corners. It selects whether or not the grip will vibrate
when the game timer runs out. Similarly be buzzer menu selects whether
or not the game timer will sound a buzzer when it elapses. When the
vibrate setting is on, the grip frame will quietly vibrate in short pulses
for 10 seconds immediately after the timer hits 1:00 remaining. Both
the timer and buzzer will activate when the timer hits 0:00. The
vibrate menu is represented by a small solid rectangle with lines progressing
out from its corners. It selects whether or not the grip will vibrate
when the game timer runs out. Similarly be buzzer menu selects whether
or not the game timer will sound a buzzer when it elapses. When the
vibrate setting is on, the grip frame will quietly vibrate in short pulses
for 10 seconds immediately after the timer hits 1:00 remaining. Both
the timer and buzzer will activate when the timer hits 0:00.
The temperature menu, symbolized by
a small thermometer, selects whether the temperature will be shown in Centigrade
or Fahrenheit. The screen contrast is adjustable. This menu
is represented by a half dark circle. This feature is locked and
can not be changed without opening the grip and pressing the lock button.
The reason for this is so that a player will not change a setting, and
then turn down the contrast to make the screen unreadable by a referee.
A padlock symbol indicates when this menu is locked.
 The
serial number menu, shown under the S/N icon gives the serial number of
the circuit board. This number is not normally programmed in at the
factory. Instead it is left at the default value of 1234567890.
Authorized Matrix customizers have the ability to reset the circuit board
serial number, and will do so, to indicate that they have made custom modifications
to the gun. For example, serial numbers beginning with TMC mean that
TheMatrixCenter.com has worked on the gun, and will have a service record
based on that number. Below the serial number the version number
of the software in the circuit board. At the time of this writing
1.24 was the most current version. The serial number menu is also
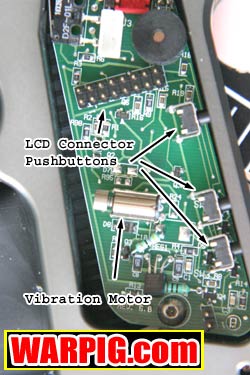
used to test the buzzer and vibrate circuits. Pressing the middle
button causes the vibration motor to run, and pressing the bottom button
actuates the buzzer. The
serial number menu, shown under the S/N icon gives the serial number of
the circuit board. This number is not normally programmed in at the
factory. Instead it is left at the default value of 1234567890.
Authorized Matrix customizers have the ability to reset the circuit board
serial number, and will do so, to indicate that they have made custom modifications
to the gun. For example, serial numbers beginning with TMC mean that
TheMatrixCenter.com has worked on the gun, and will have a service record
based on that number. Below the serial number the version number
of the software in the circuit board. At the time of this writing
1.24 was the most current version. The serial number menu is also
used to test the buzzer and vibrate circuits. Pressing the middle
button causes the vibration motor to run, and pressing the bottom button
actuates the buzzer.
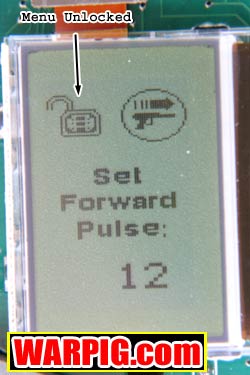
The forward and back pulses are represented
by small icons of the Matrix with an arrow above it pointing either down
the barrel or toward the back of the gun. These settings also are
locked from outside access, indicated by a padlock icon.
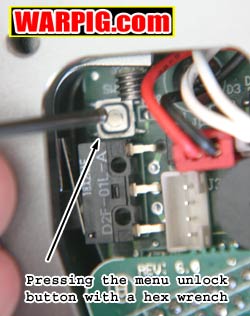 For
each of the locked modes, changing them requires removing the three screws
that hold on the left side of the wraparound grip. This exposes the
Matrix LCD circuit board. Near the micro-switch in the upper left
of the board is a small metallic button. Lettering on the circuit
board labels it as SW4. The mode to be changed is selected, and then
the lock button is pressed. The padlock icon on the LCD display will
change to an open padlock, indicating the mode is unlocked. As soon
as that menu is closed, the mode will once again be locked. The Matrix
LCD software will not allow the controlled menus to be left unlocked for
access while the grip is closed. Since the dwell times of the front
and back pulse can effect velocity this feature is designed to protect
both player safety and minimize the chance of cheating the chrono in tournament
play. For
each of the locked modes, changing them requires removing the three screws
that hold on the left side of the wraparound grip. This exposes the
Matrix LCD circuit board. Near the micro-switch in the upper left
of the board is a small metallic button. Lettering on the circuit
board labels it as SW4. The mode to be changed is selected, and then
the lock button is pressed. The padlock icon on the LCD display will
change to an open padlock, indicating the mode is unlocked. As soon
as that menu is closed, the mode will once again be locked. The Matrix
LCD software will not allow the controlled menus to be left unlocked for
access while the grip is closed. Since the dwell times of the front
and back pulse can effect velocity this feature is designed to protect
both player safety and minimize the chance of cheating the chrono in tournament
play.
Continued on Page2
|

