
Tippmann X7
by Bill Mills - Photos by Dawn Mills - Nov 2007
Features HowItWorks Disassembly Adjustment Testing Data
The quick-strip pin system makes disassembly of the X7 provides a quick method for disassembly of the marker, and removal of the bolt and valve system.
 The X7 barrel removes by simply unscrewing it, but taking off the forestock means removing the front two pins.
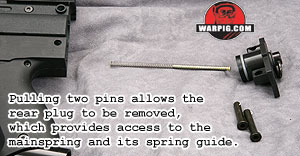 Two more pins at the back of the marker hold the back plug in place. It should be noted, when removing these pins, that the top pin is a little shorter than the one below it, and this order is important during reassembly. The back plug fits rather tightly, and requires a little bit of wiggling to work free. Once it has been removed. The mainspring and spring guide (a rod sitting inside the spring, which prevents it from bending and kinking) can be removed from the back.
 The lower of the two pins holding the back plug in place, also is the rear pin for the grip frame. Removing the grip frame's front pin allows it to be pulled down and away from the receiver. The hose from the bottom-line, acts as a leash, keeping the two assemblies together.
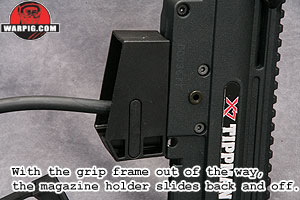 In order to remove the hose, the magazine fitting must be removed. Sliding it back unlocks it from the receiver, so that it can be lifted away.
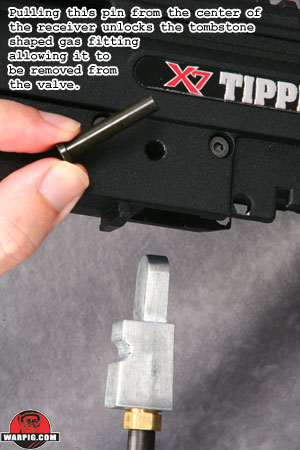 One more pin is what locks the tombstone air fitting into the receiver. Taking out this pin allows the tombstone to be pulled down and out of the receiver.
The tombstone also functions as a lock for the valve assembly. Once it is removed, the valve is free to be removed from the receiver – at least in theory. The velocity adjuster screw must be turned in far enough that it will clear the body, instead of locking the valve in place. On the X7 tested for review, the power tube was still tight in the receiver with the tombstone out and velocity screw in. Loosening, but not removing the screws holding the two receiver halves together allowed enough play for the valve to come free.
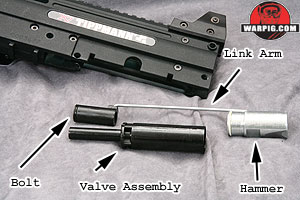
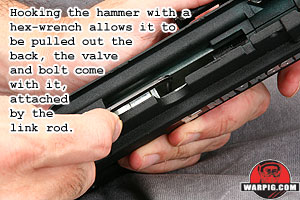 Hooking the hammer with a hex-wrench from the bottom of the receiver is a simple way to pull it to the back. Because the hammer is connected to the bolt by the link rod, the bolt then pulls the valve assembly, and all the internals slide right out the back of the marker.
 Further disassembly is not necessary for regular cleaning and maintenance, as a pull-through squeegee can be used to clean the inside of the receiver. Replacement of the rubber ball detent requires removal of the rear sight, and the screws holding the two receiver halves together.
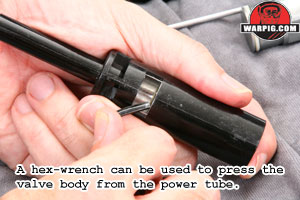 A continuous leak through the valve, can be addressed by disassembling it to check the cup seal and rear valve o-ring. The valve body can be pried out of the power tube housing with a hex wrench.
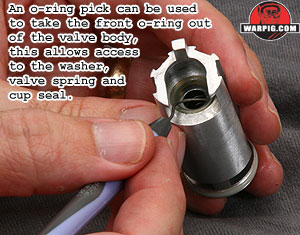
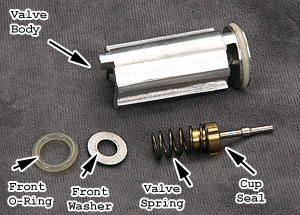 An o-ring pick is needed to remove the front o-ring from the front of the valve body. Beneath the o-ring is a washer and the valve spring. These lift out to allow for removal of the valve pin and cup-seal. The valve face, a small brass ridged washer sits against an o-ring in the back of the valve and may also be pulled out for inspection with an o-ring pick. Valve assembly is the reverse of disassembly, and a bit of finesse is needed to work the o-ring back into place securing the valve internals inside the valve body.
 The entire marker re-assembles by rigging the bolt, valve assembly, hammer and link-rod back together, and sliding them into the receiver. The tombstone locks the valve in place. It in turn is secured by a quick-strip pin, and the remaining pins are used to lock in the grip frame and back plug, after the magazine housing and mainspring are reinstalled.
After reassembly, the X7 must of course be chronographed again before use (as it must before any day of use) since the velocity adjuster will have been repositioned for valve removal.
Continue to Adjustment .